Summary
Let's see how we can export recently taken photos from Android to computer...
- Download Droid Transfer and connect your Android device (Set up Droid Transfer)
- Open the "Photos" tab from the feature list.
- Click "Export New Photos".
- Set a folder on your PC that you'd like to export your photos to.
- Droid Transfer will scan the chosen folder for existing photos, and will show you which of your Android phone photos are not backed up.
- Click "Save to PC" to export all these photos to your chosen folder.
Detailed Information
If you're wondering how to export photos from Android to PC, you're in the right place. Droid Transfer makes it easy to back up photos to your computer. After backing up your photos, Droid Transfer will let you know when your Android device has new photos on it that you've not yet backed up to your computer! Let's see how:
To begin, connect your Android device to Droid Transfer on your PC using a Wi-Fi or a USB connection.
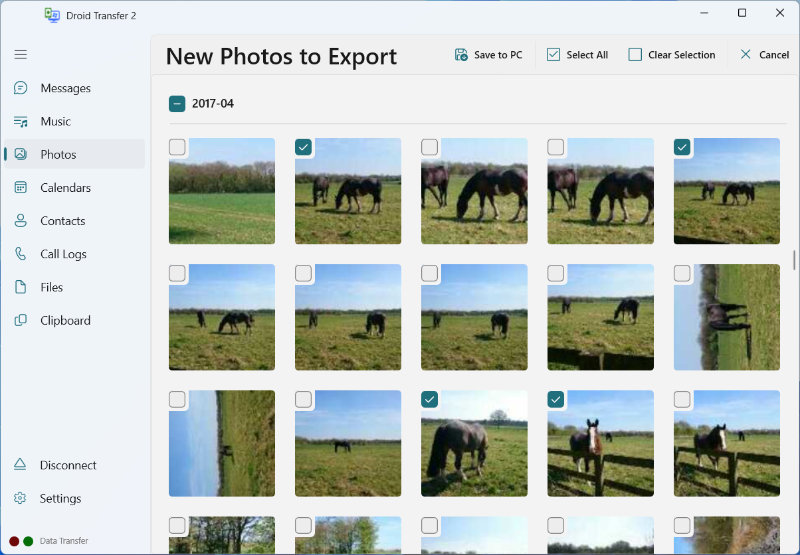
Next, click the "Photos" section in Droid Transfer. You'll see all the photos stored on your connected Android device.
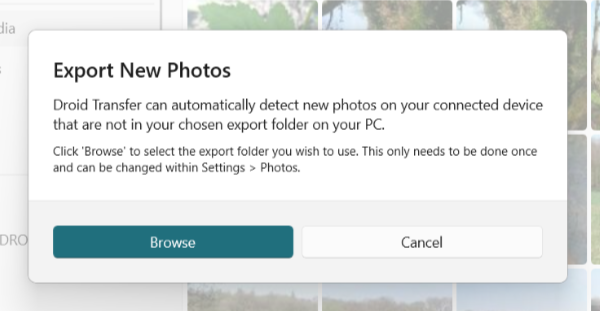
Click "Export New Photos". If this is the first time you are using this function, Droid Transfer will prompt you to select a folder on your PC. This folder will be used when backing up your photos. Click "Browse", and then select a folder and hit "Select folder".
Next, Droid Transfer will scan the folder for existing photos, and let you know which of your Android photos are not currently backed up in your chosen folder.
Select the photos you'd like to save, then click "Save to PC" to export all your selected photos to your chosen folder on your PC.
Droid Transfer will copy your photos in the same quality as they are stored on your device. You can copy all kinds of image formats, from JPEG, PNG and .HEIC (How to view HEIC formatted photos on your computer). Droid Transfer will copy RAW photos in a .DNG format, without modifying or converting the file.
Once the backup is complete, Droid Transfer will provide a link to the folder where the photos were saved, allowing you to review the copied images.
Future Backups
If in the future you wish to create differential backups of your photos, simply connect your phone to Droid Transfer as you did previously, then select Photos > Export New Photos.
This time, you'll see the message below:
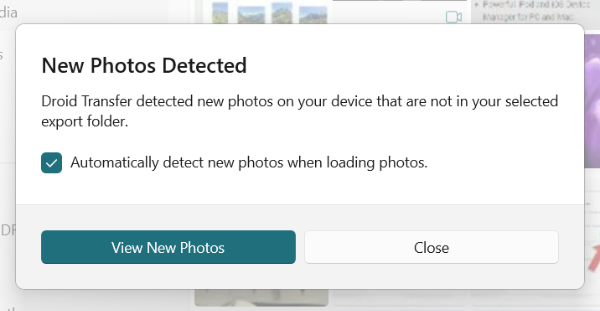
Click "View New Photos" to view only the photos on your Android that you have not already backed up to your chosen folder on your computer.
To back up these new photos, simply select the photos you want, and click "Save to PC" as you did before!
Selecting Photos
You may not want to export all of your photos and there are many ways to define which ones you want to export in Droid Transfer.
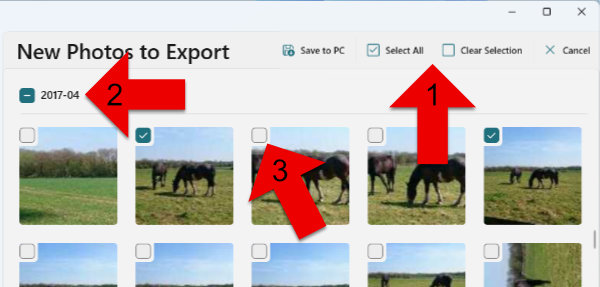
- Select All / Clear Selection- Click these buttons to select all your photos or deselect all.
- Select/Unselect Photos from a date- Click the checkbox next to a date to select/deselect all photos which were taken within that date range.
- Select/Unselect Individual Photos- Click the checkbox on a photo to include or exclude it from the current selection.
Export New Photos Settings
Droid Transfer provides all the options you need to set up your photo backups to meet your specific requirements.
To access these options, go to Settings > Photos.
- Photos Export Folder Location - Change the folder on your computer you use to back up your Android photos to.
- Group Photos By Date - Groups your photos by either Year, Month or Day. By default, photos are grouped by Month.
- Automatically check for new photos that have not been exported - keep this checked if you want Droid Transfer to let you know when you have new photos to back up to your folder.
- Include Videos - Check this if you want to back up your videos too.