Connect with Droid Transfer via USB
To connect your Android device using USB, there are a few more steps to take than when you connect using Wi-Fi. However, if your Wi-Fi connection is shaky, data transfer may be slow or even freeze. If this is the case, or if you have a large number of files or messages you wish to transfer, we would recommend using a USB cable instead.
Firstly, please ensure that you have downloaded both Droid Transfer on your PC and the Transfer companion app on your phone, as both are needed to allow your PC and your Android phone to communicate with each other:
Your Android phone does not need to be rooted for Droid Transfer to connect your device. You do however need to Enable Developer Mode and USB Debugging on your phone. Don't worry, you don’t need to be planning to develop an Android game to turn on Developer Mode and debugging and there is no cost or consequence for turning this on, except for another menu being added on your phone.
You can use the list below to skip to each step:
Or you can follow along with our video guide below to connect with Droid Transfer via USB:
1. Enable Developer Mode
- On your Android device, find and open Settings from the main menu.
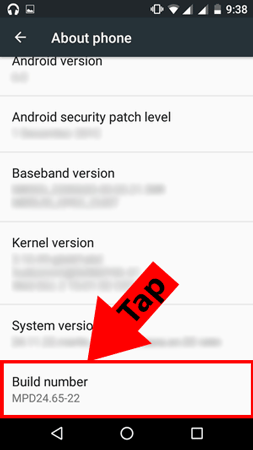
- In Settings, tap "About phone / About Device / About".
- Scroll down to "Build Number / Build Version", and tap it 5 or 6 times. Your device will let you know how many taps are remaining.
- Developer Mode is now enabled, and you don’t have to repeat this process again unless you perform a factory reset. How does it feel to be a developer? After completing the transfer, you can easily turn Developer mode off, by toggling the Developer options button.
2. Enable USB Debugging
Now that you are a developer, you can enable USB Debugging. This is required in order to transfer files between your Android and PC using a USB connection.
- On your Android device, again open Settings.
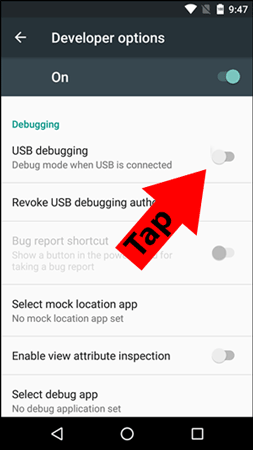
- Scroll down to the new option "Developer Options", and tap to open.
- Ensure that "Developer Options" is ON.
- Also ensure that the "USB Debugging" option is enabled.
- You may get prompted to confirm this change. If you receive this pop-up, please tap "OK / Apply".
USB Debugging greyed out?
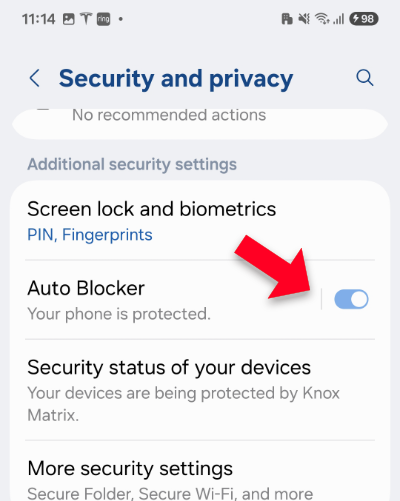
If "USB Debugging" is grayed-out and you are using a Samsung device, you may need to disable "Auto Blocker" to continue.
How to Disable Samsung Auto Blocker
Some Samsung devices have a feature called "Auto Blocker" which can prevent USB Debugging from being enabled. To disable Auto Blocker, follow these steps:
- Open the Settings app on your Samsung device.
- Scroll down and tap "Security and Privacy" or "Biometrics and Security".
- Scroll down to "Additional Security Settings".
- Tap "Auto Blocker" to disable it.
Tip: If you can't find the Auto Blocker setting, you can search for it in the settings search bar.
Once Auto Blocker is disabled, you should be able to enable USB Debugging as described above.
3. Connecting your phone and PC with Droid Transfer
Now that you have completed the setup for USB transfer, you can run the Droid Transfer app!
- Launch Droid Transfer from your PC's Desktop.
- When you see the Welcome screen, please connect your Android device to the PC using your USB cable.
- Your phone may prompt you to allow permissions with this computer. If this is the case, tap "OK / Allow".
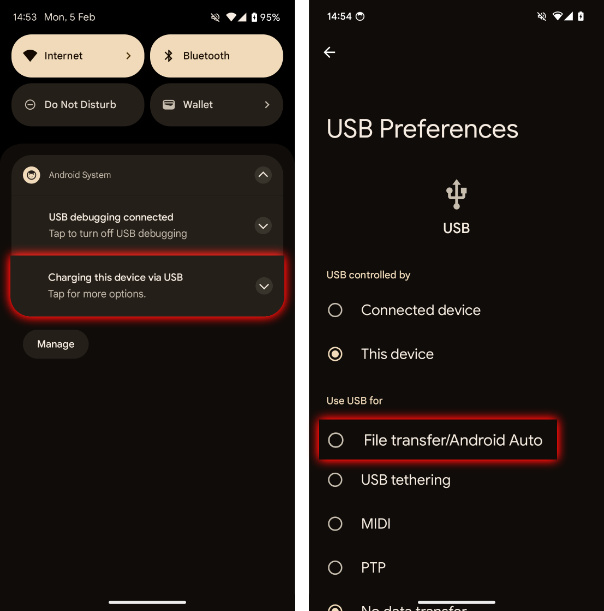
- Your device may also ask what function you would like to do with the computer (Charging Only, File Transfer, etc...). We would like to transfer files, so select that option and confirm.
If you don't receive this prompt, swipe down from the top of your Android screen and tap "Charging this device via USB". Then, under "Use USB for" select "File Transfer".
- Once the permissions are given, Droid Transfer will connect to your Android device, and automatically open the Transfer Companion on it.
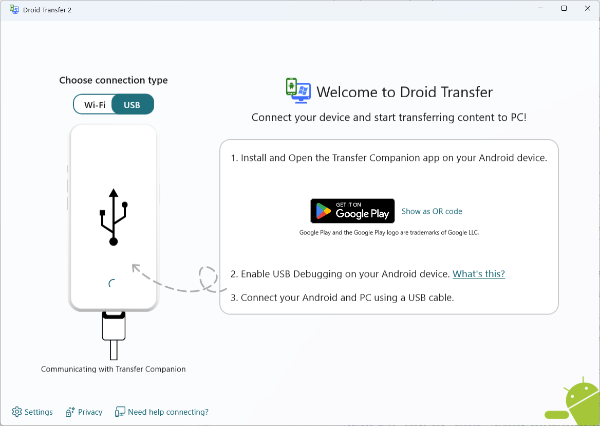
Eureka! Your Android phone is now connected to Droid Transfer on your PC. You can now transfer media between your Android and computer.
Troubleshooting USB Connection
Please see the steps provided in the USB Connection Troubleshooting guide with tips on what to do if you're struggling to connect your phone and your PC and how to ensure that a stable connection is maintained.
If neither a Wi-Fi or a USB connection is working for you, this might be a Windows Firewall configuration error. Please see our instructions on how to configure Windows Firewall to allow Droid Transfer to connect to your phone.


