How to Backup iPhone to External Hard Drive
Your iPhone holds valuable data — from photos and messages to contacts and more. A regular backup ensures your information stays safe in case of loss, theft, or damage
In this guide, we’ll show you how to back up an iPhone to an external hard drive. Since iPhone backups can take up a lot of space, many users prefer storing them on an external drive instead of filling up their computer.
Quick jump to:
Extra: Learn more about different types of iPhone backups including iTunes and iCloud backups.
1. Back up iPhone Directly to an External Drive (Windows and Mac)
TouchCopy is a Windows and Mac app that lets you save all your iPhone content directly to your computer or an external drive.
With TouchCopy, you can access music, photos, and files straight from your iPhone and copy them to your chosen drive in just a few clicks. For step-by-step instructions, see our support article on saving iPhone photos and music to an external drive.
For other data types — such as messages, contacts, and call logs — TouchCopy works by reading your iPhone backup. If no backup is found, it will automatically create one for you, and you can even choose to store this backup on your external drive.
Ready to get started? Download TouchCopy:


Next Steps
- Back up iPhone to external hard drive (Windows)
- Back up iPhone to external hard drive (Mac)
- Save selected iPhone content to external hard drive (Mac & Windows)
Back up iPhone to external hard drive with a Windows computer
Usually, iPhone backups are created with iTunes or the Apple Devices app on Windows. However, these apps do not allow you to choose where to save your backups. So, if your PC or laptop does not have space to store the backup, it will fail.
Using TouchCopy instead, you can easily choose any location on your computer, or an external hard drive to store your backups.
Let's see how to back up your iPhone to an external hard drive with TouchCopy for Windows...
- Launch TouchCopy on your PC and connect your iPhone using a USB cable or Wi-Fi.
- Click Settings from the menu on the left of the program, then select Backups.
- Select the "User defined location" option.
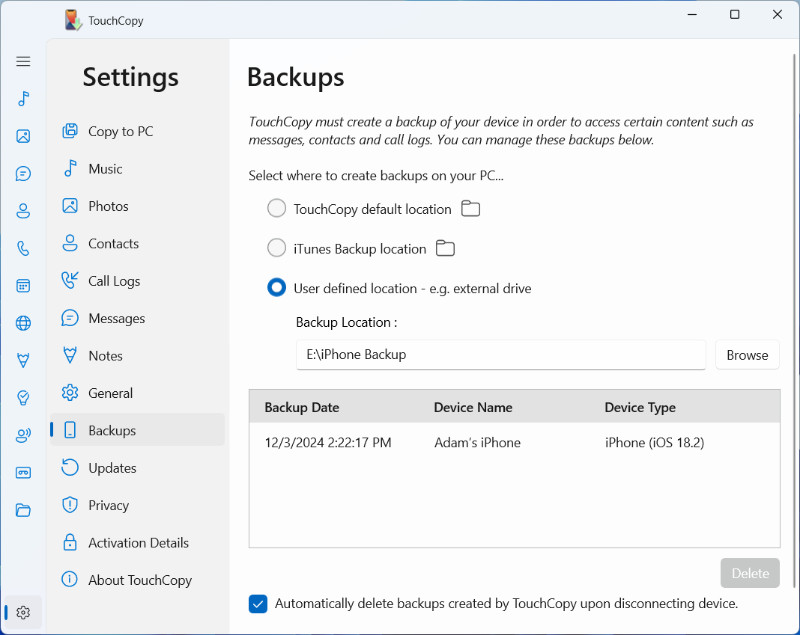
- Click Browse and choose a folder on your external hard drive to save the backup to, then click Open to select it.
- Finally, choose the content you'd like to backup to your external drive. Clicking on Messages, Call Logs, Calendars and Notes in TouchCopy will automatically start backing up your device to your external drive.
This new backup will be saved to your chosen external hard drive location - so make sure the drive is connected to your PC when you are using TouchCopy!
Read on for more information on how to save selected iPhone content to your external hard drive.
Back up iPhone to external hard drive with a Mac
The default way to create iPhone backups on Mac is through Finder (or iTunes on older Macs). This is usually fine for users with a lot of spare hard drive space, but it does not offer a choice to save a backup on an external drive (without using command line Terminal shenanigans). Nor does Finder/iTunes allow you to access your iPhone content from within your backup.
To alleviate these concerns, we recommend using TouchCopy.
Let's see how to back up your iPhone to external hard drive with TouchCopy for Mac...
- Launch TouchCopy on your Mac and connect your iPhone.
- Click Preferences from the menu on the left of the program, then select Backups.
- Choose the "External backup location" option.
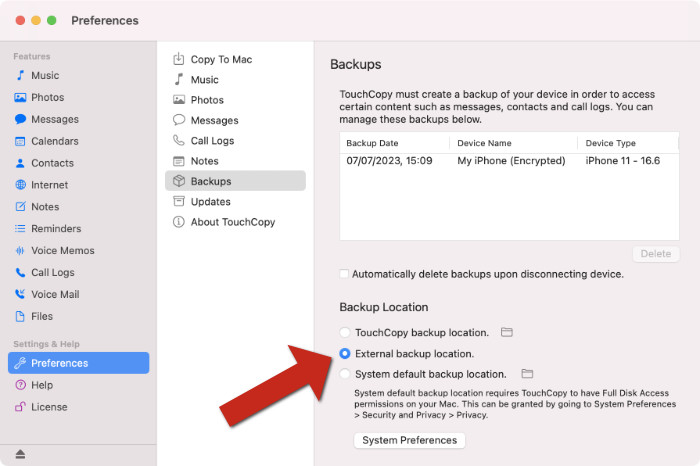
- Navigate to the location on your external hard drive where you'd like to save your backup, then click Open to select the location.
- Finally, click a section like Messages in TouchCopy. It will automatically start backing up your device to your external drive.
Check out our guide for more information about changing backup location in TouchCopy.
How to save selected iPhone content to external hard drive (Mac and Windows)
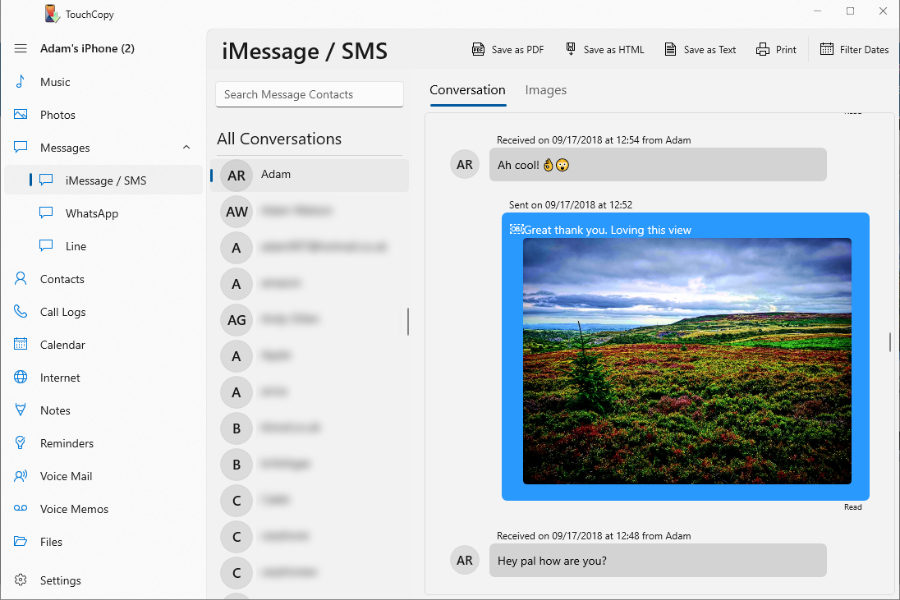
The main advantage of using TouchCopy to back up your iPhone content is that you have the ability to save the content you need in a usable way.
Unlike iTunes and Finder backups, which restrict access to and extraction of files from the backup, with TouchCopy, you can choose exactly what content from your iPhone you want to save, and save it as readable and useable files on your computer or external hard drive. Here's how it's done...
- Open TouchCopy on your PC or Mac.
- Connect your iPhone using a USB cable or Wi-Fi.
- Select the content you wish to backup (Messages, Photos, Music, Contacts, Call Logs, Calendar, Internet, Notes, Reminders, Voice Mail, Voice Memos, Files).
- Choose a save option in TouchCopy's toolbar.
- Choose your external hard drive as the location to save to.
- Click Save!
If you have not done so already, you can download TouchCopy from here:
TouchCopy lets you back up data from your iPhone directly to your computer. Once connected, you can access and copy music, photos, messages, contacts, and more — saving them securely to your PC, Mac, or any external drive connected to your computer.
Unlike iTunes, Apple Devices or Finder, TouchCopy saves individual files rather than creating a single backup file. This means you can’t perform a full “Restore” in one go, but you can easily re-add many of these files to your iPhone (or another device) whenever you need them.
For example, if you’ve backed up your music, photos, and contacts with TouchCopy and later lose them from your iPhone, you can restore them to your device — or even to a new iPhone — using iTunes or Finder.
2. Back up iPhone to External Drive with Finder on Mac
Without the use of a specialist app like TouchCopy above, backing up your iPhone to an external drive can get a bit complicated. But by carefully following the steps below you can accomplish it.
On Mac, this is possible by first moving your existing backup to your external hard drive, then instructing the Mac (using some Terminal 'wizardry') to use the new location when creating iPhone backups in the future.
- Step 1: Move a backup from Mac to your external drive
- Step 2: Set up your Mac to automatically make future backups to external hard drive
Step 1: Move a backup from Mac to your external drive
Moving an existing backup of your iPhone to your external drive is the easy bit.
First, you'll need to locate your iPhone backup on your Mac. If you haven't yet got one, find out how to back up your iPhone to your Mac. Note: you'll need to have backed up to your Mac itself, rather than to iCloud.
Now, let's see how to move your iPhone backup from Mac to your external hard drive...
- Ensure your external hard drive is connected to your Mac.
- Connect your iPhone to your Mac using your USB cable.
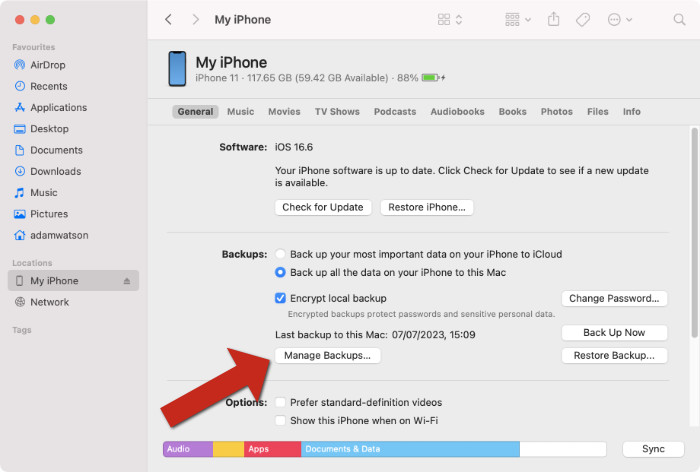
- Open Finder and select your iPhone under "Locations".
- Click "Manage Backups..." to see the device backups stored on your Mac.
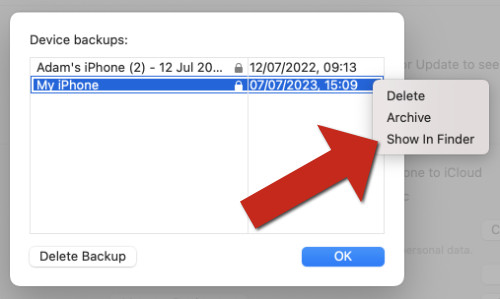
- Right-click the backup of your iPhone, and choose "Show in Finder".
- The iPhone backup will be stored in a folder within a "Backup" folder. The backup will be a folder named with a long ID string of seemingly random characters. Right-click this folder and Copy it.
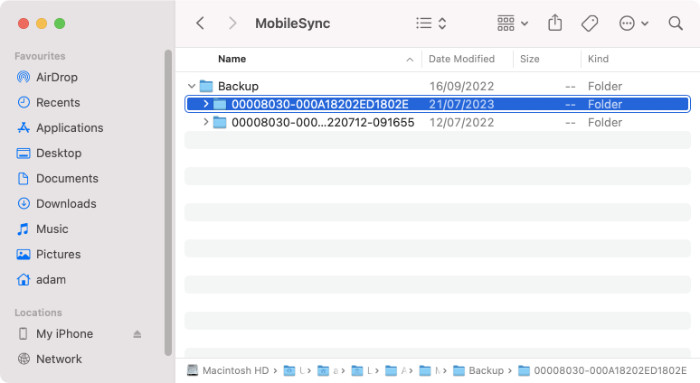
- Finally, select your external hard drive from the list of Locations in Finder and create a new folder called ios_backups. Right-click and Paste your backup into this ios_backups folder.
Now you have a copy of your iPhone backup stored on your external drive! You may wish to delete the original backup stored on your Mac hard drive at this point to clear some space. (Need to clear more space on your Mac?)
Set up your Mac to automatically make future backups to external hard drive
Now for the tricky part - creating a 'Symlink' to set up Finder to save your iPhone backups to your external hard drive whenever you back it up in the future. A Symlink (or symbolic link) is a file which tells the Mac that one file points directly to another file in a different location. Using this feature, we can create a link from the standard iOS backup location on Mac to a folder on an external drive.
As this step will require using Terminal, we recommend first creating a system backup using Time Machine. This way, you'll be able to go back, should something go wrong.
If you are unsure about using Terminal on your Mac, you can stop at the step above. Moving your iOS backups to your external drive manually will still save space on your Mac - you'll just need to remember to do this each time you back up your device. Alternatively, use Method 1: TouchCopy to back up your iPhone to your external drive without the need for Terminal or symlinks.
That said, let's see how to back up iPhone to external drive using symlink...
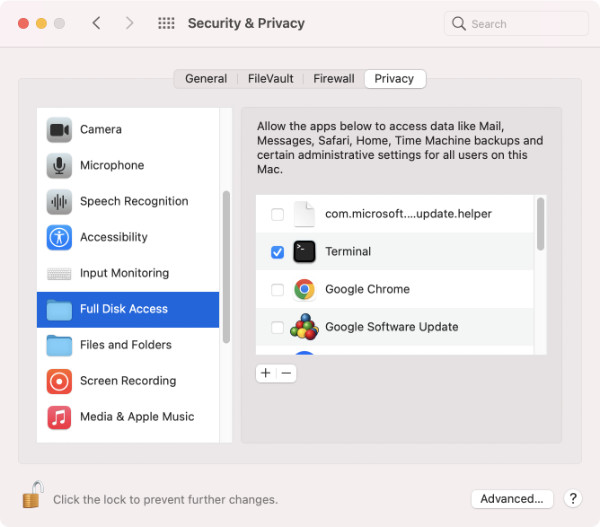
- First, you'll need to ensure that Terminal has the correct permissions. To do this, open System Preferences > Security & Privacy > Privacy > Full Disk Access. Here, click the 'lock' icon which will allow you to make changes - you'll need to enter your password to allow this. Finally, click the '+' icon, and select Terminal from the list.
- Next, use cmd+spacebar on your keyboard. In the search box, type Terminal and hit Enter/Return to open Terminal.
- In Terminal, paste the following code. You'll need to replace 'yourexternalharddrivename' with the name of your external hard drive (and if you didn't follow the section above, ensure you have a new folder in the root of your external drive called ios_backups).
ln -s /Volumes/yourexternalharddrivename/ios_backups ~/Library/Application\ Support/MobileSync/Backup/
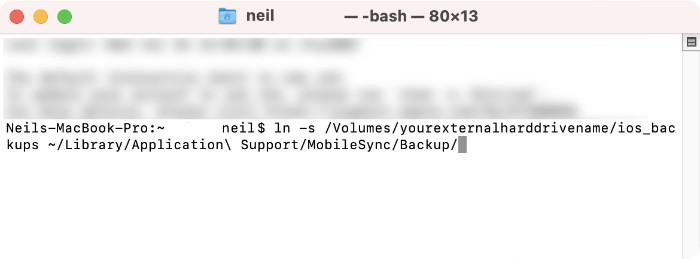
- Hit Enter/Return, then you can close Terminal.
The symlink has now been made from the original backup location on Mac to the folder on your external hard drive.
Now, whenever you make a new backup of a device in Finder, the backup will be saved to your external hard drive, rather than to your Mac. Just make sure that your external drive is connected to the Mac when you want to create a new backup!
3. How to Move an iPhone Backup to External Drive on Windows
As we have seen, iTunes and Apple Devices do not provide the option to back up your iPhone directly to an external hard drive (use TouchCopy to back up your iPhone to an external drive). However, you can manually move existing iPhone backups from PC to your external drive.
First, you'll need to locate your iPhone backup on your PC. If you haven't yet got one, find out how to back up your iPhone to your computer. Note: you'll need to have backed up to your PC itself, rather than to iCloud.
Now let's see how to move your iPhone backup from PC to your external hard drive...
- Ensure your external hard drive is connected to your PC.
- Connect your iPhone to your PC using your USB cable.
- Open File Explorer and enter this path: %appdata%\Apple Computer\MobileSync\Backup and hit Enter to navigate to that folder.
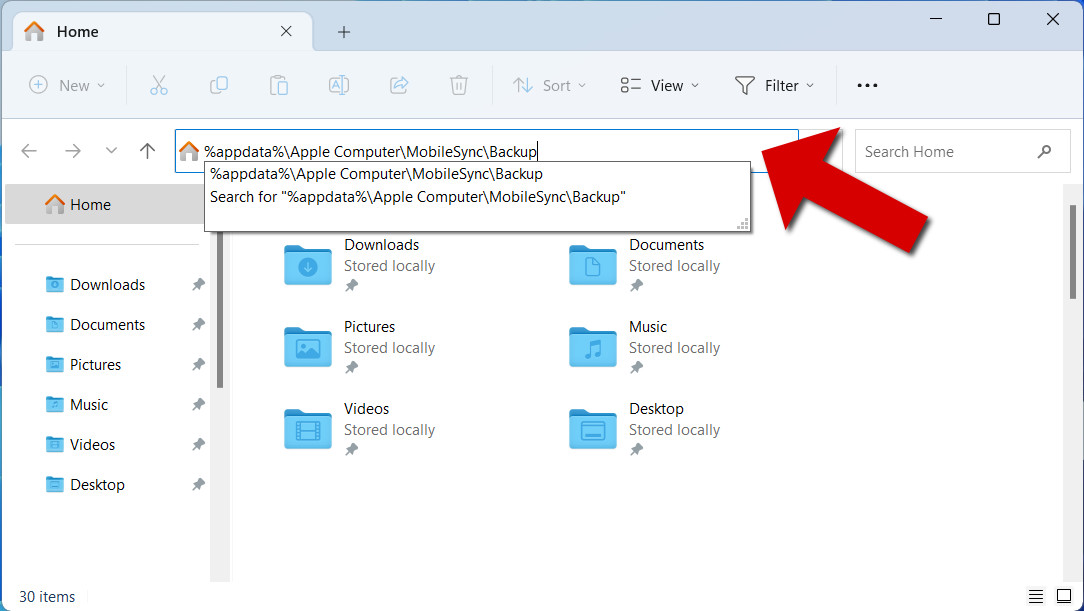
- Within this Backup folder, you'll find your iOS device backups. They will be named with long random strings of characters.
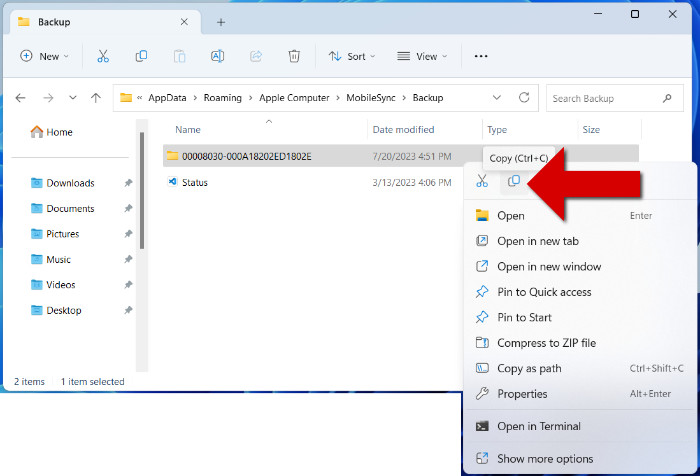
- Use the "Date modified" column to determine which backup is the iPhone backup you just made. Right-click the backup and Copy it.
- Now you can navigate to your external drive in File Explorer.
- Optional: Create a new folder on your external drive to store your iPhone backup in.
- Open the folder on your external drive where you wish to save your backup, then right-click and Paste!
If you were unable to locate your iPhone backups at the path in the guide, find where else iOS backups may be stored on your computer.
Unlike on Mac, it is not possible on Windows to create a link to tell iTunes to back up the iPhone to the external drive. This means that you'll need to manually copy backups from your PC to your external drive every time you make a backup - unless you use TouchCopy to make backups straight to your external drive!
4. Transfer iPhone files directly to External Drive with a USB cable
Did you know that you can back up files from your iPhone directly to an external drive, without a computer?
All you need is the right adapter to connect your iPhone to the drive. Make sure your external drive is properly formatted and review Apple's recommendations for compatible USB adaptors.
With this method, you can back up photos, videos, and documents directly. For other content such as music, messages, and contacts, we recommend using TouchCopy (Method 1).
For step-by-step instructions, see our full guide on transferring photos from iPhone to an external hard drive without a computer.
Conclusion
There are several ways to back up your iPhone to an external hard drive. If you want complete control over what you save — without technical steps like using Terminal — we recommend TouchCopy. It lets you back up photos, music, messages, contacts, and more straight to your external drive. For a quick space-saving option, you can also move existing iPhone backups manually. Choose the method that best fits your needs.
Popular FAQs
- What's the Difference Between Backup Types in TouchCopy?
- How to Change Where Device Backups are Made to and Read from in TouchCopy
- TouchCopy is Stuck while Creating a Backup of my Device
- How to Recover from a Backup Failed Error Message
- Using TouchCopy with Encrypted Device Backups
- How to Create a New Encrypted Backup in iTunes
- Forgot Your iPhone Backup Password? Here's How to Reset It
- How to Remove iPhone Backups in iTunes, Finder and iCloud
- How to Update iOS on iPhone or iPad