What to do if TouchCopy gets stuck or freezes while creating a backup
Summary
TouchCopy needs to create a backup of your connected iOS device, to enable you to view and save content like Messages, Call Logs and Contacts. These backups are created locally on your PC or Mac and can be deleted after exiting TouchCopy.
In some cases, TouchCopy may appear to get stuck or freeze during backup. This guide will help you resolve the issue so you can complete your transfer.
Quick jump to the section you need...
- Creating a backup in TouchCopy
- What to do if TouchCopy gets stuck or freezes while backing up
- Set permissions
- Create a new Backup outside of TouchCopy
- Back up with Apple Devices or iTunes
- Back up with Finder (macOS Catalina and higher)
- Deleting device backups in TouchCopy
Creating a backup in TouchCopy
When you attempt to access a section in TouchCopy which requires a backup of your iOS device, TouchCopy will let you know. You can access Music, Photos and Files without the need for a backup.
If you do not currently have a backup of the connected device stored on your computer, TouchCopy will ask whether you'd like to make a Reduced backup or a Full backup (what's the difference between the backup types?).
If you already have a backup of your device stored on your computer, you can tell TouchCopy to read from that, or to create a new backup (this choice is shown in the screenshot below).

How long does it take to do a backup? Depending on the amount of content stored on your device, it may take some time to create a full backup. For this process to complete, please ensure that:
- you have sufficient free storage space on your computer in which to store the backup of your device.
- your iPhone, iPad or iPod remains connected via USB cable or Wi-Fi with your computer.
- you enter your device's passcode on-screen, when prompted, in order to trust the connected computer.
What to do if TouchCopy gets stuck or freezes while backing up
Run TouchCopy as administrator (PC version)
If you are using a Windows computer, it may be beneficial to run TouchCopy as administrator, ensuring it has the correct permissions to access your backup.
To do this, make sure TouchCopy is closed. Then, click the Start menu on your computer and search for "TouchCopy". Right-click the TouchCopy app entry and choose "Run as administrator".

Ensure TouchCopy has the correct permissions (Mac Version)
If you are using a Mac computer running macOS Mojave or higher, please make sure that TouchCopy has the correct permissions on your Mac.
To do this:
- From your Launchpad, open System Settings > Privacy & Security > Full Disk Access.
- Scroll down and click the "+". If prompted, enter your password to allow changes.
(On macOS Sonoma and earlier, you'll need to click the lock icon before being able to click "+".) - Select TouchCopy from the list and click Open to grant Full Disk Access.
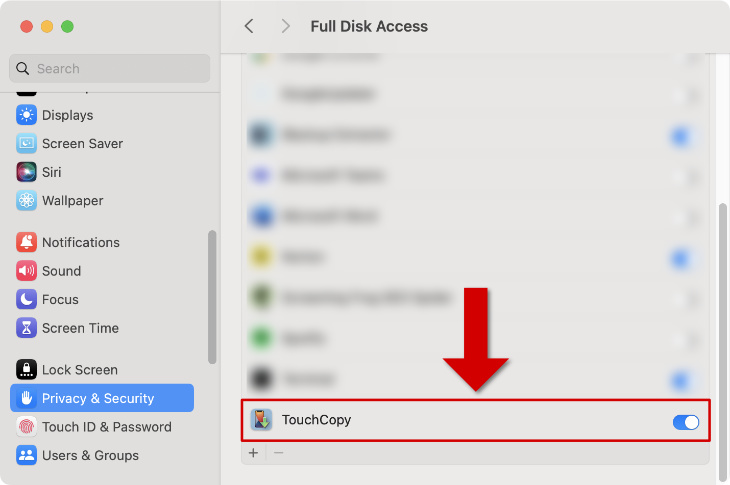
This will ensure that TouchCopy has access to all of your latest data.
Create a new backup outside of TouchCopy
If you continue to experience issues creating a backup in TouchCopy after checking your permissions, it may be beneficial to create the backup using iTunes, Apple Devices or Finder instead.
Create a backup of your device using iTunes or Apple Devices
- Launch iTunes or the Apple Devices app on your computer.
- Connect your iPhone.
- If using iTunes, click your device icon to access your device summary.
- Apple Devices will show your device summary automatically.
- Select "Backup all of the data on your iPhone to this computer".
- Optionally, tick "Encrypt local backup" to protect the backup with a password.
Certain TouchCopy features, such as saving your iPhone call logs, are only available for encrypted backups. Keep this password safe, as you'll need to enter it in TouchCopy so that it can access your iOS device content.
- Optionally, tick "Encrypt local backup" to protect the backup with a password.
- Under "Backups", click "Back Up Now". Please ensure that your computer has enough space to complete a backup of your iOS device.
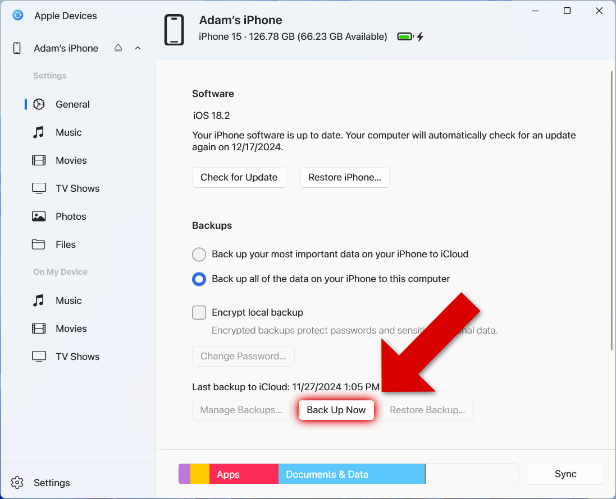
- When the backup is complete, close iTunes or Apple Devices and open TouchCopy.
- In TouchCopy, go to "Settings" and then "Backups". Here, change your backup location to be the "iTunes/Apple Devices" backup location.
- Once set, close Settings, connect your iPhone and attempt to access your Messages using TouchCopy.
Create a backup of your device using Finder (macOS Catalina and higher)
- Launch Finder on your Mac.
- Connect your iPhone.
- Select your device from the list.
- Tick the option to "Encrypt local backup" to protect your backup with a password. Certain TouchCopy features such as saving your iPhone call logs are only available for encrypted backups.
- Choose "Back up all the data on your iPhone to this Mac".
- Click "Back Up Now".
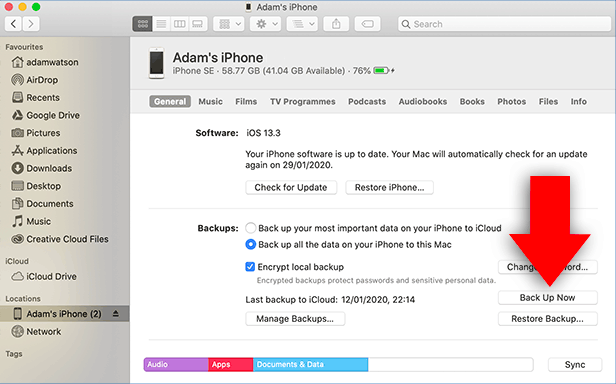
- When the backup is complete, close Finder and open TouchCopy.
- Go to "TouchCopy" > "Preferences" and then "Backups". Here, change your backup location to be the "System" backup location rather than TouchCopy. As you have already set TouchCopy to have full disk access, you can click confirm on the message that is displayed.
- Once set, please connect your iPhone and attempt to access your Messages using TouchCopy.
Deleting device backups in TouchCopy
As mentioned, your computer needs to have enough free space to store a backup of your device.
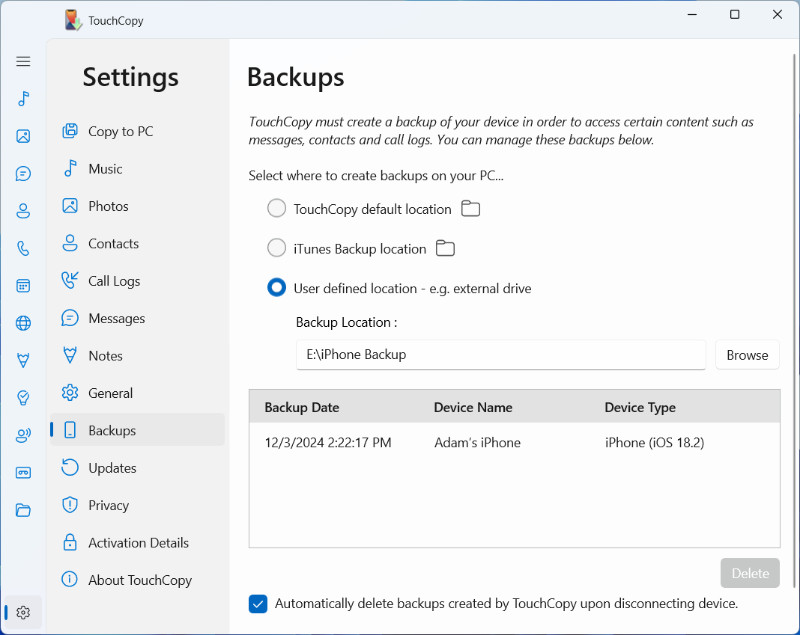
TouchCopy enables you to manage your existing iOS device backups by clicking on Settings > Backups in TouchCopy for PC, or Preferences > Backups in TouchCopy for Mac.
Here, you can select a backup you don't need, and click Delete. This can clear significant space on your computer.
Once enough space is made, you can connect your iPhone with TouchCopy and try making a backup again.

Popular FAQs
- What's the Difference Between Backup Types in TouchCopy?
- How to Change Where Device Backups are Made to and Read from in TouchCopy
- How to Backup iPhone to External Hard Drive
- How to Recover from a Backup Failed Error Message
- Using TouchCopy with Encrypted Device Backups
- How to Create a New Encrypted Backup in iTunes
- Forgot Your iPhone Backup Password? Here's How to Reset It
- How to Remove iPhone Backups in iTunes, Finder and iCloud
- How to Update iOS on iPhone or iPad