Need to transfer photos from your iPhone to your PC? In this guide, we compare the best methods in 2026 and show you how to use each one, along with the pros and cons. Whether you need to clear space on your iPhone, back up your precious memories, or edit images on a larger screen, you'll find the ideal solution here.
Quick jump to any of the sections in the guide:
Method 1: TouchCopy
Best for: Selectively copying photos, preserving albums, and regular backups.
TouchCopy is one of the easiest and most flexible ways to transfer photos from iPhone to PC. It lets you copy selected photos and videos directly to your Windows 10 or Windows 11 computer, without syncing your entire library with iTunes or iCloud. It can even detect new photos on your device and prompt you to back them up, making it ideal for regular photo backups.
You can transfer photos via Wi-Fi or USB, and keep your album structure intact when saving to your PC.
Unlike the other methods in this guide, TouchCopy has the unique ability to save photos from your text messages!


How to Transfer Photos from iPhone to PC with TouchCopy
-
Open TouchCopy on your PC and connect your iPhone or iPad using a USB cable or Wi-Fi.
-
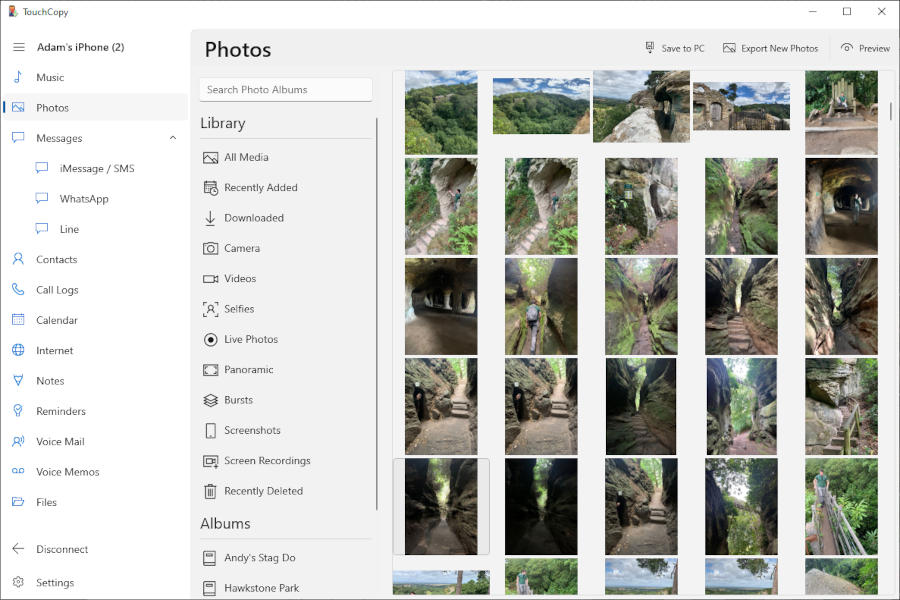
Click “Photos” to view all the photos and videos stored on your device.
-
Browse through your library by “All Media”; via types like “Videos”, “Selfies” or “Screenshots”; or by Album.
-
Select the photos you want to copy.
-
Click “Save to PC” and select a location on your PC to save your media.
TouchCopy will maintain your album structure. So, when copying your iPhone albums or sections like “Favorites” or “Selfies”, your photos will be saved into folders for each album – keeping your library organized and tidy.
Tip: You may find that many of the photos stored on your iPhone are in the HEIC format. You'll need certain components from Microsoft in order to view HEIC files on Windows. See our guide on how to view HEIC photos.
If you have HEIC photos on your iPhone, but you'd rather save them to your PC as JPGs, TouchCopy can convert them for you. To do this, simply go to Settings > Photos and under “When saving HEIC images”, choose “Convert to JPG”. See the user guide for more information about TouchCopy's Photo Settings.
Regularly Backing up your iPhone Photos
For those who wish to make incremental backups of your iPhone photos, TouchCopy offers an excellent solution.
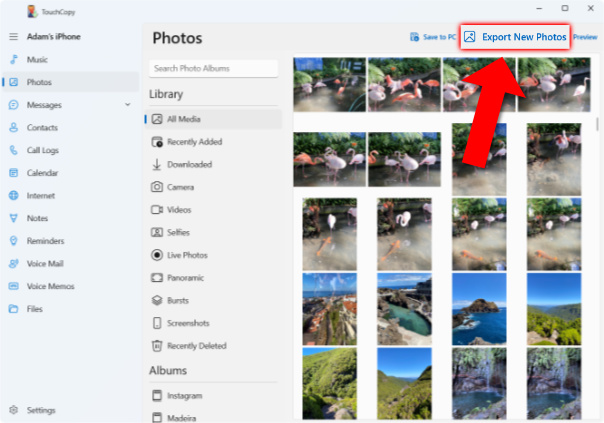
By using “Export New Photos”, you can designate a folder on your PC to store your incremental photo backups. Simply click “Save” in TouchCopy to export your photos to this folder, and TouchCopy takes care of the rest.
Now whenever you take some new photos on your iPhone, TouchCopy identifies which ones haven't yet been saved and back them up to your chosen folder, helping you avoid duplicates and saving valuable time.
TouchCopy will even organize your exported photos into folders by the date they were taken – so you can easily manage your library.
Watch the video to see how to copy iPhone photos with TouchCopy
Method 2: Windows Photos App
Best for: Built-in Windows option
The Windows Photos app comes preinstalled on all PCs running Windows 8 and higher.
The main draw for this method is the integration with iCloud. If you have the iCloud for Windows app installed on your PC, and you're signed into your Apple account, you can access your iCloud photos directly from within the Photos app.
This was notably the slowest of the USB cable methods reviewed. Users prioritizing speed should consider alternative transfer options.
How to import iPhone photos to PC with the Windows Photos app
-
Launch the Photos app on your Windows PC.
-
Connect your iPhone with a USB cable.
-
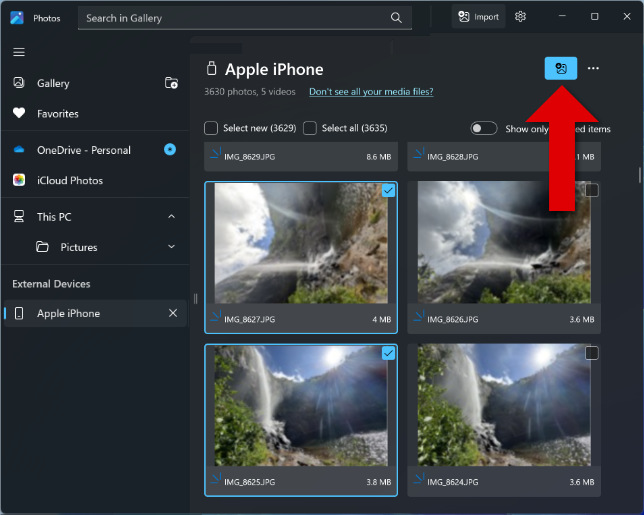
Click “Import” and then select “Apple Phone”.
-
Select the photos you'd like to import.
- Click an individual photo to select it.
- Use “Select All” if you want to copy all your photos.
- Use “Select New” if you only want to copy photos you've not copied before.
-
Click the Import button and confirm the folder you want to copy your photos to.
-
Click “Import” to begin the transfer.
Importing photos in this way will not maintain your iPhone photo albums, and you can't sort or filter them by type. For more organizational control over your photos, try TouchCopy.
Why is some of my media missing from the list? If some of your media is not found using a USB cable transfer method, it is likely that those files are stored in iCloud, rather than on your iPhone itself.
Method 3: Windows File Explorer
Best for: Simple drag-and-drop copying
If you prefer a straightforward, old-school approach, you'll be glad to know that you can easily drag and drop photos from your iPhone to your PC using Windows File Explorer.
Drag-and-drop photos from iPhone to PC
-
Connect your iPhone using your USB cable and unlock it.
-
Press Win+E to open File Explorer, then find your iPhone under “This PC”.
-
Select your iPhone and open “Internal Storage” to find your device's media.
- On older iPhones, you may need to open a DCIM folder to access your media.
-
Open another File Explorer window and go to a folder where you want to save your photos.
-
Drag and drop your desired photos or folders from your iPhone to the PC location.
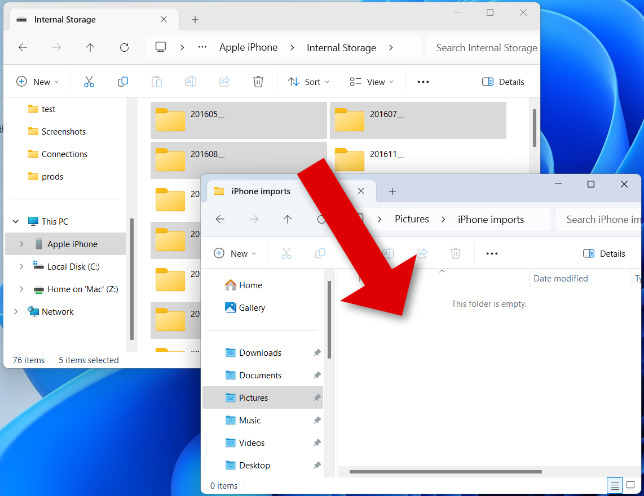
When viewing your iPhone photos in File Explorer, you'll see that they are grouped by date taken. For example, the folder “202411_” contains all the photos taken in November 2024.
This method (like the others in this guide) does not move the original photos, rather, a copy of those photos is saved to the PC. As such, the original photos will remain on the iPhone.
Method 4: iCloud
Best for: Wireless syncing for a shared library across multiple devices
If you'd like to have access to all your photos and videos across multiple devices, you'll want to consider iCloud.
Syncing your iPhone photos with iCloud means that you can access them on any device from which you can get onto the internet.
iCloud offers only 5GB of free storage, which is quickly consumed by photos and videos. For expanded storage beyond this limit, a paid monthly iCloud subscription is required. This limitation is a key consideration for users with large photo libraries.
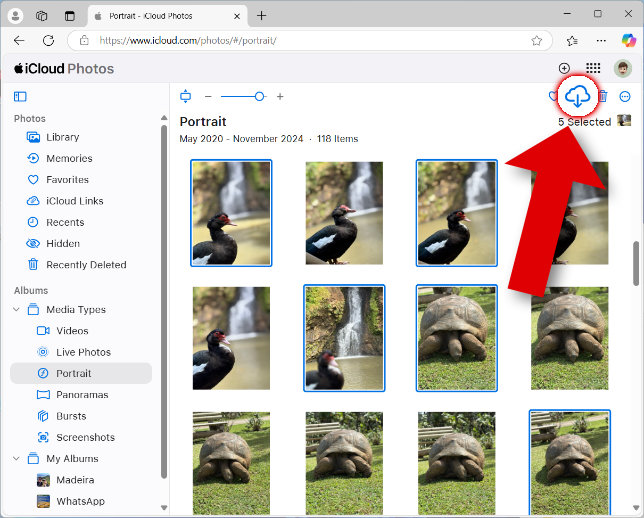
How to transfer photos from iPhone to PC wirelessly with iCloud
-
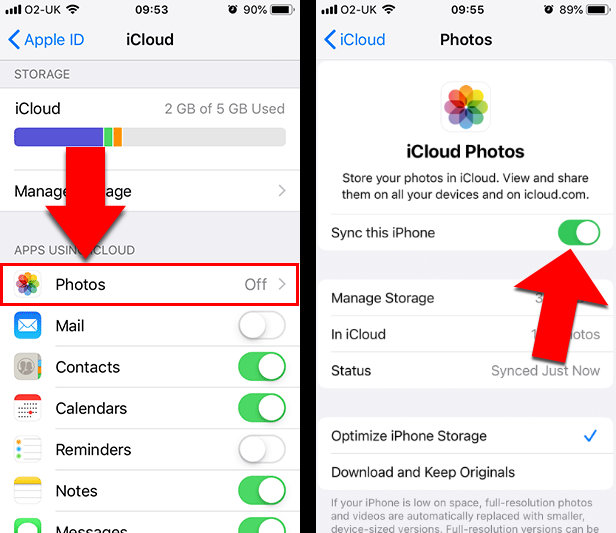
On your iPhone, go to Settings > your name > iCloud.
-
Tap Photos and then toggle on “Sync this iPhone”.
-
On your PC, go to the iCloud Photos website and sign in using your Apple ID.
-
Select the photos you'd like to download.
-
Click the Download icon.
iCloud is great once you are set up, and any new photos you take will automatically be uploaded to iCloud. However, there are some pain points that we experienced:
- If you have lots of photos and videos on your iPhone, initially uploading them to iCloud takes a very long time. Ensure that you use a fast and stable Wi-Fi connection for the best results.
- Photos downloaded from iCloud to PC do not maintain album structure or any kind of organization by folder – you will simply receive a zipped file of all your selected photos.
Tip: On each of your iOS devices, you can choose whether to keep full-resolution images on each device, or optimized versions to save space. To access this, go to Settings > your name > iCloud > Photos.
Method 5: Other Cloud Services
Best for: Making use of an existing Google Drive, OneDrive, or Dropbox account
If you prefer not to use iCloud or you already subscribe to another service, you can transfer photos using platforms like Google One, OneDrive or Dropbox.
The steps to transfer iPhone photos will vary with each service used, but the basics still remain: upload your iPhone photos to the cloud storage, access the service on your PC, and download the photos you want to your computer.
A great example platform is Google. Google offers 15GB of free storage across all Google services, which is much higher than iCloud's 5GB.
You can use the Google Photos app on your iPhone to back up and sync your iPhone photos with your Google account. This will give you access to your photos from any device, and your library will be automatically updated as you take new photos.
If you don't want to upload your entire library, you can use Google Drive instead.
With the Google Drive app installed on your iPhone, you can copy selected photos to your Google storage without having to sync your entire library. To do this, simply select items from the Photos app on your iPhone, tap the Share icon, and find “Drive”.
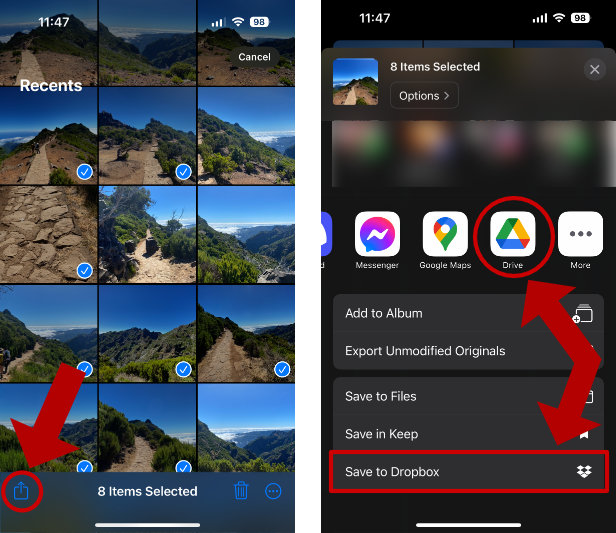
As with other methods, your photos will not be organized into folders by date or by album. For the best organization, use TouchCopy.
Method 6: Email or Message
Best for: Quickly sending just a few photos
If you only need to copy a few photos, you can't get much easier than sending them to yourself via email or message.
Does sending photos via email or message reduce image quality? Yes, transferring photos using email or messaging services typically involves compression, leading to a noticeable loss in the original image quality.
We only recommend this method for a couple of photos at a time, as there are restrictions on the amount of data that you can attach to emails and messages:
- Email attachment limits: Services like Outlook and Gmail limit the total size limit of an email to 20MB.
- WhatsApp attachment limits: You can send up to 100 photos at a time using WhatsApp.
How to send photos from iPhone to PC with WhatsApp
-
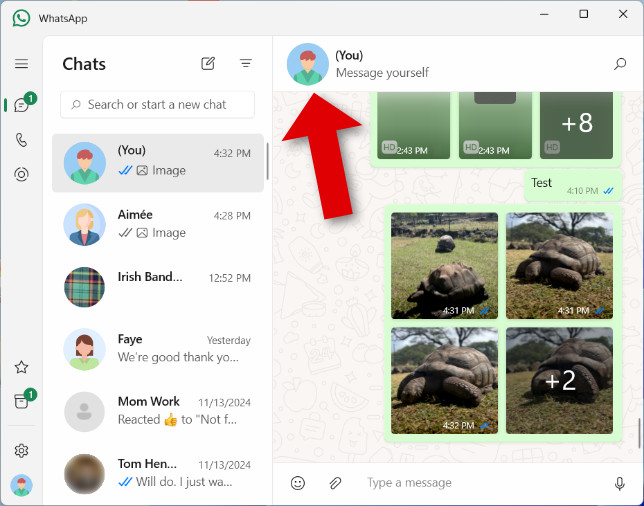
Open WhatsApp on your iPhone and send your desired photos in a chat with yourself.
-
On your PC, get WhatsApp from the Microsoft Store.
-
Launch WhatsApp on your PC and log in to your account.
-
Open the chat with yourself and click your profile picture at the top of the screen.
-
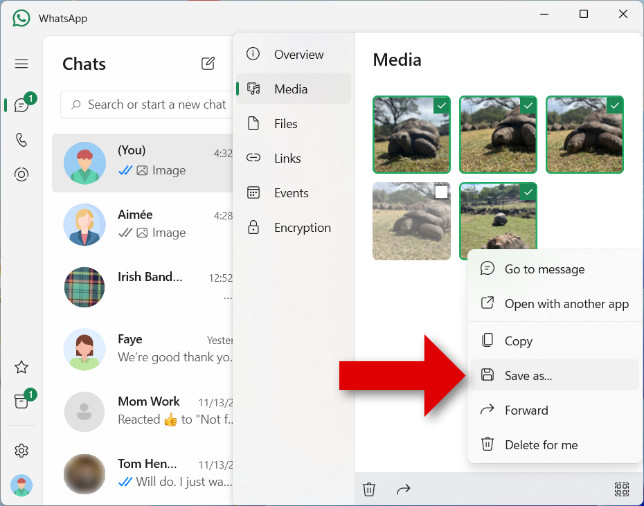
Click “Media” and select the photos you want to download.
-
Right-click a selected photo and choose “Save as…”.
-
Choose a destination on your PC and click Save.
Comparison of the methods
To help you choose the right method, we've compared each option using the criteria that matter most.
Use the table below to compare connection type, backup support, album preservation, and how well each method handles large photo libraries.
| Method | Connection | Select specific photos | Regular / continuous backups | Keeps album structure | Batch transfer support | Cost |
|---|---|---|---|---|---|---|
| TouchCopy | USB or Wi-Fi | Yes | Yes | Yes | Excellent | Free trial / paid |
| Windows Photos App | USB | Yes | Yes | No | Good | Free |
| Windows File Explorer | USB | Yes | No | No | Good | Free |
| iCloud | Wireless | Limited | Yes | Limited | Fair | Free up to 5GB |
| Other Cloud Services | Wireless | Yes | Yes | No | Fair | Free tier / paid |
| Email or Message | Wireless | Yes | No | No | Poor | Free |
Conclusion
Now you know the best methods to transfer photos from your iPhone to your PC. Each option has been thoroughly tested to ensure accuracy and reliability. If you're unsure which method suits you best, here are a few quick suggestions:
Best All-Rounder
TouchCopy offers the most flexible way to transfer photos from iPhone to PC. It supports USB and Wi-Fi transfers, preserves album structure, and makes it easy to copy selected photos or create regular backups. It can even transfer photos from text messages, making it a great all-in-one solution.
Best Simple USB Method
Windows File Explorer is a fast and familiar way to copy photos directly from your iPhone to your PC. It's ideal for quick, manual transfers, but offers less control and organization, as you can't browse or save photos by album. You'll also need to manually keep track of which photos you've already copied.
Convenient Wireless Syncing
If you want to transfer photos without a cable, iCloud is the most convenient option. It automatically syncs your photos across devices and keeps them backed up in the cloud. However, free storage is limited, and uploading large photo libraries can take time.
Thanks for reading!
FAQs
How to transfer photos from iPhone to PC using iTunes
Unfortunately, you can't copy photos from iPhone to PC using iTunes or the Apple Devices app. You can sync in the opposite direction: from your PC to your iPhone.
My PC doesn't find my iPhone
Ensure the iPhone is unlocked, and tap to trust the computer if prompted.
Otherwise, try a different USB cable, ensuring that it supports data transfer rather than only charging.
Some of my photos are missing
If using a USB cable method, you won't be able to copy photos from your iPhone if they are stored in iCloud. To copy such photos, you have 3 options:
- Download iCloud photos to your iPhone, allowing you to copy them using any of the above methods.
- Download iCloud Photos directly to your PC.
- Get the iCloud for Windows app. This will allow you to access your iCloud photos directly in the Windows Photos app.
I can't view my photos on my PC after import
Many photos taken on iPhone are saved in HEIC format. HEIC uses modern compression methods to attain low file sizes while maintaining great image quality.
If you are unable to view HEIC photos on your PC, you may not have the HEIC components installed. Find out more about how to view iPhone HEIC images on Windows PC.
Alternatively, you can use TouchCopy to convert your HEIC photos to JPG. JPG is natively supported on all Windows systems.
Can you AirDrop to a PC?
No, you can't AirDrop photos from iPhone to PC. AirDrop is not supported on Windows systems.
If you want to wirelessly transfer iPhone photos to your computer, try the cloud methods mentioned in this guide.
Otherwise, AirDrop is certainly one of the best ways to transfer files from iPhone to Mac.
Want more tech tips like this?
Add us as a Preferred Source on Google.