Wondering how to transfer photos from your old iPhone to a new one, or simply between devices? Given that an estimated 2.1 trillion photos were taken worldwide in 2026, most on smartphones, it's clear photos are integral to our lives. This article provides the best methods to safely and efficiently move all your pictures when you upgrade your iPhone, so you can keep your cherished memories with you.
Jump straight to:
Method 1: TouchCopy (how to transfer photos from iPhone to iPhone without iCloud)
Best for: Full & selective transfers with maximum control and backup safety
First up is our easiest and most robust method - the TouchCopy software.
TouchCopy is the only tool you need for managing your iPhone with your computer. With it, you can transfer any photos and videos from your iPhone - even media sent and received in text messages, iMessages and WhatsApp chats!
TouchCopy works locally on your computer, so you don't need to worry about uploading your photos to iCloud or other online services. In this method, we'll need to transfer photos from iPhone to computer, then transfer the photos from computer to your new iPhone.
Let's see how to transfer photos from iPhone to iPhone...
- Open TouchCopy and connect your iPhone.
- View your iPhone photos via your computer by clicking "Photos" in TouchCopy.
- Click "Save to PC" or "Copy to Mac" to copy your photos to your computer.
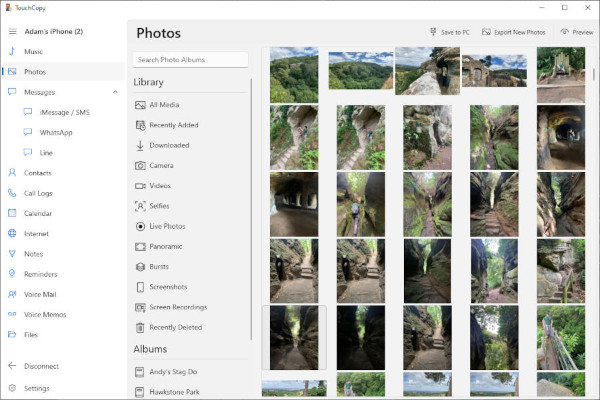
Transferring Photos from iPhone to computer with TouchCopy - Once the copy is complete, close TouchCopy and safely disconnect your iPhone.
- Connect your new iPhone and open iTunes or the Apple Devices app on Windows, or Finder on macOS.
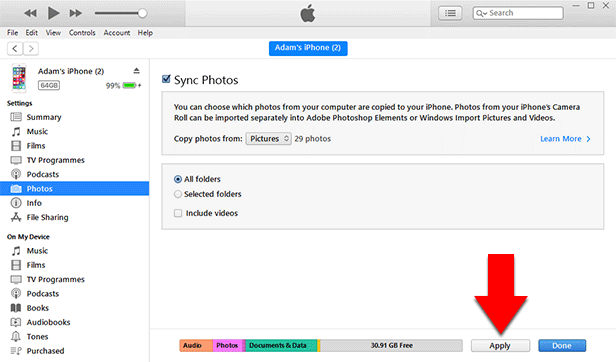
- Select your device > click Photos > tick Sync Photos > choose the folder containing your photo/video library > click Apply > click Sync.
Transferring Photos from PC to iPhone with Apple Devices
Transferring Photos from Mac to iPhone with Finder


Do you have important media in your text messages which aren't saved to your Photos app? Find out how to save photos from your text messages, iMessages and WhatsApp chats with TouchCopy.
Important: Syncing will replace all photos and videos currently on your iPhone with the media stored in the selected folder on your computer. To avoid losing anything, make sure you've saved all your photos and videos using TouchCopy before you sync.
Method 2: iCloud
Best for: Automatically syncing all photos between devices
Next up is Apple's cloud service - iCloud. iCloud is great because you can access any of your data that is stored in iCloud on any of your devices that are using the same Apple ID. The restrictions for this method are that it requires an internet connection to access photos or upload photos to iCloud, and that your iCloud space is limited.
When you sign up for iCloud, you get 5GB of space free. If you need any additional space, you can take out a monthly subscription with your desired plan.
Let's see how to transfer photos from iPhone to iPhone using iCloud...
- On your iPhone, go to Settings > [Your Name] > iCloud.
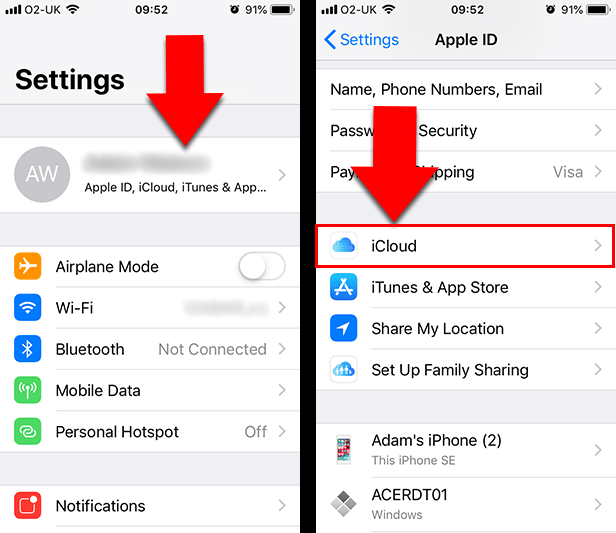
- Tap "iCloud Photos" and turn on "Sync This iPhone".
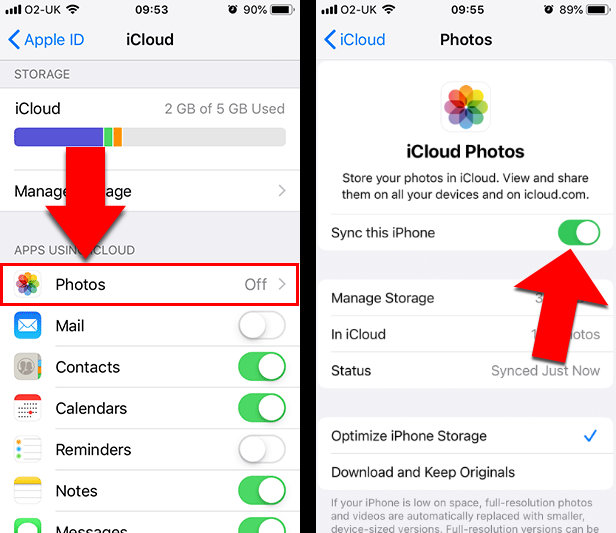
- Select either "Optimize iPhone Storage" or "Download and Keep Originals".
- Your iPhone will start uploading photos to iCloud.
- Once done, enable iCloud Photos on the other iPhone.
Once the photos are uploaded to iCloud, you can access them in the Photos app of your new iPhone, as long as you're signed in with the same Apple ID.
Method 3: iTunes, Apple Devices app or Finder
Best for: Full one-time sync using a computer and USB cable
This method uses Apple's own tools: the Apple Devices app on PC, Finder on Mac, or iTunes on older systems.
However, it has a few important limitations to be aware of before you begin:
- You can only transfer photos from your iPhone's Camera Roll (not iCloud Photos, photos synced from computer, shared photos)
- Syncing photos from your computer can overwrite your current photo library on your iPhone, risking data loss if not backed up.
- You can't transfer photos to your iPhone with this method if you use iCloud Photos (as seen in Method 2).
To avoid any complications, we recommend using Method 1.
Step 1: Transfer photos from iPhone to computer
- Windows- Connect your iPhone to your PC or laptop with a USB cable > In the AutoPlay popup, click Import Pictures and Videos > Select a destination for the iPhone photos > Click Import.
- Mac- Connect your iPhone to Mac with a USB cable > Launch the Photos app > Select your device > Select the photos you wish to transfer > Click Import Selected. You can instead use the "Import All New Items" button to import any photos which you have not previously imported to your Mac before!
Step 2: Transfer photos from computer to iPhone
Important: Syncing replaces all photos and videos on your iPhone with the contents of the selected folder on your computer. To avoid data loss, ensure all your photos and videos are backed up to your computer first.
-
If using Windows 10 or later...
- Connect your new iPhone to your computer using your USB cable.
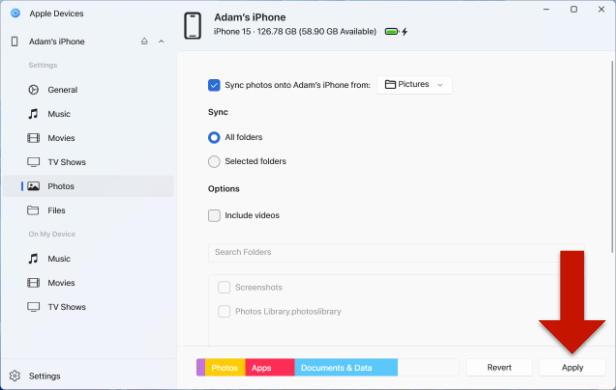
- Launch the Apple Devices app.
- Select "Photos" from the list of settings.
- Check "Sync photos onto your device from:" and choose an application or folder.
- Click "Apply", and then "Sync".

-
If using a Mac with macOS Catalina or later...
- Connect your new iPhone to your Mac with a USB cable.
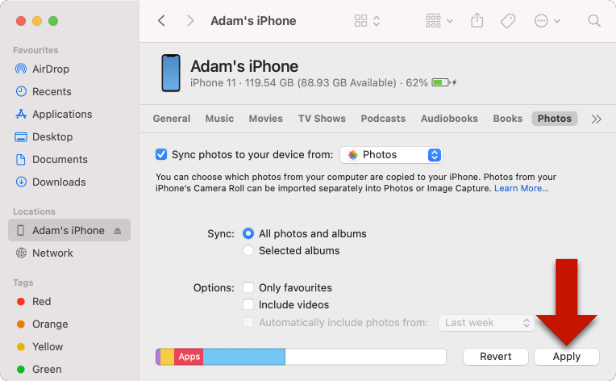
- Launch the Finder app.
- Select your device.
- Click the "Photos" header.
- Check "Sync photos to your device from:" and choose an application or folder.
- Click "Apply", and then "Sync".
-
If using Windows 8 or earlier or macOS Mojave or earlier...
- Connect your new iPhone to your computer with a USB cable.
- Launch iTunes.
- Click your device icon.
- Click the "Photos" header.
- Check "Sync Photos" and choose an application or folder.
- Click "Apply", and then "Sync".
Method 4: Send photos directly from iPhone to iPhone with AirDrop
Best for: Quickly sending a few photos wirelessly
If you only have a few photos to send, Apple's free AirDrop service may be all you need. This method is really quick and easy once you've set up AirDrop on your iPhones.
Before you begin sending photos, open the Control Center on your iPhone by swiping down from the top-right corner of your screen (if using an earlier iPhone than iPhone X, you can instead swipe up from the bottom of your screen).
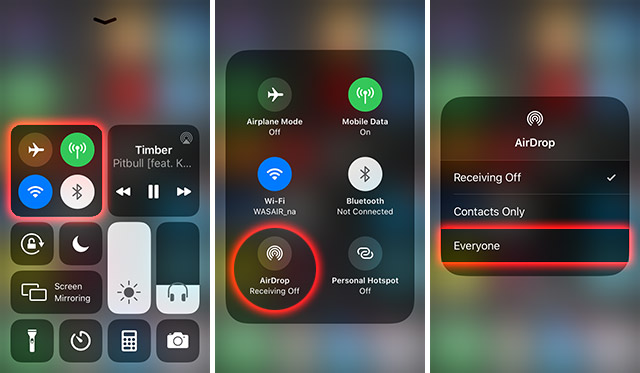
- Open the Control Center on each of your iPhones, and turn on Wi-Fi and Bluetooth.
- Tap and hold the connection section of the Control Center, then ensure AirDrop is turned on. When you enable AirDrop, choose either Contacts Only or Everyone. Also, ensure Personal Hotspot is turned off.
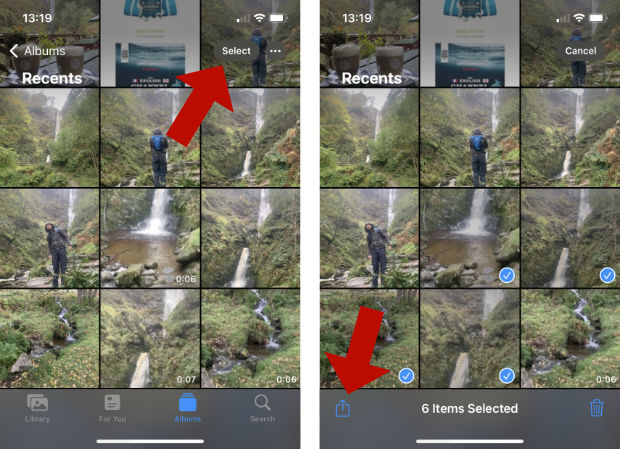
- Open the Photos app on your first iPhone and select the photos you want to copy to your second iPhone. To select multiple photos, you can tap "Select", and then tap all the photos you like.
- Tap the Share icon at the bottom of your iPhone screen, then tap the AirDrop option.
- Choose the person or device you want to send the photos to.
- You may need to tap to accept the files on the receiving device.
Conclusion
Transferring photos from one iPhone to another has never been easier, thanks to the variety of methods available. Whether you prefer the flexibility of TouchCopy, the convenience of iCloud, the integration of iTunes or Finder, or the simplicity of AirDrop, you can find a solution that suits your needs.
By following the steps in this guide, you can ensure your cherished memories are safely and efficiently moved to your new device.
Thanks for reading!
Want more tech tips like this?
Add us as a Preferred Source on Google.