iPhones now can have huge storage capacities (up to a whopping 1TB!), however, the size of photos also increases with the improvements in camera technology. So, to save precious space on your device, you may want to transfer photos from your iPhone to your Mac.
Whether you want to keep a copy of your photos, edit them on your Mac, or clear space on your iPhone, this guide will show you the best ways to transfer photos from iPhone to Mac.
Quick jump to any of the sections in the guide:
Method 1: Mac Photos app
Best for: Built-in USB imports to the Mac Photos app
Using the Photos app, which comes preinstalled on Mac, you can import photos directly from your iPhone using a USB cable.
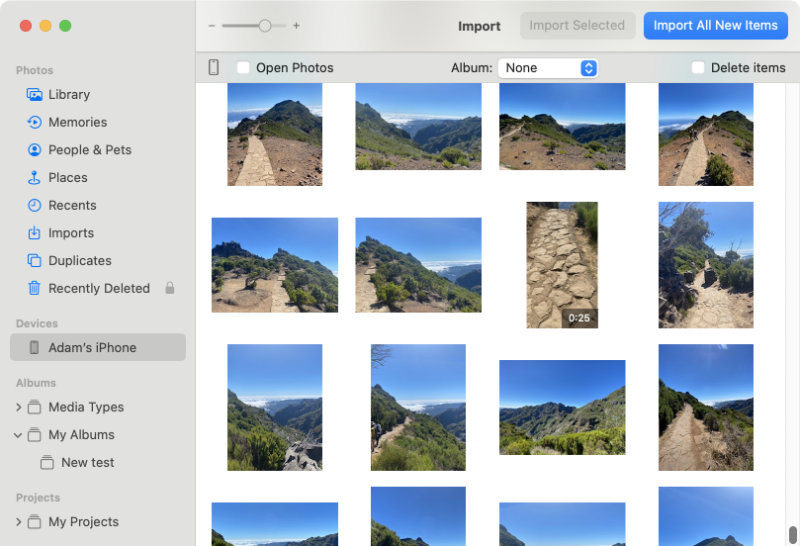
How to import photos from iPhone to Mac using the Photos app
-
Connect your iPhone to your Mac using a USB cable.
-
Open the Photos app on your Mac.
-
Click your device from the sidebar to see its photos.
You'll now see the Import screen for your device. Here, the app shows all your iPhone photos and videos which have not yet been saved to your Mac Photos library.
-
Select your photos and click "Import Selected" or click "Import All New Items".
You can select individual photos by clicking them. To select multiple photos, click and drag a selection box around them.
Using "Import All New Items" will import all photos and videos from the iPhone which are not present in Mac Photos, regardless of selection.
Your photos and videos will be imported directly into the Photos app on your Mac.
Extra: Import options in the Mac Photos app:
- Album organization: Using the Album dropdown selector, you can select an existing album in your Photos library or create a new album. The album selected will be the album to which your iPhone media will be imported.
Note that you won't be able to select an iPhone album to copy using this option. To maintain iPhone albums, we recommend using TouchCopy (method #3) instead. - Item deletion: If you tick this checkbox, any time you import photos or videos using the Photos app, those imported items will then be deleted from your iPhone.
Pros
- Direct transfer with USB cable.
- Import selected photos or regularly back up new photos.
- Option to delete photos after they've been copied.
Cons
- Unable to copy photos from messages.
- Does not support copying of photo albums from iPhone.
- Unable to select photos by type (camera, selfies, panoramic, etc.).
Method 2: AirDrop
Best for: Quickly sending a few photos wirelessly
AirDrop is a fantastic tool inbuilt on both iPhone and Mac that you can use to transfer photos via Wi-Fi between the devices.
This method does not have the same control over photo transfer and organization as methods like TouchCopy and Mac Photos, however, it will certainly suit those who want to quickly send a few key photos.
How to AirDrop photos from iPhone to Mac
-
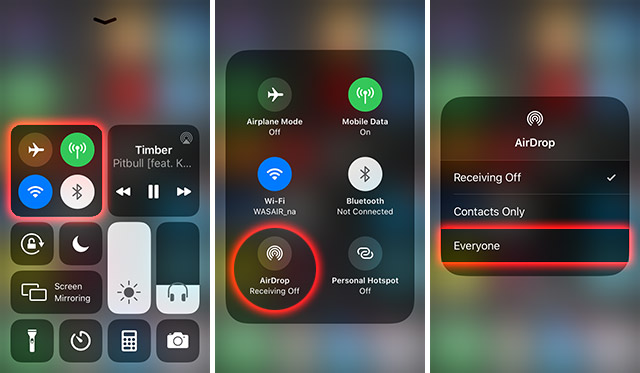
Turn on Wi-Fi, Bluetooth and AirDrop on your iPhone and Mac.
Open the Control Center on your iPhone by swiping down from the top-right corner of your screen (or if using a device older than iPhone X, swipe up from the bottom of your screen).
Tap and hold the connection section of the Control Center to access more options. Ensure that Wi-Fi and Bluetooth are ON. Then tap AirDrop and choose either "Contacts Only" or "Everyone".
-
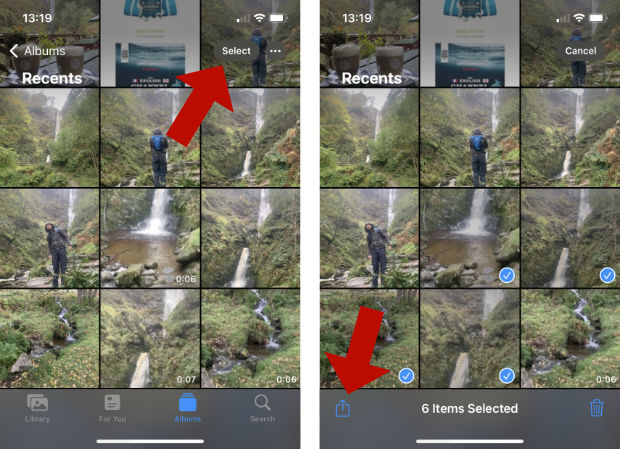
Open the Photos app on your iPhone and select the photos you want to send.
To select multiple photos and videos, tap "Select". Now, when you tap another photo, it will be added to your current selection.
-
Tap the "Share" icon and choose "AirDrop".
-
Select your Mac to send your photos.
You may get a notification on your Mac that the iPhone is attempting to send photos. If so, click Accept.
Photos and videos sent to your Mac with AirDrop will be saved to your Downloads folder.
Pros
- Direct and wireless transfer.
- Quick and easy.
Cons
- Does not support copying of photo albums from iPhone.
- Unable to copy photos from messages.
- Transferred photos are saved to Downloads, rather than to Mac Photos.
Method 3: TouchCopy
Best for: Preserving albums, smart backups and saving photos from text messages
If you want more control than Apple's built-in tools offer, TouchCopy is the best option for selectively copying photos, preserving albums, regular photo backups, and even exporting pictures from messages.
TouchCopy is an app for Mac and Windows that lets you copy any content from your iPhone to your computer.
 TouchCopy - Copy iPhone content to computer
- Fast and safe transfer of photos and videos from iPhone to Mac.
- Conveniently transfer via USB cable or Wi-Fi.
- Keep your photos organized in albums or save them by date.
- Copy photos by type (Photos taken on your camera, videos, selfies, recently deleted, etc.).
- Back up photos the smart way with the Export New Photos feature.
- Transfer photos from iPhone messages to the computer.
How to transfer photos from iPhone to Mac using TouchCopy
-
Open TouchCopy on your Mac.
If you don't already have it, you can download and install TouchCopy for free.
-
Connect your iPhone.
You can connect your iPhone using Wi-Fi or a USB cable.
-
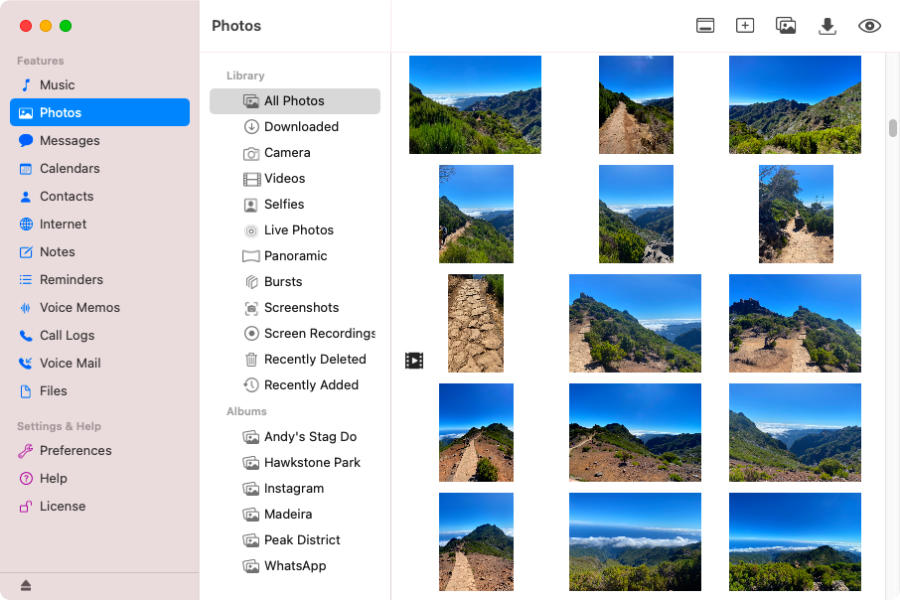
Click "Photos".
The Photos section in TouchCopy displays the iPhone's photos and videos.
-
Select the photos you want to copy.
- Select individual photos.
- Click an Album or photo category (videos, selfies, recently deleted...) to select it.
- Select all photos in your current view with Cmd+A on your keyboard.
-
Copy the selected photos to your Mac.
In the toolbar at the top of TouchCopy, you can choose to copy your selected photos to the Mac Photos app (
 ), or choose a specific folder on your Mac to copy to (
 ).
).
Your photos will be copied in the same quality as they are stored on your device. TouchCopy can back up all image formats, from JPEG, HEIC, animated GIFs and even Apple ProRaw photos!
To regularly back up iPhone photos to your Mac, utilize the Export New Photos feature (![]() ) in TouchCopy. When connecting your iPhone to TouchCopy, it will display new photos since the last backup, enabling you to selectively copy only unsaved photos to your Mac.
) in TouchCopy. When connecting your iPhone to TouchCopy, it will display new photos since the last backup, enabling you to selectively copy only unsaved photos to your Mac.
Discover more about how to use TouchCopy to transfer photos from iPhone to computer.
How to transfer photos from iPhone messages to computer
It's not only photos and videos you can transfer with TouchCopy. You can copy other content like messages, contacts, call history, voicemails, calendars and more.
A standout TouchCopy feature in the scope of this article is that it can access and copy pictures from messages on an iPhone. Photos received in messages are not saved to the Photos app on the iPhone by default, so other methods in this guide will not be able to save them.
Find out how to transfer photos from iPhone messages to computer with TouchCopy.
Pros
- Direct transfer with USB cable or Wi-Fi.
- Import selected photos or regularly back up new photos.
- Copy iPhone photo albums to maintain album structure.
- Ability to save photos from text messages.
Cons
- Purchase required for full license - free demo available allowing for up to 100 free photo copies.
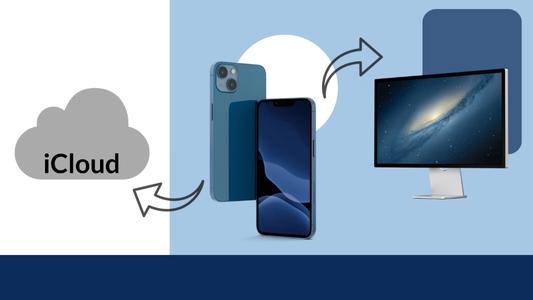
Method 4: iCloud
Best for: Automatically syncing your photo library across Apple devices
If you store your photos in iCloud, you can access them on any device which uses your Apple ID. So, if you sync your iPhone photos with iCloud, you can also access them on your Mac!
Note that you'll only have 5GB of iCloud storage space unless you subscribe for more, so ensure that you have enough space before turning on iCloud Photos on your iPhone.
How to sync photos from iPhone to Mac using iCloud
-
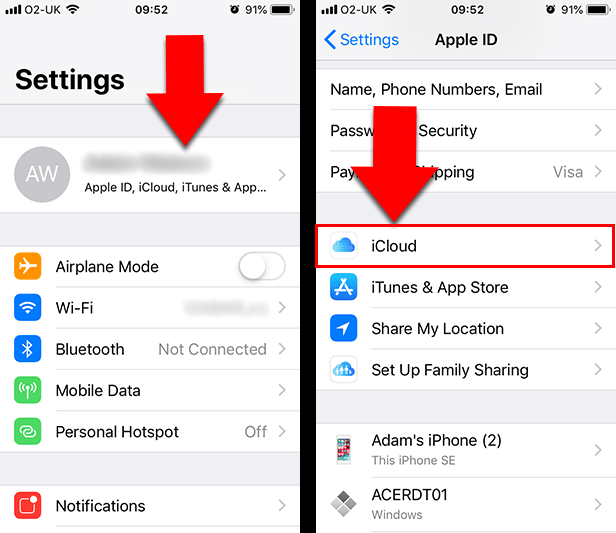
On your iPhone, go to Settings > [Your Name] > iCloud.
-
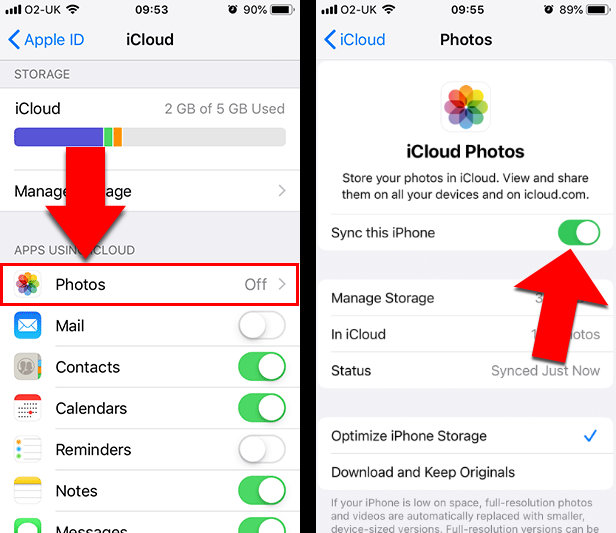
Tap Photos and then toggle on "Sync this iPhone".
You will receive a notification if you do not have enough iCloud storage space available for your photos and videos.
Once your photos have been uploaded to iCloud, you'll be able to access them in the Photos app on your Mac.
If your iPhone photos do not appear in the Mac Photos app, click the Apple menu icon > System Settings > Apple Account > iCloud > tick "Photos". Your Photos app will now populate with media saved in iCloud.
Pros
- Constant and automatic syncing of your photos.
- Access your photos on any device.
- Maintains iPhone photo album structure.
Cons
- Only 5GB of free storage - monthly subscription required for more storage space.
- Unable to copy photos from messages.
Method 5: Other Cloud Services
Best for: Making use of an existing non-iCloud account
If your iCloud is already full, or you simply prefer to use a different platform, you can copy photos from iPhone to Mac using other cloud services like Google Drive, Dropbox and OneDrive.
There are 2 ways to do this.
-
Via a web browser: Visit the website of your chosen cloud service on your iPhone, log into your account (or create one), and upload your photos.
-
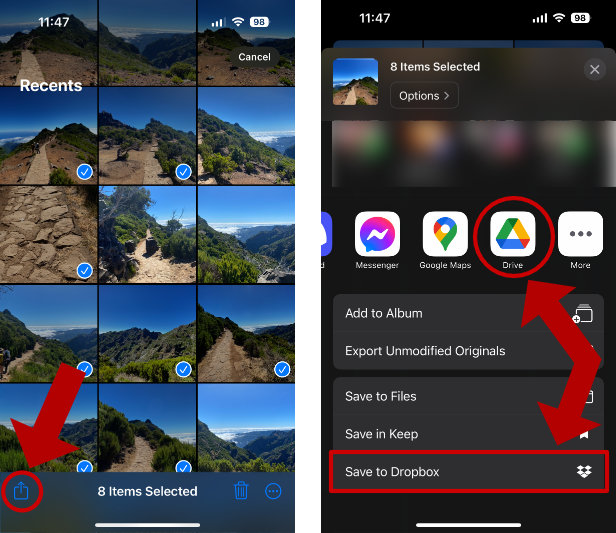
Via the iPhone app: Each cloud service has its own mobile app. You can download your chosen cloud service app from the App Store on your iPhone.
Once installed, you can log into your account (or create one). Now, you can select media in the Photos app on your iPhone and upload them to your chosen service via the app!
To do this, open Photos on your iPhone, select the photos you want to upload, and then tap the Share icon at the bottom of your screen. Select your chosen app and follow the steps on screen to complete the upload.
Once the photos have been uploaded to the cloud service of your choice, you can log into the same account via the website on your Mac to view the photos. You can even download them to your Mac if you wish.
Pros
- Access your photos on any device.
Cons
- Free storage allowance varies per service - a monthly subscription may be required for more storage space.
- Does not maintain iPhone photo album structure.
- Unable to copy photos from messages.
Method 6: Email or Message
Best for: Sending a few photos without using a cable
If you only need to transfer a few photos, you may choose to simply send them from your iPhone to your Mac via a message or email. Note that depending on the channel you use, there may be file size limits to how many photos you can send in one go.
The idea here is to open your email manager on your iPhone, create a new email to yourself, and attach your desired photos. After sending the email, access the same email account on your Mac and download the attached photos.
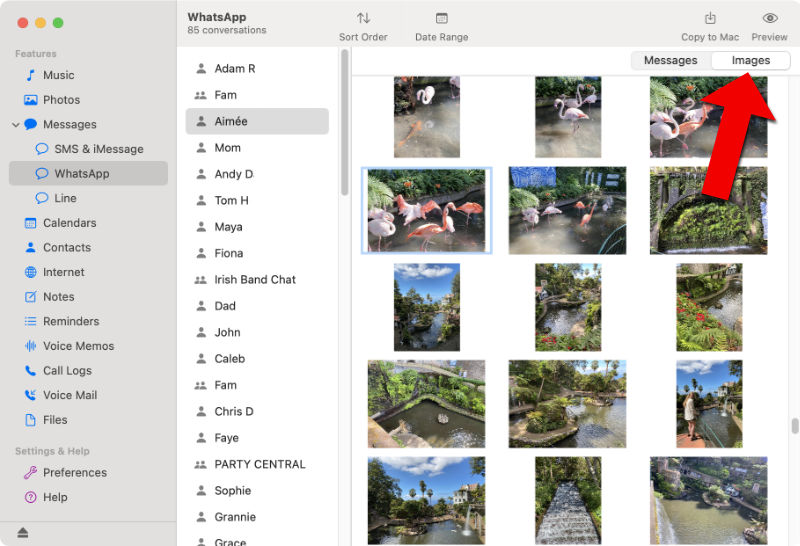
Similarly, if you use a messaging app like iPhone "Messages" or WhatsApp, you can send photos to yourself. Note that some mobile plans may charge for sending MMS messages (messages sent with multimedia attached), so if you are not using iMessages or WhatsApp, check that you won't get charged for sending photos!
Pros
- Can be fairly quick for a small number of photos.
Cons
- Limited number of photos you can transfer, depending on method.
- Does not maintain iPhone photo album structure.
- Unable to copy photos from messages.
Comparison of the methods
To help you quickly compare the different methods, here's a side-by-side breakdown of how each option performs.
This table highlights key differences in speed, flexibility, and features so you can choose the best way to transfer your iPhone photos to your Mac.
| Method | Connection | Select specific photos | Regular / continuous backups | Keeps album structure | Batch transfer support | Cost |
|---|---|---|---|---|---|---|
| Mac Photos app | USB | Yes | Yes | No | Good | Free |
| AirDrop | Wireless | Yes | No | No | Poor | Free |
| TouchCopy | USB or Wi-Fi | Yes | Yes | Yes | Excellent | Free trial / paid |
| iCloud | Wireless | Limited | Yes | Limited | Fair | Free up to 5GB |
| Other Cloud Services | Wireless | Yes | Yes | No | Fair | Free tier / paid |
| Email or Message | Wireless | Yes | No | No | Poor | Free |
Conclusion
Now you know the best ways to transfer photos from your iPhone to your Mac. Each method has its own strengths depending on how many photos you're moving and how much control you need. If you're still unsure, here are some quick recommendations:
Best All-Rounder
TouchCopy offers the most complete solution for transferring photos from iPhone to Mac. It gives you full control over what you copy, preserves album structure, supports both USB and Wi-Fi, smart backups, and even lets you export photos from messages. It's ideal if you want a reliable, flexible way to manage and back up your photos.
Best Built-in Option
The Mac Photos app is the easiest way to import photos using a USB cable. It works seamlessly with macOS and is perfect for quickly importing new photos or maintaining a simple backup routine, although it offers less control over organization.
Best for Quick Wireless Transfers
AirDrop is perfect for sending a small number of photos quickly without cables. It's fast and convenient, but not designed for large transfers or ongoing backups.
Best for Automatic Syncing
iCloud is the most convenient way to keep your photos synced across devices automatically. Once enabled, your photos will appear on your Mac without any manual transfer, though storage limits and upload time can be a drawback for larger libraries.
Thanks for reading!
Want more tech tips like this?
Add us as a Preferred Source on Google.