SD cards are a convenient medium on which to store large files like photos and videos. This makes them desirable for people who take lots of pictures on their mobile phones - devices which can quickly fill up with such media.
Whether you want to simply have a backup of your photos, or you want a copy of your photos before deleting them to clear space on your phone, this guide will help.
Unlike many Android devices, iPhones do not have an inbuilt SD Card slot. So how do you move your iPhone photos to an SD card? Here we cover the easiest 3 ways to do just that. Let's get started!
Quick jump to any of the sections in the guide:
1. Transfer iPhone Photos to SD Card without a computer
As iPhones do not have an SD card slot, you can't insert such storage directly into the phone. However, you can use an SD card reader with your iPhone to directly copy content between your device and an SD card.
Using an adaptor enables you to manage your SD Card's files and folders from the Files app on your iPhone. However, to copy your pictures to the SD Card, you'll need to use the iPhone Photos app.
How to transfer photos from iPhone to SD Card using an adaptor
-
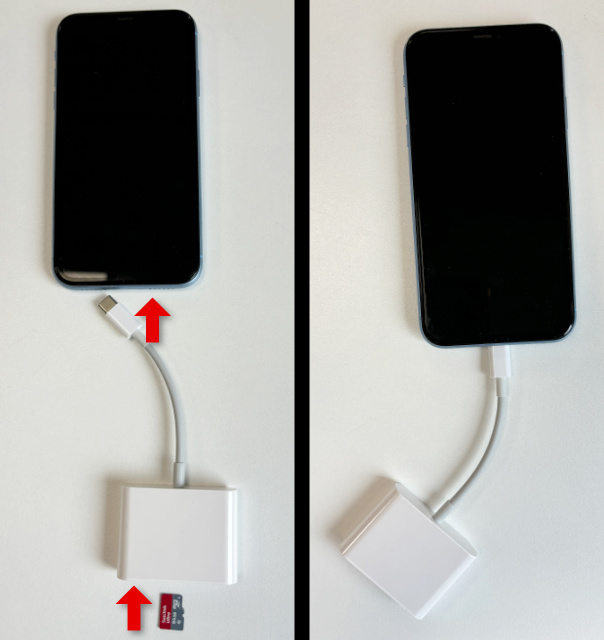
Insert your SD Card into the reader, then connect the reader to your iPhone's charging port.
-
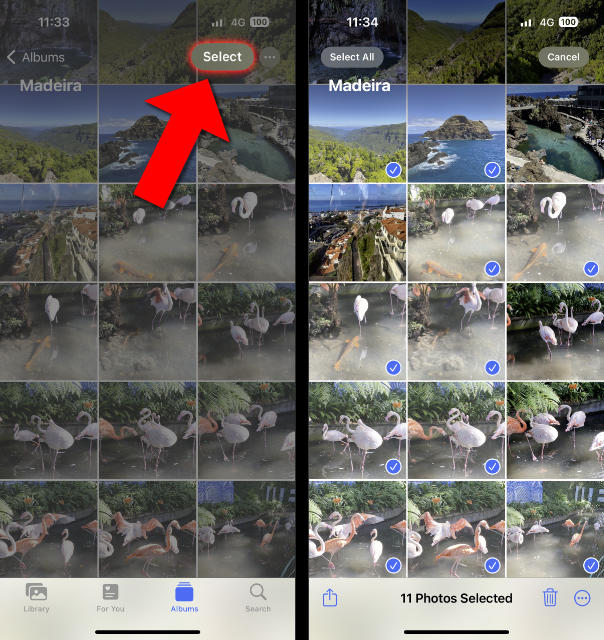
Open the Photos app on your iPhone and select the photos you want to copy.
- While viewing your general Library in the Photos app, tap "Select", then tap all the photos you want to select.
- While viewing an Album you can select all photos in the album at once. To do this, tap "Select" then tap "Select All".
-
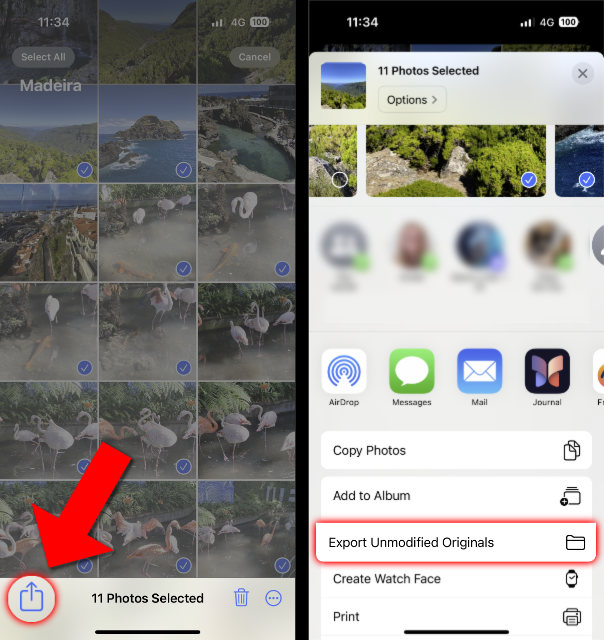
Tap Share and select "Export Unmodified Originals".
-
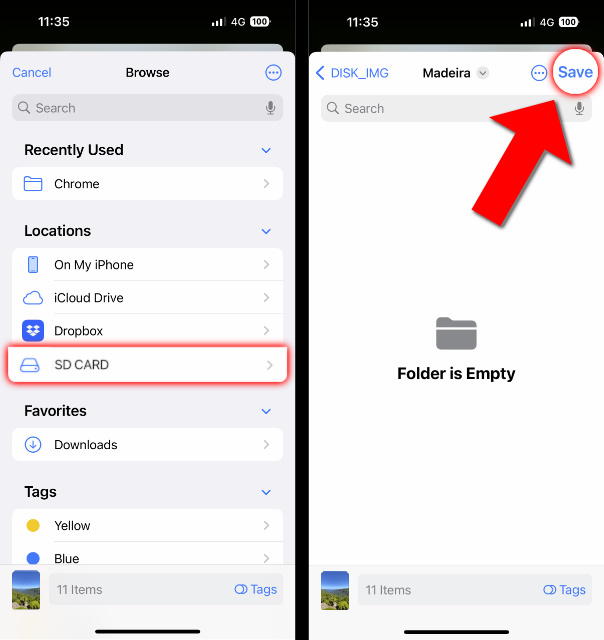
Select the SD card location, choose a folder in which to store your photos, then tap "Save".
Here, you may wish to create a new folder for your exported photos. In my example below, I created a new folder to store my holiday photos in, so I can easily organize my library.
Pros
- Direct transfer from iPhone to SD Card.
- Quick and easy.
- Does not require the use of a computer.
- Ability to view your entire library, or filter by album or media type (Selfies, Slow-Mo, People, etc.).
Cons
- Requires an SD Card reader.
- Cannot perform a differential photo backup.
- Selecting photos can be fiddly.
- Unable to group photos by date.
- Does not maintain album structure.
- Unable to copy photos within messages.
2. Conveniently save photos to SD Card using your PC/Mac
If you don't want to fork out for an iPhone-compatible SD card reader, you can use your computer. Many computers have an SD card slot built-in, but if yours doesn't, you can use an SD card reader for this method.
With the TouchCopy app for PC/Mac, you can easily copy photos, videos, messages and other files from your iPhone to your computer (and by extension, to a connected SD Card). Unlike the other methods in this guide, TouchCopy can also copy photos from within your text messages!
TouchCopy is bursting with features to make saving your photos easy and comprehensive. One of the biggest benefits, in our opinion, is providing an easy and safe way to regularly back up photos from your iPhone. TouchCopy will let you know what photos on your device you haven't backed up yet, to save you time (and avoid creating duplicates on your SD Card or computer)!
Creating Differential Backups of iPhone Photos to an SD Card
-
Insert your SD Card into your computer.
If your computer does not have an SD card slot, connect your SD card reader to your computer, then insert your SD card into the reader.
-
Open TouchCopy on your computer and connect your iPhone.
-
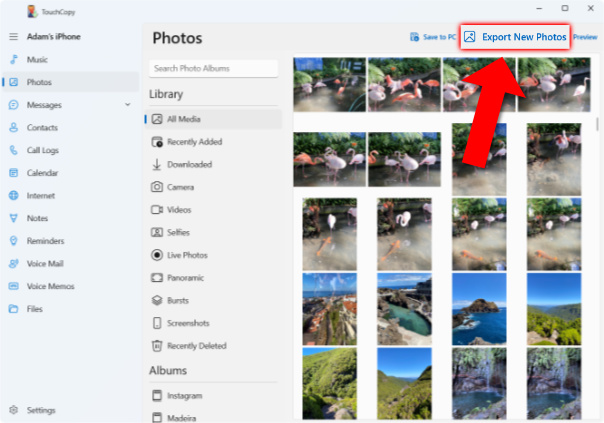
Click "Photos" and then click "Export New Photos" or the Export New Photos icon (
 ) on Mac.
-
Choose where you'd like to save your photos.
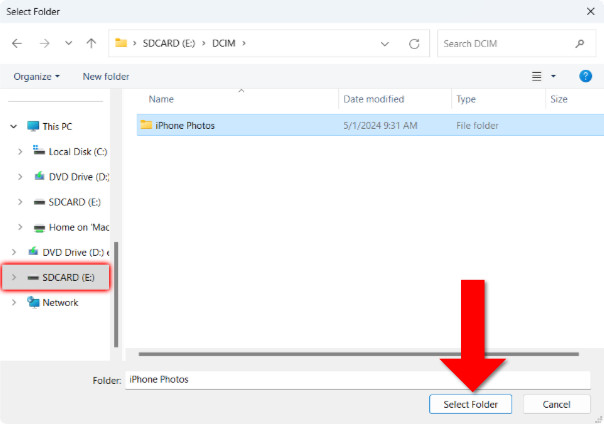
Click "Browse" when prompted, then select your SD Card.
You may wish to create a new folder here for your iPhone photos, to keep your SD Card organized.
Click "Select Folder" when you have made your selection.
-
Select the photos you want to copy.
TouchCopy will compare the photos on your device with the photos in your selected SD Card folder. It will then let you know which iPhone photos are not in your chosen folder on the SD Card. This will be useful when you take some more pictures and want to back them up with TouchCopy in the future!
You can export all new photos on your iPhone to your SD card by clicking "Select All", or use the checkboxes next to each photo.
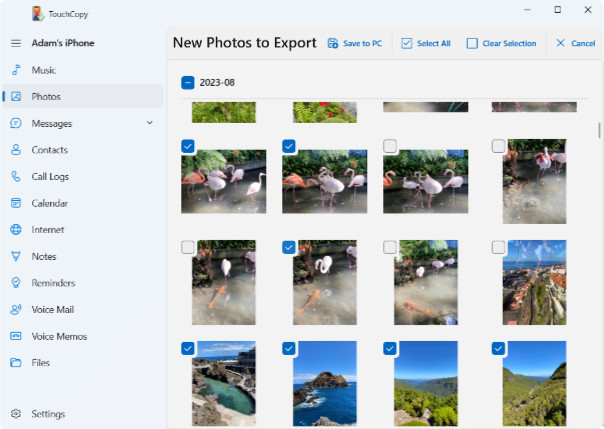
- Click "Save to PC" or the Save to Mac icon (
 ).
).
Other notable TouchCopy photo management features
- Group photos by date - When using "Export New Photos", choose to group your media by the date they were taken (day / month / year).
- Maintain album structure - When instead using the "Save to PC/Mac" feature you can copy your photo albums. TouchCopy will create a separate folder for each of your albums.
- Media-type filtering - When using other methods, you'll be faced with a long list of disorganized photos. With TouchCopy, not only can you view your library by album, but you can filter by Selfies, Live Photos, Videos, Recently Deleted and more.
- Full control of your media - Ability to convert HEIC formatted photos to JPG (in case you aren't able to view HEICs on your computer). You can also choose how to save your Live Photos (as images, video, or both)!
- Copy photos from within messages - if the photos you receive in iMessage and/or WhatsApp are not automatically set to save to the Phone Photos app, the other methods in this guide will not find them. Using TouchCopy's Messages feature, however, you can save images from within messages, the conversations themselves, or both!
Watch the video to see how to copy iPhone photos with TouchCopy
Pros
- May not require a separate SD Card reader.
- Copy photo albums to maintain album structure.
- Save photos by date (day, month, year).
- Filter media by type for easy viewing and saving.
- Perform differential photo backups.
- HEIC to JPG conversion.
- Can copy photos within messages.
Cons
- Purchase required for full license - free demo available allowing for up to 100 free photo transfers.
3. Copy photos using File Explorer on a PC
If you don't mind putting in a bit of work to organize your photos yourself, you can use Windows File Explorer to copy photos from your iPhone to your SD Card.
This is a very easy method which allows drag-and-drop copying of your photos from one device to the other, however, if you want more control over your photos, including maintaining albums, we recommend using TouchCopy instead.
How to transfer photos from iPhone to SD Card using File Explorer
-
Insert your SD Card into your PC.
If your PC does not have an SD Card slot, you can insert the SD Card into an SD Card reader, and then connect the reader to the PC.
-
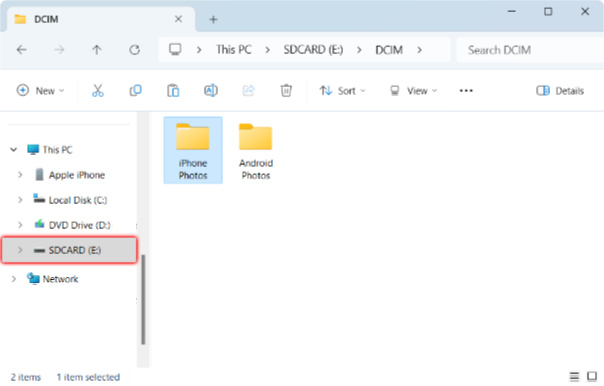
Open File Explorer and select your SD Card.
Create a new folder on your SD Card or navigate to an existing folder that you'd like to save your iPhone photos to.
-
Connect your iPhone to your PC using your USB cable.
-
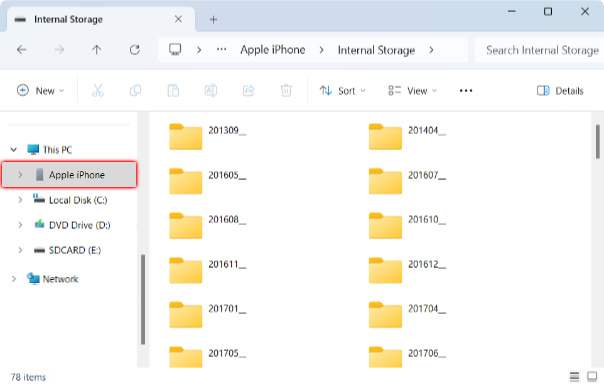
Open a new File Explorer window and select your iPhone.
To open a new window, right-click the File Explorer icon at the bottom of your screen and click "File Explorer".
Select your iPhone from the list on the left of the window.
-
Access your iPhone photos.
To do this, open "Internal Storage" where you'll find a list of folders which contain your iPhone photos by month.
-
Select the photos you want to move from your iPhone.
You can do this by selecting folders, or individual photos within your folders.
-
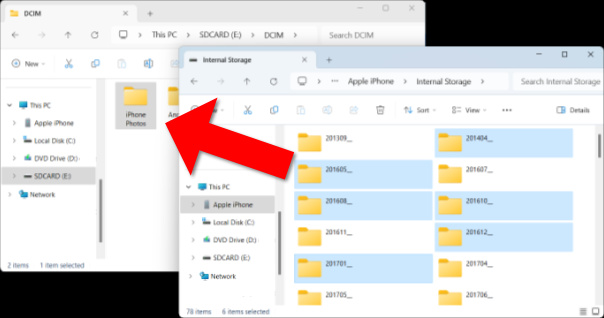
Drag your selected photos from iPhone to SD Card.
Dragging your selection from one File Explorer window to the other will copy your photos to your desired location. Ensure that you drag your selection onto the folder where you want to save the photos.
Pros
- May not require a separate SD Card reader.
- Quick and easy with drag and drop.
- Photos are organized into folders by month.
Cons
- Does not maintain album structure.
- Cannot perform a differential photo backup.
- Unable to filter the library by media type.
- Inconvenient to search through folders during the selection process.
- Unable to copy photos within messages.
Looking to clear space on your iPhone?
If your aim is to free up iPhone storage space, you may wish to remove media from your iPhone which you have safely backed up to your SD Card.
Conclusion
Through extensive research and testing, we've compiled the best methods for transferring photos from iPhone to an SD Card in this comprehensive guide.
You now have all the information you need to choose the best method for you. Consider:
- whether you need to use (and/or purchase) an SD Card adaptor;
- how much time you want to spend on managing your photos (if you are shorter on time or experience, you may want an app like TouchCopy to do the work for you);
- as well as how much organizational control you need over your photo library.
If you are still unsure, here are our recommendations:
Best All-Rounder
TouchCopy offers the most control over your photo library by far. This feature-rich software simplifies copying photos from your iPhone to an SD Card via your PC or Mac. Easily navigate and view your iPhone photo library by album, media type, and large previews. Organize your library by date and maintain albums effortlessly. The app notifies you of iPhone photos not yet backed up, making regular backups a breeze.
Best Direct Transfer
You can connect an SD card directly to your iPhone using a compatible SD card reader and manage its content from the iPhone itself. Copying photos is straightforward with the Photos app's filtering options. However, this method doesn't maintain album structure and requires manual organization into folders on the SD card.
Thanks for reading!
 Publisher:
Wide Angle Software


