How to convert HEIC to JPG on iPhone

Introduction
High Efficiency Image File Format (HEIC) is an image file format that boasts a smaller file size and an improved image quality compared to JPG.
HEIC was adopted by Apple in 2017 and is available on iOS devices running iOS 11 or newer, starting from the iPhone 7. HEIC is supported on Windows 11 and macOS High Sierra (10.13) or newer.
The trouble is, the majority of Windows users are still using Windows 10, which does not natively support HEIC. For this reason, you may find that you need to convert HEIC images to the widely supported JPG format.
This guide will show you 4 different ways to convert HEIC images from iPhone to JPG:
Quick jump to:
How to convert HEIC from iPhone to JPG on Windows
With TouchCopy, you can copy any kind of content from your iPhone to your PC including Messages, Contacts and Call History. When it comes to your Photos, you can choose to copy your HEIC photos as HEIC, convert HEIC to JPG, or both!
How to convert HEIC to JPG on Windows with TouchCopy
- Download and install TouchCopy on your PC.
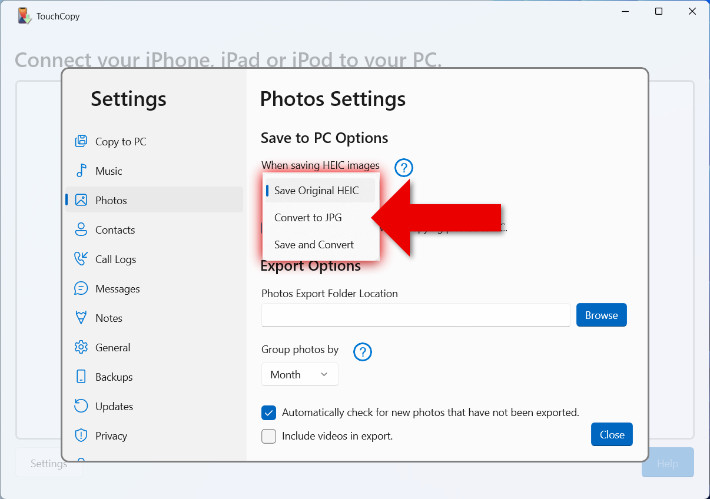
- Launch TouchCopy and go to Settings > Photos. Here, click the dropdown selector under "When saving HEIC images" and choose:
- "Convert to JPG": Whenever you save HEIC photos from iPhone to PC, TouchCopy converts HEIC to JPG, and saves only a JPG for you.
- "Save and convert": For each HEIC photo saved by TouchCopy, the original HEIC file will be saved, as well as a converted JPG version.
- Connect your iPhone to your computer via USB cable or Wi-Fi.
- In TouchCopy, click "Photos".
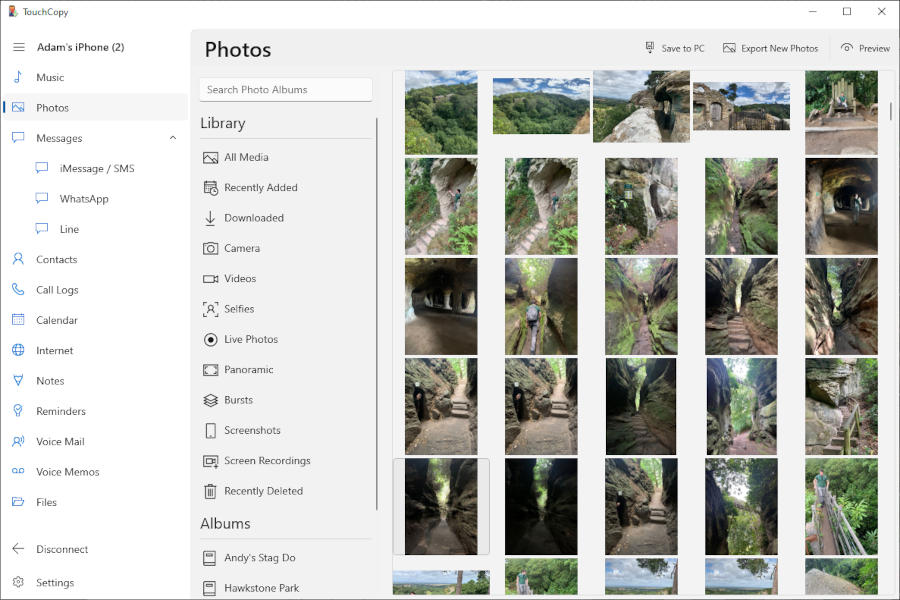
- Select the HEIC photos you want to convert to JPG.
- Click "Save to PC" and choose the folder on your PC to save the photos to.


Tip: You can use the "Export New Photos" feature in TouchCopy to find out which photos have not yet been copied from your iPhone, saving you time if you regularly back up your photos to PC!
How to view HEIC photos on Windows
If you use Windows 11, HEIC is supported by default, so you can simply open a HEIC photo in the Photos app and see it in all its glory.
Windows 10, however, does not have native support for HEIC. To view HEIC on Windows 10, you'll need to install Microsoft's HEIF Image Extensions (free) and HEVC Video Extensions ($0.99).
Once installed, you'll be able to view your HEIC photos in the Windows Photo app.
How to convert HEIC from iPhone to JPG on Mac
Mac has strong support for HEIC photos, from all the way back in macOS High Sierra (10.13). However, JPG has been around for much longer and has universal support. As such, you may still want to convert HEIC to JPG on Mac, if you plan to use your photos in certain apps or share them with others.
Tip: You can use TouchCopy to copy HEIC photos from iPhone to Mac!
How to convert HEIC to JPG using Preview on Mac
- Open a HEIC photo in the Preview app on Mac.
- At the top of your screen, click File > Export.
- Name your file and choose where to save it on your Mac.
- Use the "Format" dropdown menu to select "JPEG".
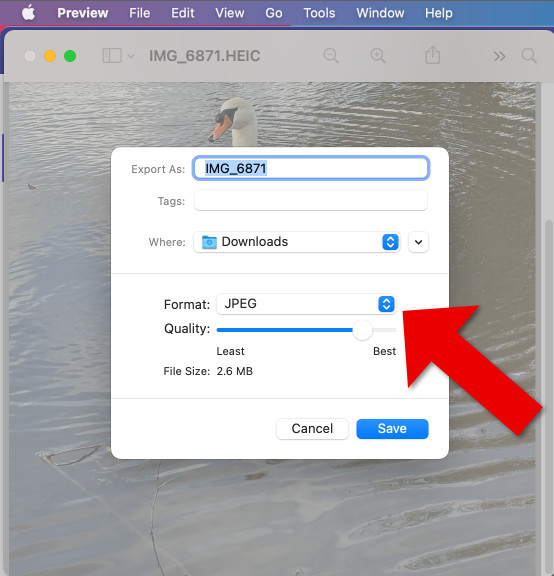
- Click Save.
How to convert HEIC to JPG on an iPhone itself
So, we've seen how to do it on a PC and on a Mac, but did you know that you can convert HEIC to JPG on an iPhone itself?
Not that using this method, both a HEIC version and a JPG version will be stored on your device. So, if you are worried about the limited storage on your iPhone, try saving to your PC or Mac using the methods above.
How to convert HEIC to JPG on iPhone
-
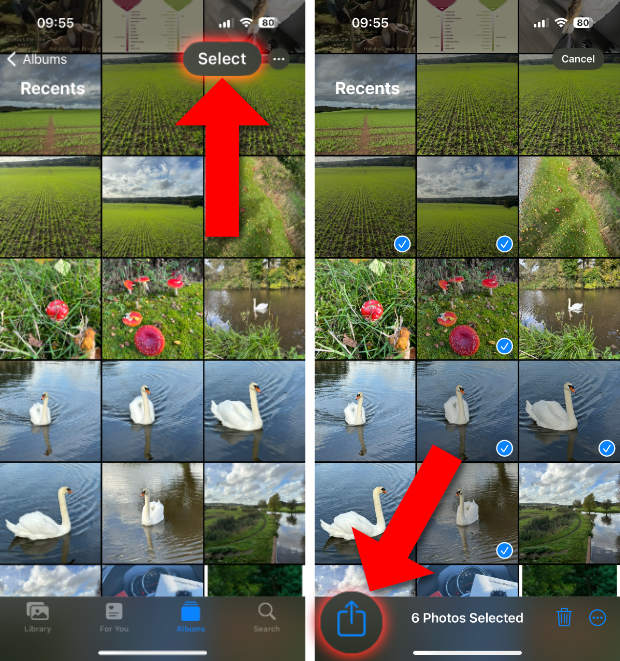
Open the Photos app on your iPhone and tap Select.
-
Select all the HEIC photos you want to convert, tap Share and choose "Copy Photos".
-
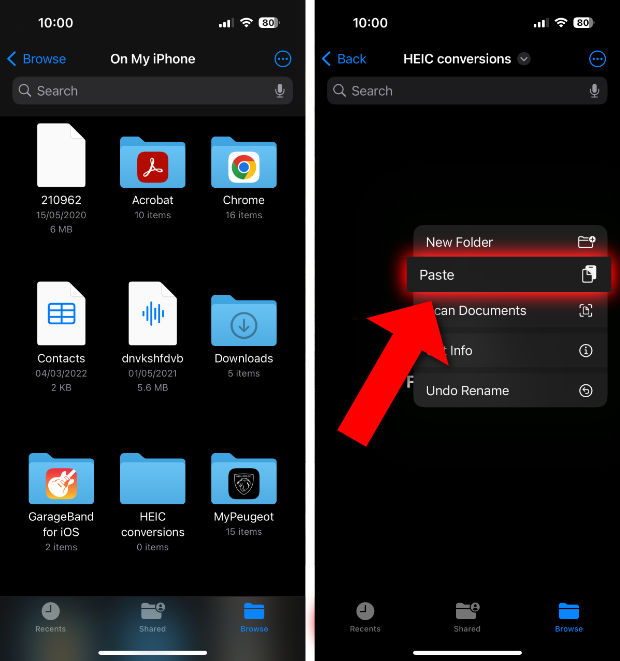
Open the Files app and navigate to "On My iPhone".
-
Long press and choose Paste in your desired folder.
-
The HEIC files will be converted to JPG and saved to this folder for you.
If you want an HEIC from your Files app in your Photos app, select the photo, tap Share, then "Save Image". The JPG will then be saved in your Photos app too.
How to save photos taken on iPhone as JPG by default
If your iPhone can take HEIC-formatted photos, any photo it takes will be stored in HEIC format by default. If you would prefer the photos your iPhone takes to be stored in JPG format instead, you can do this in Settings. To change the format, follow the steps below:
- Open the Settings app on your iPhone.
- Scroll down and select Camera.
- Tap the Formats option and select "Most Compatible".
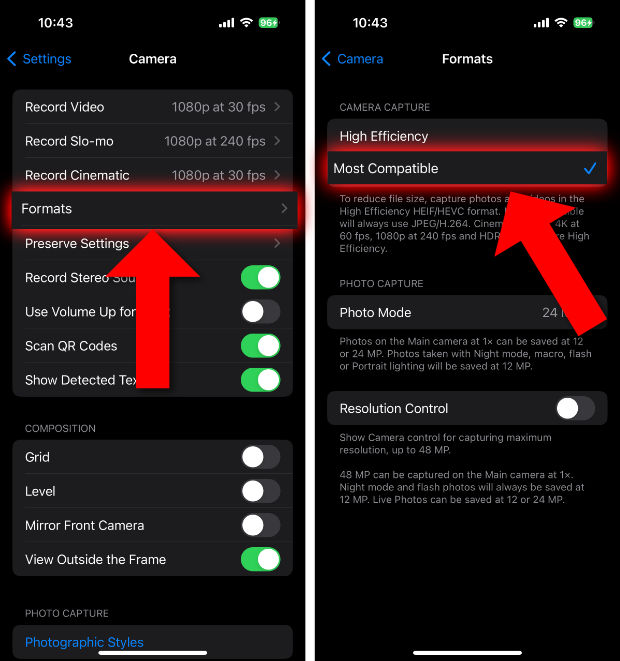
There are currently two options available. These are 'High Efficiency' and 'Most Compatible'. By setting the format to 'High Efficiency', future photos and videos will be stored as HEIF/HEIC files. By setting the format to 'Most Compatible', future photos and videos will be stored as JPG (JPEG/H.264) files.
Please note that changing the camera format will only affect future photos and videos that are taken after the format has been changed. Existing photos and videos will not be reformatted to the newly chosen setting.
Popular FAQs
- Transferring Photos from iPhone to Laptop: A Guide for PC and Mac
- How To Transfer Music and Photos from iPhone To External Hard Drive
- How to Transfer Video from iPhone to PC
- How to Transfer Photos from iPhone Messages to Computer
- How to Fix Photos Not Showing in Messages
- How to View HEIC Formatted Photos
- Backing Up ProRaw Photos on iPhone Pro Models
- How to Delete All Photos From iPhone at Once
- How to Transfer Photos from iPhone to Android