How to Transfer Photos from iPhone to Laptop: A Guide for Windows and Mac
Whether you're using a Windows laptop or a MacBook, there are several simple ways to copy your iPhone photos safely and quickly.
In this guide, we'll walk you through the best methods, including USB transfers, wireless options like iCloud, and helpful tools for full backups and selective copying.
- Make regular backups of iPhone photos
- Transfer selected photos to your laptop
- Import photos to Windows
- Import photos to MacBook
- Sync photos with iCloud (PC and Mac)
Option 1: Make regular backups of iPhone photos on your laptop
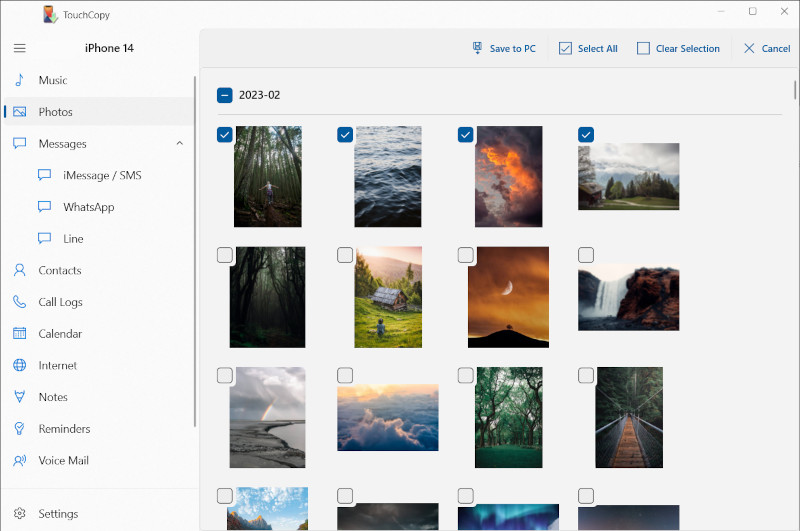
Using the trusted iPhone backup solution TouchCopy, you can set a folder on your computer to transfer your iPhone photos to. The beauty of this method is that you will never create duplicates of photos that you have already copied.
You can use TouchCopy's Export New Photos feature to make regular backups of iPhone photos to a chosen folder on your laptop. TouchCopy will show you which iPhone photos are not yet in the destination folder! Let's see how it works...
- Download TouchCopy and launch it on your laptop or MacBook.
- Connect your iPhone using a USB cable or Wi-Fi.
- Click "Photos".
- Click "Export New Photos" and choose a folder where you want to store your iPhone photos.
- Choose the photos you want to export, or click "Select All".
- Finally, click "Save to PC" or "Save to Mac" to export your photos!
Great! Now go and take some new pictures on your iPhone. Next time you connect it with TouchCopy, the software will show you which photos you have not yet backed up, making it easy to see which ones need to be transferred.
Want to see it in action? Watch our video below to see how to easily transfer photos from your iPhone to your laptop with TouchCopy.
Option 2: Transfer selected iPhone photos to your laptop
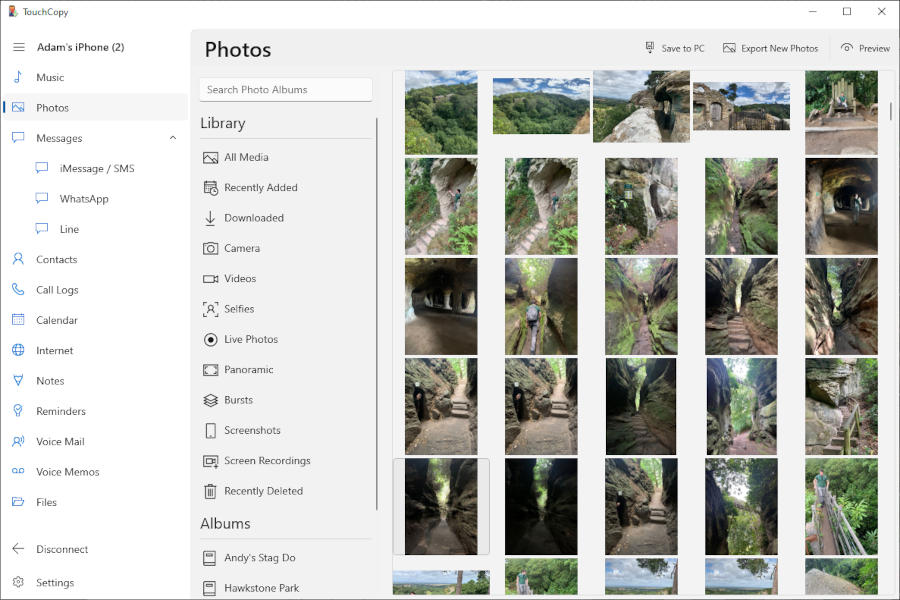
With TouchCopy, you can view your iPhone photos on Windows and Mac and choose exactly what you want to transfer. Here's how...
- Run TouchCopy and connect your iPhone with a USB cable or Wi-Fi.
- In the "Photos" feature, you'll see a list of all of your device's photo albums.
You can also transfer videos from your iPhone, iPad or iPod with TouchCopy! - Select the photos/albums you'd like to save.
- Click "Save to PC" or "Copy to Mac" and select a location on your laptop for your photos to be stored in.
Get the free trial of TouchCopy below and transfer up to 100 photos at no cost!


Option 3: Transfer photos from iPhone to Laptop using Windows Photo app
If you're using a laptop with Windows 10 or 11, you can use the built-in Photos app to transfer photos from your iPhone.
- Connect your iPhone with your laptop using a USB cable that supports file transfer.
- Click the Windows icon at the bottom of your screen and open the Photos app.
- Click "Import" and select your iPhone.
- Select the photos you want to import and choose a save location.
Check out our full guide on the best ways to transfer photos from iPhone to PC.
Option 4: Import iPhone photos to a MacBook using the Mac Photos app
Similar to the Photos app on Windows, Macs also come with their own Photos app preinstalled. This option is great if you don't want to store your iPhone photos in iCloud. It works similarly to Option 1 in that it will intelligently tell you what you have already imported, so you won't waste time or space on your Mac by copying duplicates of your photos.
- Connect your iPhone to your Mac using your USB cable.
- Open the Photos app on your Mac (if it doesn't open automatically).
- Click your iPhone under "Devices" on the left of the Photos app window.
- Optional: select the photos you want to import.
- Click "Import Selected" if you have selected photos, or "Import All New Items".
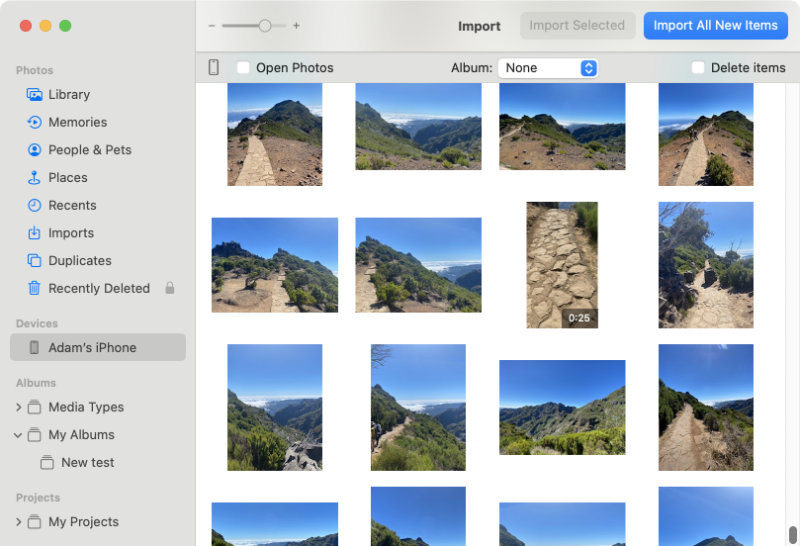
Photos will show you which photos you have already imported, and any new photos that you can back up.
Check out our full guide on the best ways to transfer photos from iPhone to Mac.
Option 5: Sync iPhone photos with your laptop using iCloud
iCloud is the perfect way to keep your photo library up to date on all your Apple devices. Using iCloud allows you to access your photos on any device which uses your Apple ID (iPhone, iPad, iPod Touch, Mac, PC and even Apple TV!).
Here's an example of how it works: Say you have iCloud Photos enabled on your iPhone, iPad and PC. You take a selfie, on your iPhone, to be envied by all your friends. The photo will automatically be available on your iPhone, as well as your iPad and PC. Smart, right?
Before you begin, make sure you have enough space in iCloud to store your iPhone photos (iCloud Photos uses your iCloud storage allowance). Also make sure that your devices are signed in with your Apple ID and are connected to Wi-Fi.
Let's see how to up iCloud Photos so you can get your photos on all your devices. Check out Apple's guide if you want to make copies of your iCloud photos locally on your devices.
Now, we'll break down the process into 2 steps: (1) uploading your iPhone photos to iCloud, (2) downloading photos from iCloud. Let's jump right in!
How to upload iPhone photos to iCloud:
- Tap the Settings app on your iPhone.
- Tap [your name] > iCloud > iCloud Photos.
- Toggle "Sync this iPhone" ON.
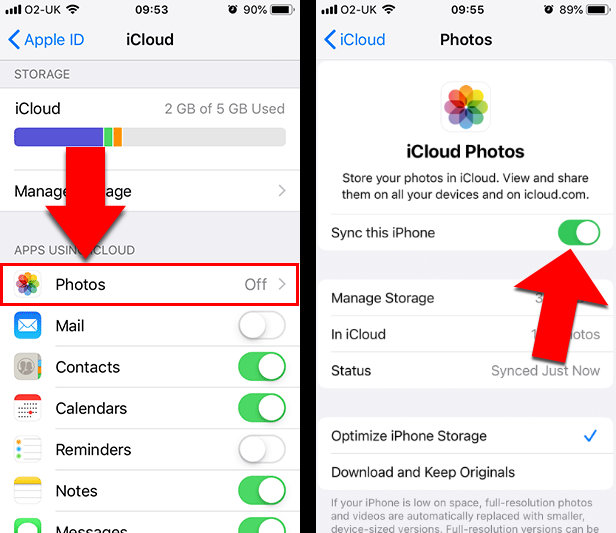
- Your photos will automatically upload to iCloud.
Depending on the speed of your internet, the time taken to see your photos in iCloud and on your other devices may differ.
Downloading photos from iCloud to your computer is now simply a case of setting up iCloud on your PC or Mac!
How to download photos from iCloud to MacBook:
- On your MacBook, open System Settings.
- Click iCloud and then Photos.
- Ensure "Sync this Mac" is enabled.
- Photos will begin to sync with iCloud.
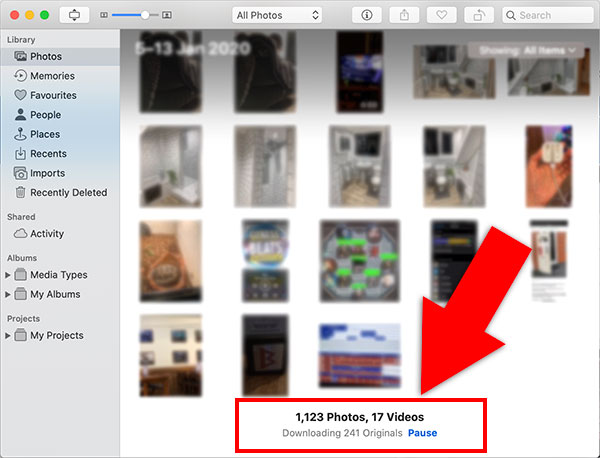
Mac Photos App downloading photos from iCloud
You can change your iCloud photo preferences in Photos > Preferences > iCloud. Here you can set whether you'd like to download original (full resolution) photos from iCloud, or whether to download device-optimized photos instead (using the "Optimise Mac Storage" option).
How to download photos from iCloud to Windows laptop:
- Download and open iCloud for Windows.
- Next to "Photos" click Options.
- Tick to enable "iCloud Photo Library".
- Click Done, then Apply.
- Open File Explorer > iCloud Photos > Download photos and videos.
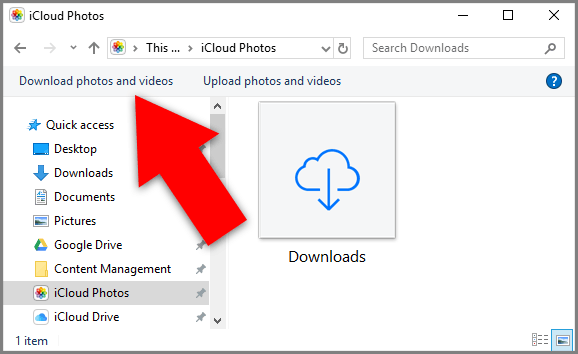
- Choose the photos you want to download from iCloud.
Note: Selecting iCloud folder/s to download photos from will also mean that new photos added to those folders will automatically be downloaded to your PC.
For example, I choose to download photos from my "2026" folder in iCloud. My current 2026 photos are downloaded to my PC. I then take 10 new photos for a trip to the park using my iPhone (which has iCloud Photos syncing enabled). The Photos are stored in iCloud and are automatically downloaded to my PC too!
Takeaways
So now you know 5 effective ways to transfer your iPhone photos to your laptop without iTunes. As you can see, each method will suit a slightly different situation.
For example, if you need to back up your photos on a regular basis (always a good idea), I would recommend Option 1 as it supports both Windows and Mac. Whereas if you'd like to be able to automatically access your photos from any device, you amy prefer Option 5.
Thank you for reading!
Popular FAQs
- How To Transfer Music and Photos from iPhone To External Hard Drive
- How to Transfer Video from iPhone to PC
- How to Transfer Photos from iPhone Messages to Computer
- How to Fix Photos Not Showing in Messages
- How to View HEIC Formatted Photos
- How to Convert iPhone HEIC images to JPG
- Backing Up ProRaw Photos on iPhone Pro Models
- How to Delete All Photos From iPhone at Once
- How to Transfer Photos from iPhone to Android