
Audio messages let you chat hands-free by sending voice recordings in iMessages. Instead of typing or reading, you can record and listen, for a convenient and personal touch.
In this article, we'll take a deep dive into audio messages on iPhone. We'll cover how to send them, how to save them to your iPhone, and how to back them up to your computer.
Quick jump to:
Method 1: How to save a voice message on your iPhone or iPad
There are 2 ways to secure your audio messages on your iOS devices: saving to Voice Memos, and keeping them in the Messages app.
Saving audio messages to the Voice Memos app
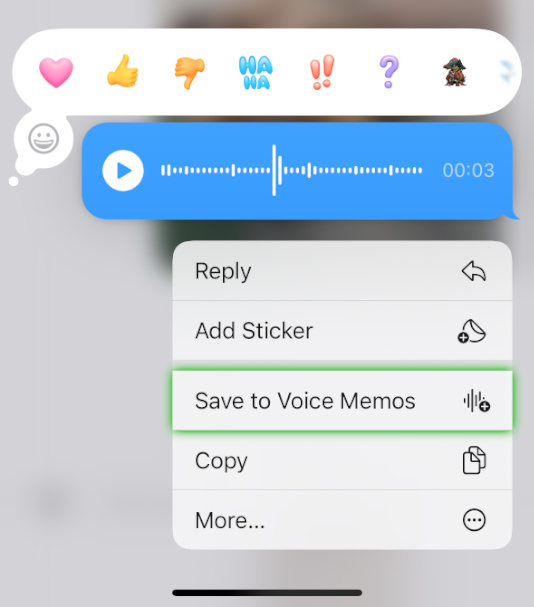
If you are using iOS 16 or later, you can save audio messages to the Voice Memos app!
To save a voice message on iPhone, tap and hold it, then choose "Save to Voice Memos".
How to find saved voice messages on iPhone
- Swipe down on your iPhone screen and search for "Voice Memos".
- Tap the app to launch it.
- You'll see your saved voice messages listed in the "All Recordings" section of the app.
Save yourself the storage space
Audio files can take up a lot of space. Why not save your voice messages to your computer to save the space on your iPhone?
Find out how to save iPhone Voice Memos to computer with TouchCopy.
Keeping audio messages in the Messages app
Ever sent an audio message, only to check back later and wonder, "Where did it go?" By default, the iPhone Messages app automatically deletes audio messages after just 2 minutes.
Once they're gone, they're gone - but you can save the audio messages to keep them stored on your device. It's also wise to save your iPhone audio messages to your PC or Mac for safekeeping.
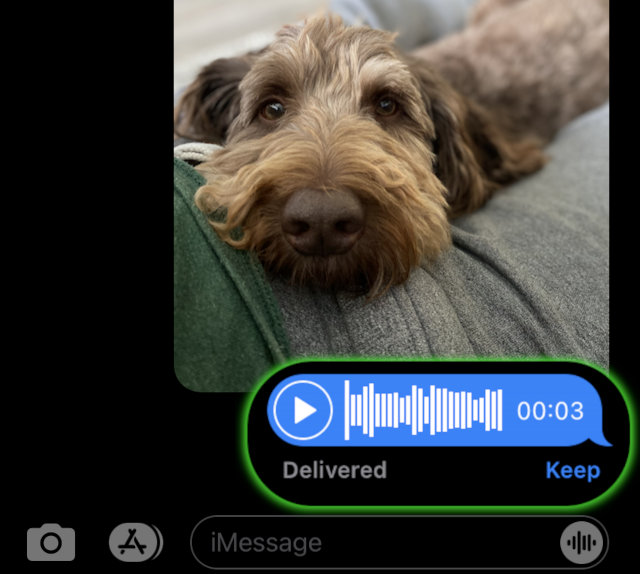
To keep a single audio message, tap "Keep" underneath an audio message to prevent it from being automatically removed.
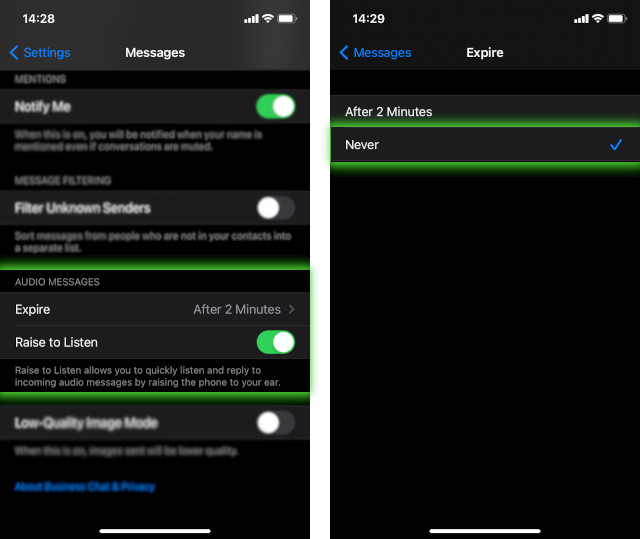
To keep all your sent and received audio messages, you can prevent your iPhone from deleting them. This will also mean that you won't need to manually choose to "Keep" each message.
Here's how to automatically save voice messages on iPhone:
- Open Settings on your iPhone or iPad.
- Scroll down and tap "Apps" > "Messages".
- Under "AUDIO MESSAGES", tap "Expire".
- Choose "Never".
This will ensure that your sent/received audio messages are never automatically removed from your device.
Method 2: How to save voice messages from iPhone/iPad to your PC or Mac
Saving voice messages to your iPhone prevents automatic deletion, but they can take up significant storage. To save space, you can back up the voice messages to your computer, and then remove them from your iPhone.
TouchCopy is a superb program which allows you to back up any iPhone files to your PC or Mac. You can save Messages, Contacts, Photos, Voice Memos, Voicemails and more!
Let's see how to view iPhone/iPad messages on your computer, and how to copy them - including attachments like Audio Messages.
- Download and install TouchCopy on your PC or Mac.
- Open TouchCopy and connect your iPhone/iPad using a USB cable or Wi-Fi.
- Click Messages and select the conversations containing your desired audio messages.
- Click the Play button on an audio message to listen to it.
- Click the Save button on an audio message to save only that file.
- Click "Save as HTML" (PC) or "HTML" (Mac) to export selected conversations to your computer.
- Choose a folder to save your files and click "OK".
- TouchCopy will save your conversation as an HTML file, which you can open in your default web browser.
- The HTML file will contain audio message transcriptions, if available.
- A separate .wav file (Windows) or .caf file (Mac) is saved for each audio message in the conversation.
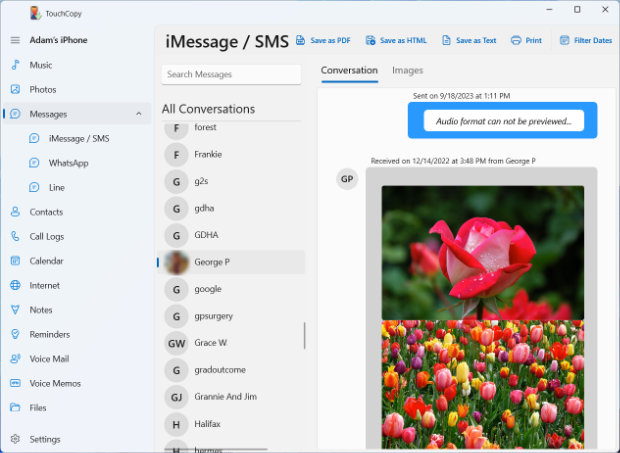


If you don't need to export your texts, you can save only your audio messages using TouchCopy's helpful "Files" tab for Messages.
What about WhatsApp?
TouchCopy can even access WhatsApp conversations, and copy your WhatsApp audio messages!
Method 3: Save audio messages from iPhone/iPad using only a Mac
If you use a Mac, you can access your iPhone or iPad messages directly thanks to iMessage sync.
To save conversations or attachments like audio messages quickly and reliably, you can use the Messages Export Pro app.
Messages Export Pro loads your conversations directly from the Mac Messages app—so you don't need to connect your iPhone or create a backup. You can learn more about exporting messages in different formats in our full guide here: How to Export Mac Messages to PDF or CSV.
Saving audio messages with Messages Export Pro is completely free. You can download Messages Export Pro free from the Mac App Store:

How to save audio messages to your Mac using Messages Export Pro:
- Launch Messages Export Pro on your Mac.
- If prompted, allow access to Messages and Contacts.
- Select the conversation containing your audio messages.
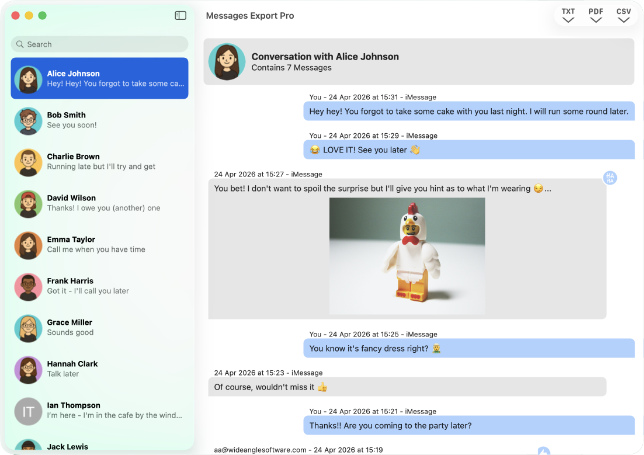
- Hover over the audio message you want to save.
- Click the save icon or choose "Save to Mac".
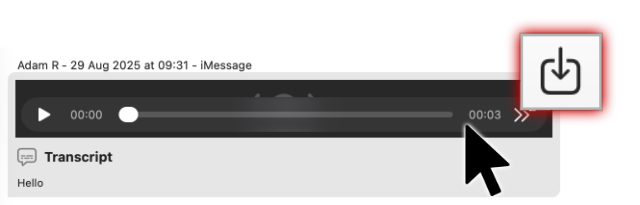
- Select a location on your Mac to save the file.
Your audio messages will be saved as standard audio files on your Mac, ready to play, share, or archive.
Listening back to your saved audio messages on your Mac is easy. The messages will be saved as .caf files which Macs support by default. So you can simply right-click the file, then "Open With" QuickTime Player.
This method is fast and efficient and works for other attachments too, including photos, videos, and documents.
Extra: How to send a voice message on iPhone
So that's how to save them, but you may also wonder how to record and send audio messages from your iPhone. Sending audio messages on iPhone is slightly different on each version of iOS.
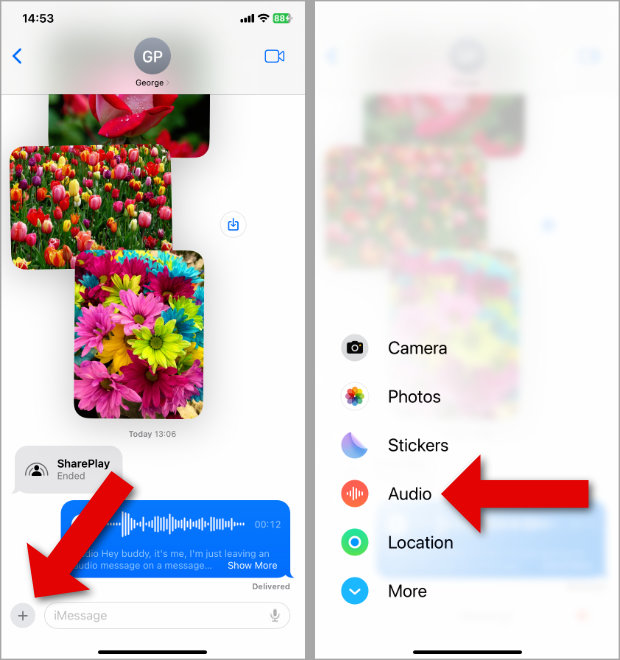
How to send a voice message on iPhone [iOS 17 and higher]
- Open the Messages app on your iPhone.
- Select a conversation and tap the "+" icon at the bottom of your screen.
- Choose "Audio" to start recording an audio message.
- Tap "Stop" to stop recording.
- Review and send your voice message.
- Tap the "play" icon to preview your message.
- Tap the "x" icon in your message box to cancel and delete the recording.
- Or tap the upward pointing arrow in your message box to send your audio message.
Takeaways
We hope this guide helped you take control of your audio messages!
Remember that they will be automatically deleted from your devices after 2 minutes unless you choose to keep them.
To back up your audio messages to your computer, you can use Messages on Mac or TouchCopy for Windows PC or Mac!
 Publisher:
Wide Angle Software