Introduction
iPhone voicemails have come a long way—from the original Standard Voicemail and Visual Voicemail introduced with the first iPhone, to the more recent additions of Live Voicemail and FaceTime Voicemail.
In this guide, we'll explore the differences between these four voicemail types, explain how to set them up and access them, and show you how to save your voicemails to your iPhone or computer.
Quick jump to any of the sections in the guide:
1. Different Types of Voicemails on iPhone
You may be surprised to hear that there are different types of voicemail you can make and receive on iPhone. Let's take a look at each:
1.1. Visual Voicemail
Visual Voicemail is a service which enables you to access voicemails on your device without needing to call your mobile carrier. You can access Visual Voicemails directly through the Phone app on your iPhone.
This allows you to choose exactly which voicemail you want to listen to, save or delete - rather than having to listen back through a list of voicemails after dialling your voicemail number.
Whether you have access to Visual Voicemail depends on the wireless carrier you are with, as well as your location. Check whether your carrier/location supports Visual Voicemail.
1.2. Live Voicemail
Apple introduced the new feature Live Voicemail with iOS 17. It was first only available in the US and Canada, but in iOS 18, it was rolled out to many more countries.
This feature enables a visual, real-time transcription of incoming voicemails on your iPhone. So, if you can't take a call and send it to voicemail, you'll see the message being left, on your screen, as it is being left for you. Cool, right?
Another advantage is that the audio and the transcription are saved to the iPhone Phone app - even if you don't have Visual Voicemail.
1.3. Standard Voicemail
If you don't have Visual Voicemail and/or Live Voicemail on your iPhone, regular voicemails will not be stored in the Phone app.
Instead, to access to your voicemails, you'll need to call your carrier's voicemail service. This is not as convenient as the services above, because you won't be able to easily choose which voicemails to listen to, save or delete.
Note: Different carriers offer different voicemail support. For example, they may offer limited storage space. This can mean that you'll start to lose older voicemails after filling the limited space.
1.4. FaceTime Voicemail
Another fantastic new feature introduced in iOS 17 was FaceTime video messages. Now, when a FaceTime video call is missed, the caller can choose to leave a video message. This makes for a much richer voicemail experience and means that a time-sensitive video can be taken, even if a call cannot be taken at the time.
Both the sender and the receiver can choose to save the FaceTime voicemail as a video to their iPhone.
This feature is available on devices using iOS17 and higher.
If it was a FaceTime audio call which was missed, you can leave a voicemail, just like with a standard call. FaceTime voicemail requires the recipient to have Live Voicemail turned on.
2. How to Set up Voicemail on iPhone
If you've been using iPhone for a while, it's likely that you are already set up with Voicemail. However, if you've not used it before on your iPhone, you'll need to set it up.
We'll cover how to initially set up your Voicemail inbox on iPhone, turning on Live Voicemail and activating Visual Voicemail. No further setup is required to receive FaceTime voicemails.
2.1. How to set up voicemail on iPhone
- Open the Phone app on your iPhone, then tap "Voicemail".
- Tap "Set Up Now" and create a password when prompted.
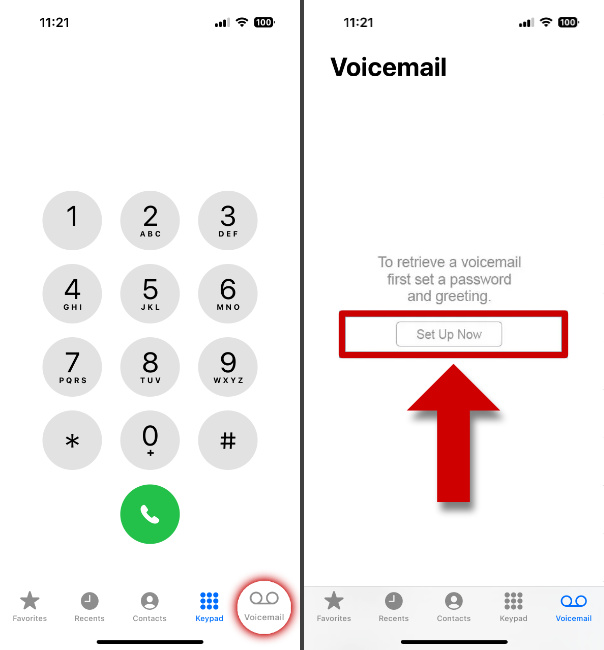
- Choose to use the Default greeting or choose "Custom" to record your own greeting.
- Finally, tap "Done".
2.2. How to Turn On Live Voicemail
Live Voicemail is on by default on devices using iOS 17 and later if your language and region are supported by the feature (at the time of writing, Live Voicemail is only available in English in the United States and Canada.).
To enable/disable Live Voicemail on iPhone, follow these steps:
- Open Settings.
- Select the Phone app, then tap Live Voicemail.
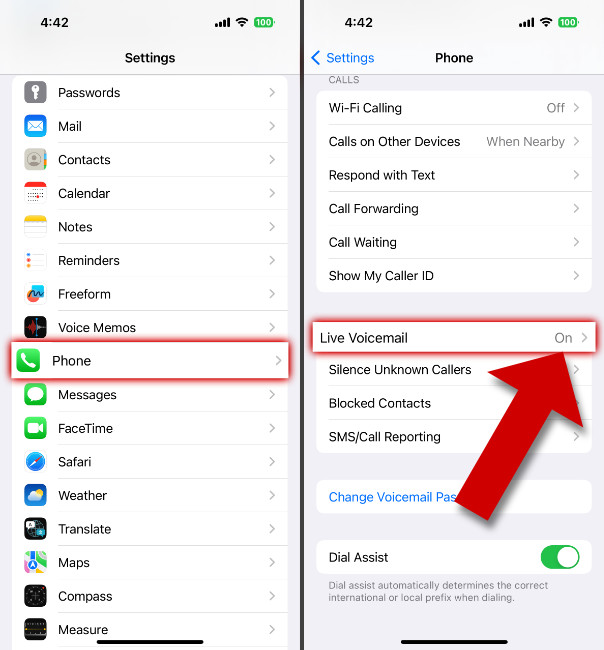
- Tap to toggle Live Voicemail on or off.
2.3. How to activate Visual Voicemail
Usually, the standard set-up is all that's needed to get started with Visual Voicemail if it's included in your plan. However, for some carriers, you may need to manually enable Visual Voicemail on your iPhone.
For example, EE users are required to send a text message from their device to enable Visual Voicemail.
Contact your carrier if you're unsure whether you need to perform extra steps to set up Visual Voicemail.
3. How to Access your Voicemail on iPhone
3.1. Viewing Visual Voicemail and Live Voicemail on your iPhone
To do this, simply open the Phone app on your iPhone, then tap "Voicemail".
All your received voicemails will be listed here, from the newest one to the oldest one. Each entry will show the sender's name or number, the date it was sent, and the duration of the voicemail.
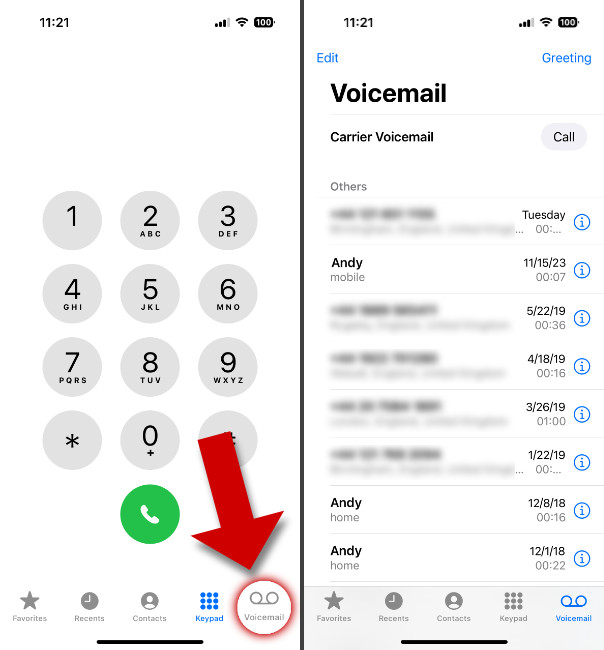
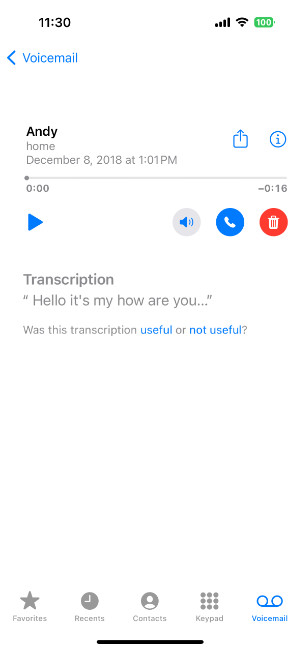
Tap a voicemail entry in the list to access it. Then, you'll be able to access these options:
- Tap the play button to listen to your voicemail. You can use the speaker icon to toggle the loudspeaker if you don't want to hold the device to your ear.
- Tap the phone icon to call the contact back who left the voicemail.
- Tap the bin/trash icon to delete the voicemail.
- Use the share icon to save or share your voicemail.
3.2. Accessing Standard Voicemail on your iPhone
If you don't have Visual or Live Voicemail, you can access standard voicemails on your iPhone. To do this, open the Phone app, select "Voicemail", and then tap "Call" next to "Carrier Voicemail". You'll be put through to your carrier's voicemail service, allowing you to listen to your voicemails.
Follow the steps voiced during the phone call to navigate your voicemails and options.
3.3. Viewing FaceTime Voicemail on your iPhone
Open the FaceTime app on your iPhone to see your FaceTime call history. If you missed a call, and the caller left a video/audio message, it will be shown as part of the call log entry.
Select the "Voicemail" block in the call log to view a recorded Live Voicemail in the Phone app on your iPhone.
These messages are left if the call was a FaceTime audio call, and you have Live Voicemail turned on.Or select the "Video" block in your FaceTime call log to view a recorded FaceTime Video Message.
These messages are left if the call was a FaceTime video call.
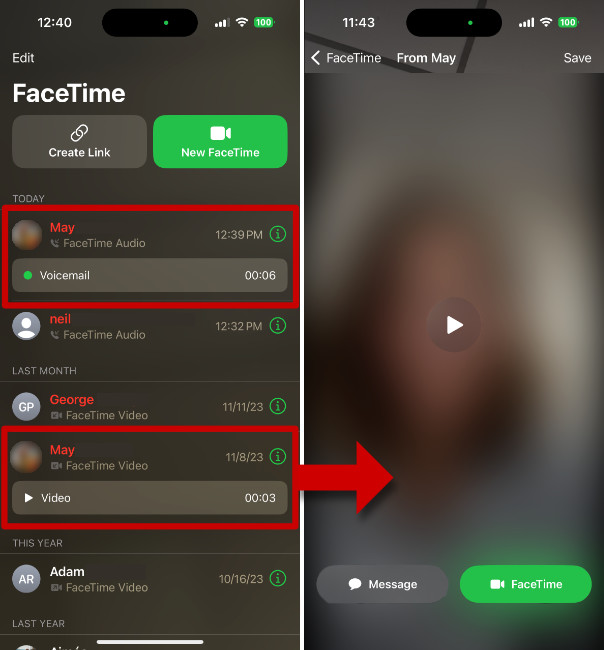
- Tap the "Play" icon to watch the video message the caller left for you.
- Tap "Save" to save the video to your iPhone camera roll.
- The "Message" button will open a message to the contact who left the voicemail.
- The "FaceTime" button will open a FaceTime call back to the contact.
4. How to Save Voicemails on Your iPhone
You can save a voicemail to your iPhone to keep it safe, share it with someone else, or export it to your computer.
Follow these steps to save a voicemail on your iPhone:
- Open the Phone app on your iPhone and tap "Voicemail".
- Select the voicemail you want to save.
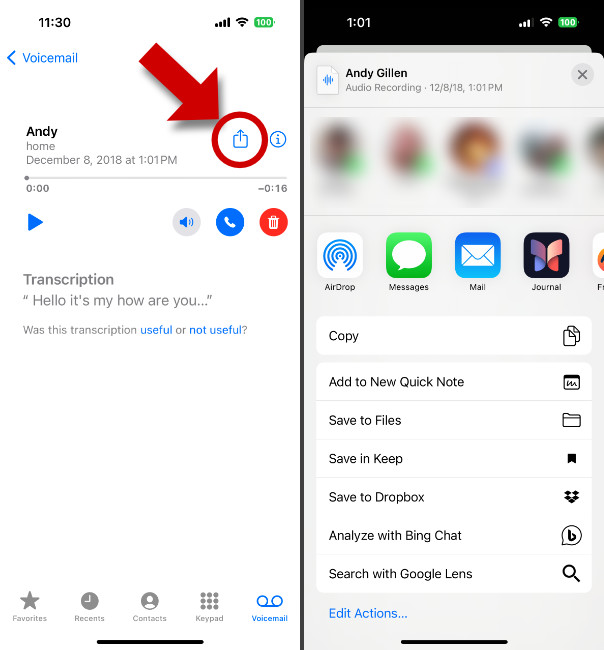
- Tap the "Share" icon.
- Choose where you want to save the voicemail to.
- You can share the voicemail directly with a contact via Messages, WhatsApp, Mail etc.
- Or save the voicemail to a location like the Files app on your iPhone, or your Dropbox account. The voicemail will be saved as an MP4 file at your desired location.
Saving FaceTime Video Messages
If you missed a FaceTime video call and the caller left you a video message, open FaceTime on your iPhone and tap the "Video" you received. Then, tap "Save" to save the video to your Photos app.
5. How to Transfer Voicemails from iPhone to Computer
Voicemails often contain important information, but some carriers have limits on storage capacity. For instance, Verizon has a storage limit of 20-40 voicemails. If you exceed this limit, you risk losing voicemails that haven't been backed up. To avoid this, it's a good idea to export your iPhone voicemails to your computer for safekeeping.
For a convenient way to export content from your iPhone to a computer, we recommend TouchCopy. Available for both PC and Mac, TouchCopy lets you copy valuable content like voicemails, messages, photos, contacts, call logs, and more.


5.1. How to save iPhone voicemails to your computer
- Open TouchCopy on your computer.
- Connect your iPhone using Wi-Fi or a USB cable.
- Click the Voice Mail feature.
- Select the voicemails you want to export.
- Click "Save to PC" or "Copy to Mac".
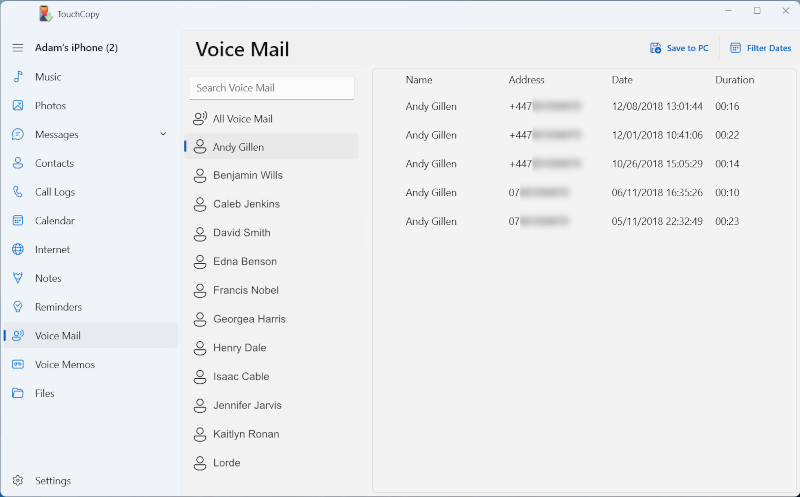
The voicemails will be saved as .amr files to your chosen location on your computer. To listen to them, you can use a free app like AMR Player on PC, or QuickTime on Mac (comes preinstalled on Macs).
5.2. Export FaceTime video messages to computer
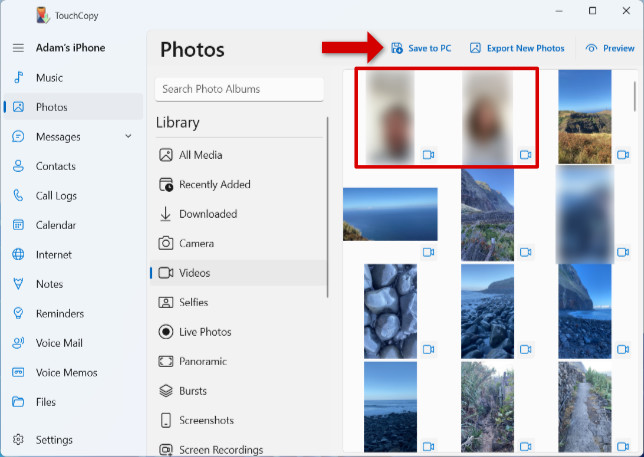
If you've saved some FaceTime video messages to your iPhone's Photos app, you can easily access and transfer them using TouchCopy.
Click the "Photos" section in TouchCopy, and select the "Videos" tab to see all the videos stored on your iPhone. Click to select the video messages from FaceTime, then click to save to your PC or Mac.
Find out more about how to save photos and videos from iPhone to computer with TouchCopy.
6. How to Delete and Manage Deleted Voicemails on iPhone
The guide wouldn't be complete without covering how to deal with deleting voicemails. Let's see how to delete voicemails from an iPhone, retrieve recently deleted ones and recover deleted voicemails from a backup.
6.1. How to delete voicemails on iPhone
Over time, your voicemail inbox may become very long and bloated. As such, you may want to delete some old and unimportant voicemails. Here's how to permanently delete voicemails on iPhone:
- Open the Phone app on your iPhone and tap Voicemail.
- Tap "Edit" then select the voicemails you want to delete.
- Tap "Delete".
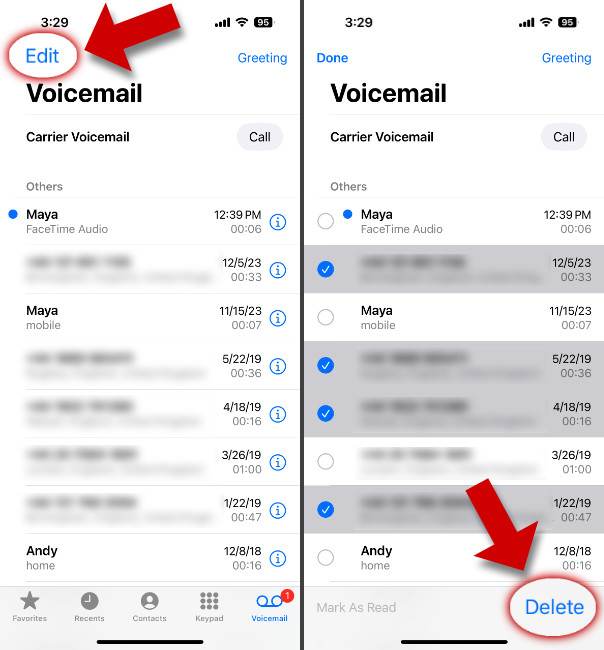
- Scroll to the bottom of your list of voicemails and tap "Deleted Messages". Here you'll find voicemails you chose to delete, but have not yet been permanently deleted.
- Permanently delete voicemails:
- Swipe left on a single voicemail to delete it.
- Tap "Clear All" to delete all entries.
6.2. How to retrieve deleted voicemail on iPhone
Recently Deleted voicemails may only remain on your device for a matter of days, depending on your wireless carrier.
If you accidentally deleted a voicemail or need to retrieve one that you deleted a few days ago, you can do this on your iPhone itself.
- Open the Phone app on your iPhone and tap "Voicemail".
- Scroll down and select "Deleted Messages".
- Tap a voicemail that you want to restore.
- Tap the trash icon with a line through it.
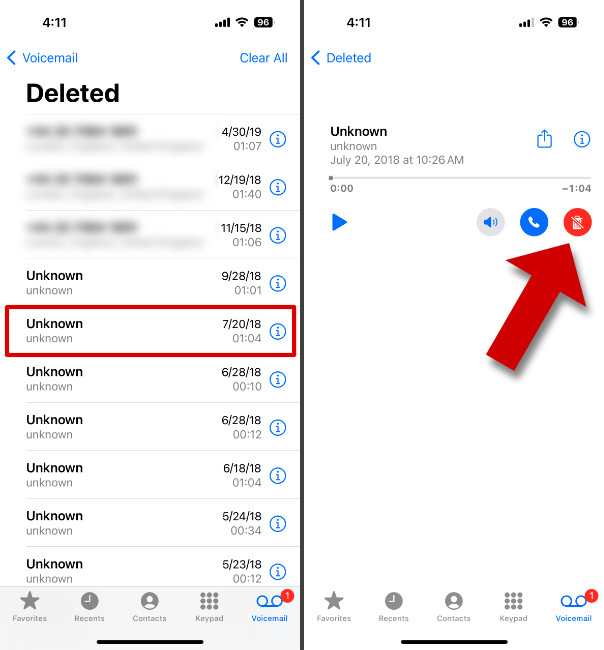
- Your voicemail will return to your main voicemail list.
6.3. How to recover deleted iPhone voicemails
If you've permanently deleted voicemails, they won't be accessible on your iPhone anymore.
However, you may still be able to get them back them back. You have 2 options: extract the voicemails from a backup of your iPhone which was made while the iPhone contained the voicemails; or failing that, ask your wireless carrier if they have the voicemails stored to share with you.
How to recover deleted voicemails from an iPhone backup
To retrieve and transfer content from an iPhone backup to your computer, you'll need an app like iBackup Extractor. This tool lets you access Voicemails, Call History, Messages, Photos, and more from local iPhone backups.
Try the free trial of iBackup Extractor to check if your backup contains the voicemails you need - you can even copy a few for free!


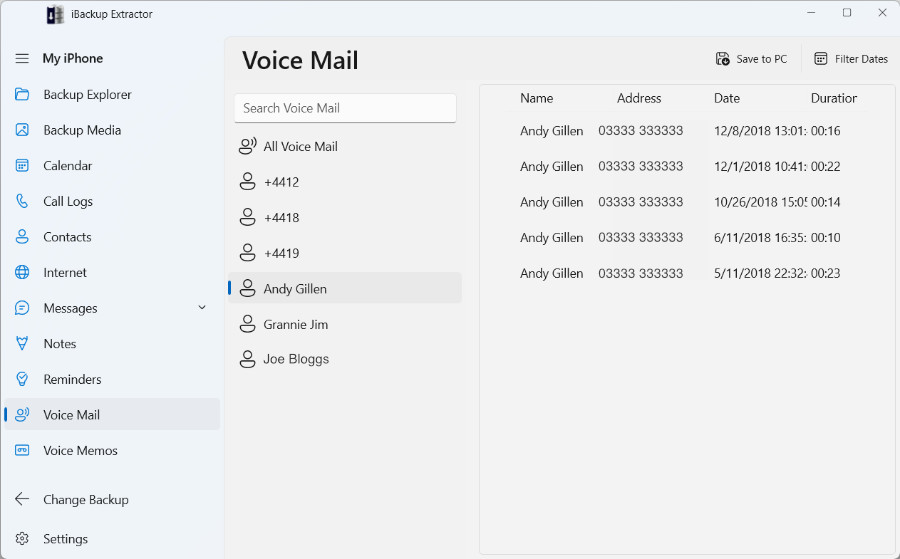
- Open iBackup Extractor on your PC or Mac.
- Select the iPhone backup you want to access.
- Click "Voice Mail" from the list of categories.
- Select the voicemails you want to extract from the backup.
- Click "Save to PC" or "Copy to Mac".
Your saved voicemails will then be available for you to listen to, whenever you want to on your computer.
What to do if your deleted voicemails are not backed up?
If you don't have an iPhone backup containing the voicemails you need, you can try contacting your wireless carrier. They may still have the voicemail stored in their system.
Act quickly, as the longer you leave it, the more likely it is that the voicemail will be permanently deleted.
Extra: How to Change a Voicemail Greeting on iPhone
When callers reach your voicemail, the greeting is the message they hear before being able to leave you a voicemail.
How to record a custom voicemail greeting on your iPhone:
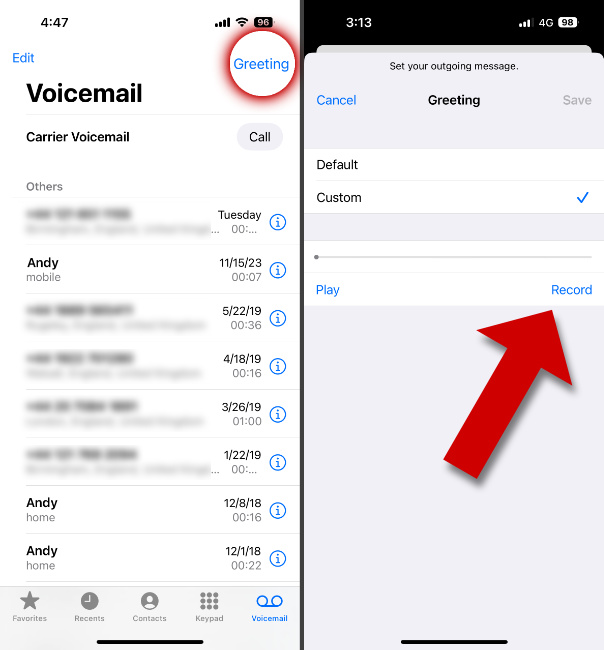
- Open the Phone app on your iPhone.
- Select the Voicemail tab at the bottom of the screen.
- Tap Greeting, then choose "Custom".
- Tap "Record" and make your greeting. Once done, tap Stop.
- You can play back your recording by pressing "Play", to check that you are happy with it.
- Tap "Save" to apply your new custom greeting.
"Why can't I change my greeting?"
Custom Greetings are not supported by all carriers or in all countries/regions.
Takeaways
Congratulations! You've now mastered the art of managing voicemails on your iPhone. From setup to efficient organization, you are now in complete control of your voicemails.
We covered setting up voicemails, creating a custom greeting, accessing voicemails, saving them to your device or a computer, and deleting them. These skills will not only save you time but also ensure that you never miss an important message again.
Thanks for reading!
Want more tech tips like this?
Add us as a Preferred Source on Google.