If you haven't got space on your PC for your files or that new app or game, or the clutter on your hard drive is causing performance issues, you're not alone.
In this article, we'll go through the top 11 ways to find what files or apps are taking up storage, and how to free up space by deleting unnecessary and duplicate files, as well as uninstalling those apps you are no longer using.
Quick jump straight to the options for cleaning up storage:
- Windows Storage Sense
- Uninstall Programs
- Remove Duplicate Files
- Delete Large, Unnecessary Files
- Delete local backups of your iPhone, iPad or iPod Touch
- Disk Cleanup
- Remove Temporary Files
- Take out the Trash
- Store data on External Storage or in the Cloud
- Defragment your Hard Drive
- Sufficient RAM
Extra: Find out how to clear disk space on a Mac >
1. Windows Storage Sense
Microsoft's Windows Storage Sense is a relatively new feature available in Windows 10 and 11, which helps you manage disk space on your computer. Storage Sense will display the types of files that are taking storage and how you can free up space. It can be set to run automatically on a schedule, or you can run it manually on demand when you need to free up space.
How to use Storage Sense on demand
If you don't need to clean up your computer files very often, or if you want control over exactly what files are deleted, we recommend using Storage Sense on demand, rather than allowing it to run automatically. Here's how:
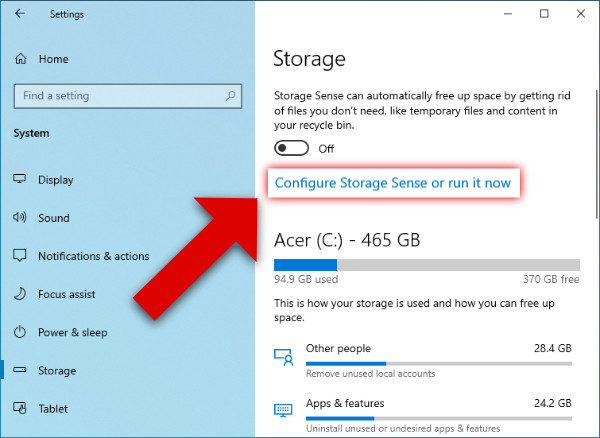
- Click your Windows icon and open "Settings".
- Click "System".
- Select "Storage" from the list on the left.
- Under "Storage Sense", click "Configure Storage Sense or run it now".
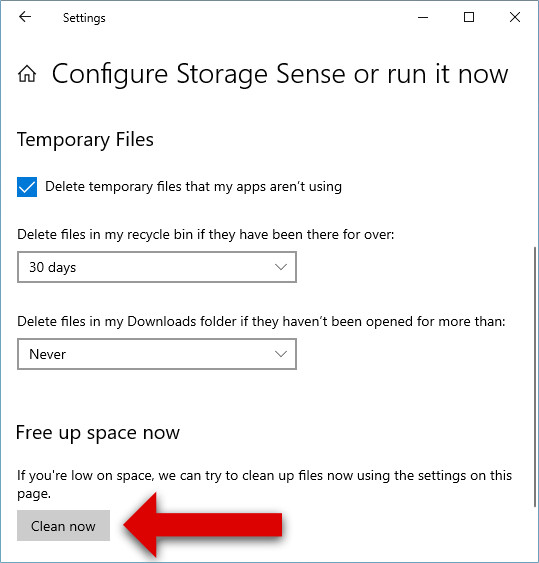
- Configure your preferences:
- Delete temporary files that your apps aren't using (enabled by default).
- Delete files from your Recycle Bin (choose to delete files which have been in Recycle Bin for over 1 day, 14 days, 30 days, 60 days or never)
- Delete files in my Downloads folder which you don't use (choose to delete files which haven't been opened for 1 day, 14 days, 30 days, 60 days, or never)
- Click "Clean Now" to permanently delete the files from your computer.
How to configure Storage Sense to run automatically
If you often need to clean up your computer for temporary files and like the sound of automating the process, we recommend using Storage Sense to automatically and periodically clean up your files. Here's how:
- Click your Windows icon and open "Settings".
- Click "System".
- Select "Storage" from the list on the left.
- Under "Storage Sense", click "Configure Storage Sense or run it now".
- Choose your preferences (set when you would like Storage Sense to run, what to delete, and how long).
- Once you're happy with your selections, toggle Storage Sense on.

- From the dropdown under "Run Storage Sense", choose how often you'd like your PC to automatically run Storage Sense (During low free disk space, every day, every week or every month.)
- Click "Clean Now" if you want to start your first scan now.
The tool is great, right? It's a massive improvement over the separate, hard-to-find features from before. However, it still does not deal with duplicate files, uninstalling unused programs and more... Jump to: finding and deleting duplicates now >
2. Uninstall Programs
For many computer users, most of the disk space used is by applications and games. If you find that you no longer use certain programs, you can uninstall and remove them from your hard drive.
Again, Windows provides the ability to easily get rid of any unwanted programs that we may have on our computer. To uninstall/remove programs, follow the steps below:
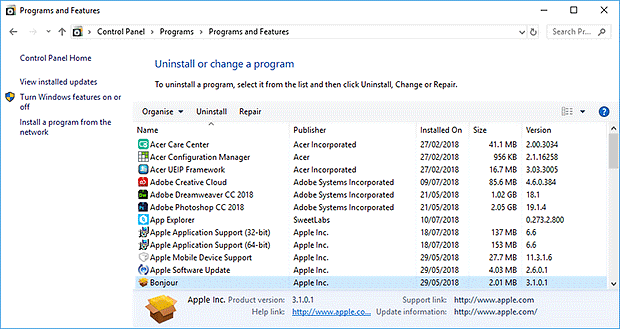
- Start -> Control Panel -> Uninstall a program
- Sort the list of programs by file size by clicking the 'Size header'. Now you can see which programs take up the most space on your computer.
- Click any program that you wish to remove, and click 'Uninstall'
3. Remove Duplicate Files
It is likely that you've accumulated duplicate files over time, which are unnecessary for the running of your computer. Unfortunately, Windows does not provide an easy way to find and remove these duplicate files, so a third-party software is needed.
There are a number of applications for the removal of duplicate files, but we'll look at Duplicate Sweeper here. Duplicate Sweeper has a clear and easy interface, and finds and removes duplicates easily.
Duplicate Sweeper uses an advanced search algorithm to scan your computer for files with the same content - even if the files have different names. Duplicate Sweeper will identify duplicate documents, photos and music on your computer, and remove them for you, freeing up lots of space for the files you really want.
You can let Duplicate Sweeper automatically select duplicate files for removal, using your preferences, or select individual files yourself. The app will send your duplicate files to Recycle Bin or Trash, so if you change your mind you can restore the deleted files to their original location.
Try Duplicate Sweeper Free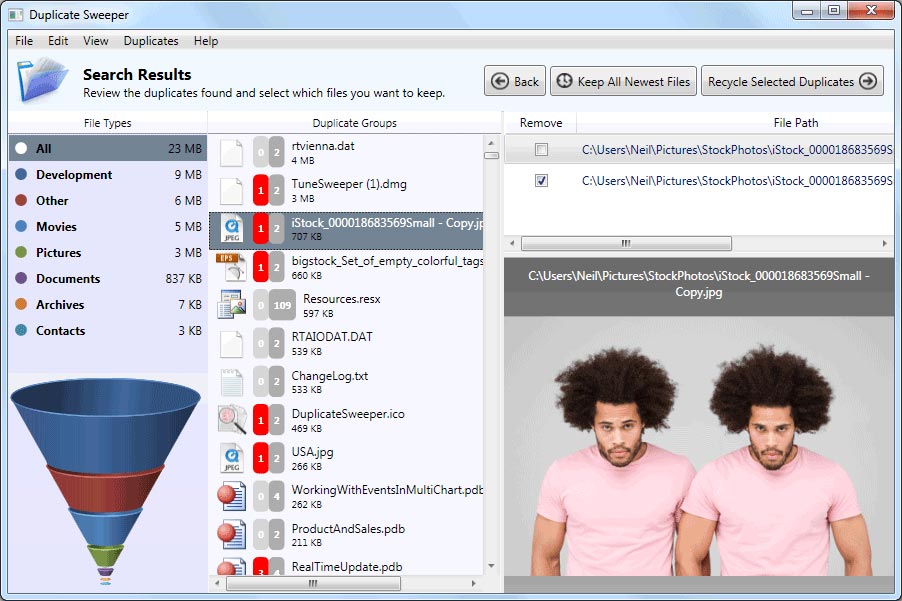
Duplicate files can take up a surprising amount of space on your computer. Watch the video below to see how Duplicate Sweeper can quickly scan your computer for duplicate files, photos and music and safely remove them to free up space.
4. Delete Large, Unnecessary Files
It goes without saying that the quickest way to clear space on your computer is to delete the biggest files.
We've already seen how to remove apps, but how do you search for other kinds of file on your computer and sort them by size?
- Open File Explorer on your PC.
- Select the location in which you want to search for files (to search your whole computer, select "This PC").
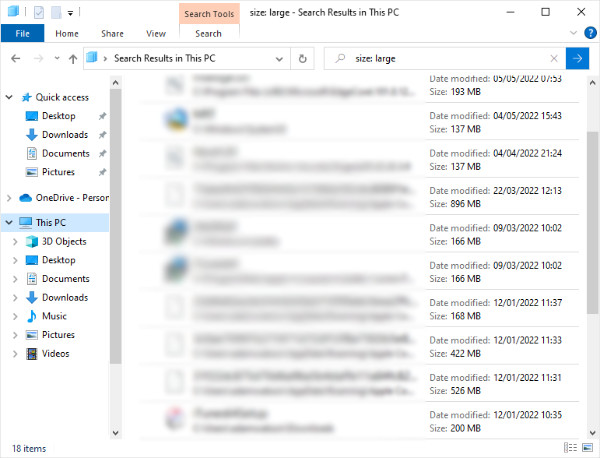
- In the search box in the top-right corner of the window, type "size: " followed by the size of file you wish to look for... For example, size:gigantic will search for files which are larger than 4GB.
- "Gigantic" (>4 GB)
- "Huge" (1 - 4 GB)
- "Large" (128 MB - 1 GB)
- "Medium" (1 - 128MB)
- "Small" (16 KB - 1 MB)
- "Tiny" (0 - 16 KB)
- "Empty" (0 KB)
- You can also search for all files larger than a certain size on your PC. For example, to search for all files larger than 1GB, type size:>1GB in the File Explorer search bar.
- Hit Enter/Return to start the scan. The scan may take some time depending on the amount of content in your chosen drive/folder.
- You'll receive a list of all files in your chosen location which fall into your size limitations. Review the files and delete the ones you don't need by using right-click > Delete.
Don't forget that deleting files only moves them to your Recycle Bin. If you wish to permanently delete these files, empty your Recycle Bin.
5. Delete local backups of your iPhone, iPad or iPod Touch
Backing up your devices to your computer is a great idea, and we highly recommend it to keep your data safe and secure. Check out our guide on the best ways to back up an iPhone.
The downside is that these device backups can take up incredible amounts of storage on your computer.
Considering that you may have backups of devices that you don't own anymore, or outdated backups or archives of your device that you may not need, deleting backups could reclaim a treasure trove of space for you.
Here's how to find and delete iTunes device backups from your PC:
- Open your search box.
- Windows 7: click Start
- Windows 8: click the magnifying glass in the top right corner
- Windows 10/11: click the Search box next to the Start button
- Your backups will be stored in any of 3 locations on your computer, depending on your system:
- In the search box, type %appdata% then hit Enter/Return.
Then navigate through the folders 'Apple' or 'Apple Computer' > MobileSync > Backup. - In the search box, type %USERPROFILE% then hit Enter/Return.
Then navigate through the folders 'Apple' or 'Apple Computer' > MobileSync > Backup. - (For backups created with TouchCopy on a PC without iTunes installed)
In the search box, type %localappdata%\Packages then hit Enter/Return. Then find the folder at this location with a name starting with 'WideAngleSoftware'. Open this folder and navigate through LocalCache > Roaming > Apple Computer > MobileSync > Backup.

- In the search box, type %appdata% then hit Enter/Return.
- Within the Backup folder, you'll see one or more folders named with a string of random characters. Each of these folders represent a device backup. To delete a backup, right-click it and choose Delete.
Be sure that you don't need the backup before you delete it and empty it from the Recycle Bin - once it's gone, it's gone!
If you're unsure what is contained in your backup, or wish to save certain content from your backups before deleting them, we recommend using iBackup Extractor. With iBackup Extractor, you can browse the content of your backup, select certain content you want to save, and extract it safely to your PC!
6. Disk Cleanup
If you are running an older version of Windows, or Windows Storage Sense isn't an option for you, we recommend the Disk Cleanup tool in Windows. It allows you to delete data such as temporary files, which can amount to GB’s (gigabytes) of data over time.
To access the Disk Cleanup function:
- Go to your Computer window (Start -> Computer)
- Right-Click your hard-drive and select ‘Properties’
- Under the ‘General’ tab, click ‘Disk Cleanup’
- Windows will scan your drive and let you know how much space you can save by running Disk Cleanup
- Select the files that you wish to delete form the drive, and hit OK

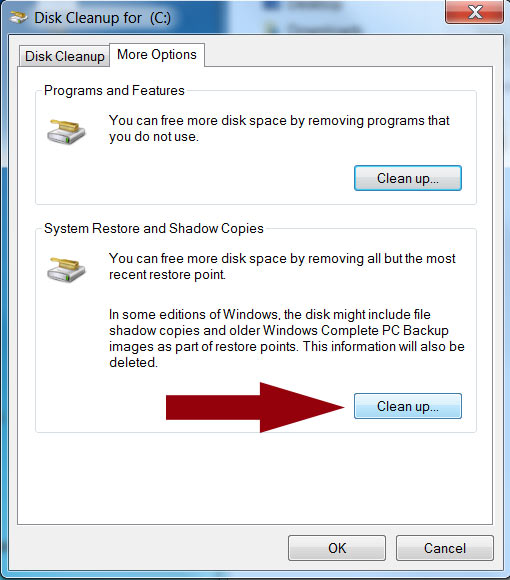
Another function to mention here is ‘Clean up system files’. Using this function, you can remove older Windows restore points from your drive, leaving only the most recent one. If you wish to use this function, please ensure that your computer is running as expected, as once the restore points are removed, you will not be able to fall back to them.
To use ‘Clean up system files’:
- Click Clean up system files
- Go to the ‘More Options tab’ in the Disk Cleanup window
- Click ‘Clean up…’ under the ‘System Restore and Shadow Copies’ heading
7. Temporary Files
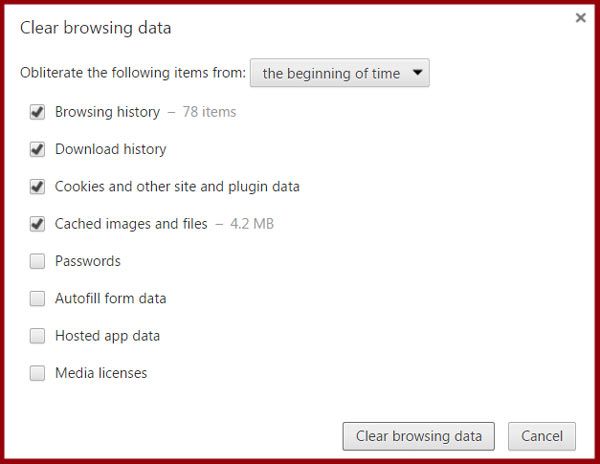
“Wait, we just removed temporary files using Windows Disk Cleanup”, I hear you say. Yes, we deleted temporary files containing webpages, stored on your hard drive for quick viewing. Unfortunately, the Disk Cleanup method did not include files saved by external apps such as Google Chrome or Mozilla Firefox. There may still be gigabytes worth of cookies, internet history and caches stored on your computer.
You can delete this information directly from your browser, or by using a third-party application.
For example, using Google Chrome, you can open the settings menu (the 3 dots next to the address bar) -> More tools -> Clear Browsing data… From here you can select which data you wish to remove, then click ‘Clear browsing data’.
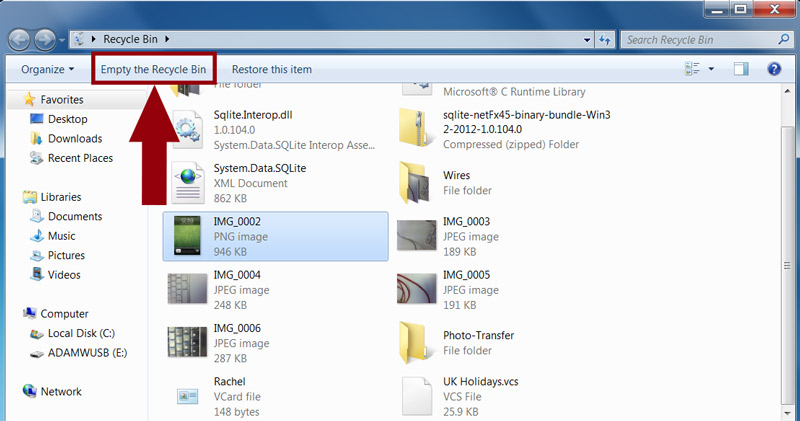
8. Take out the Trash
Some of these files which we have removed using the above steps may end up being moved to the Recycle Bin. This is a nice safety measure, because if you make a mistake and have removed a file which you now want back, you can easily restore the file from the Recycle Bin.
However, the files in the Recycle Bin are still taking up space on your computer. If you’re sure that you would like to remove the files in your Recycle Bin, you can select files and right-click to delete them, or simply click ‘Empty the Recycle Bin’ to permanently delete all of the files.
9. Store data on External Storage or in the Cloud
All previous methods in this list describe how to delete or remove files from your computer which you may not need. However, what of the files which you wish to keep, such as precious photos, video and music? These media types can accumulate to some serious storage space, but if you no longer have space for them on your PC hard drive, you still have options!
A common method for keeping data safe is to transfer it to external storage. There are 2 platforms for storing your data elsewhere from your main computer: physical storage and cloud storage.
Physical storage comes in many different shapes and sizes, but can most commonly be seen as USB Drives or external hard drives. Transferring data from your PC hard drive to an external hard drive allows you to delete the original files on your PC, while still keeping them safe in storage. Needless to say, this can clear a huge chunk of storage space on your PC.
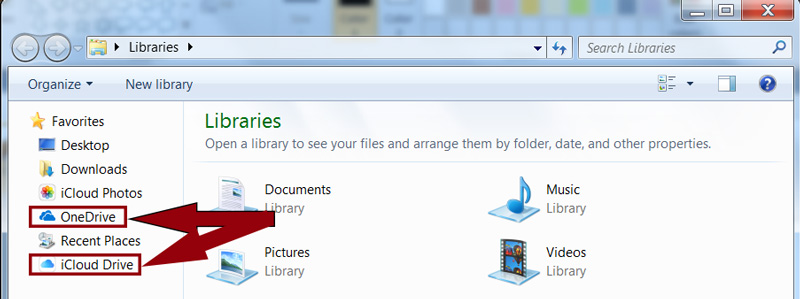
Cloud Storage allows you to store your files on remote servers, and access them via the internet. There are many different cloud service providers: Apple iCloud and Microsoft OneDrive are only two examples. Most providers offer a certain amount of storage space free, and then give the option to pay monthly for more storage space if you should need it.
Consider also that cloud storage is not immune to duplicate files. Since many cloud services charge for more space, it is crucial to remove duplicate files to save valuable space and save yourself money. Check out our guide on how to manage Google Drive files and remove duplicates.
10. Defragment your Hard Drive
When adding a new file to your computer, a particular portion of your hard drive is allocated to store the file. However, after constantly saving and deleting files, a disk will become ‘fragmented’. This means that there are gaps in your hard drive where subsequent files would not fit, so they are left vacant.
As well as affecting your usable free space on your hard drive, fragmentation also has a negative impact on your computer’s ability to store your data in sequence, hence slowing down it’s speed.
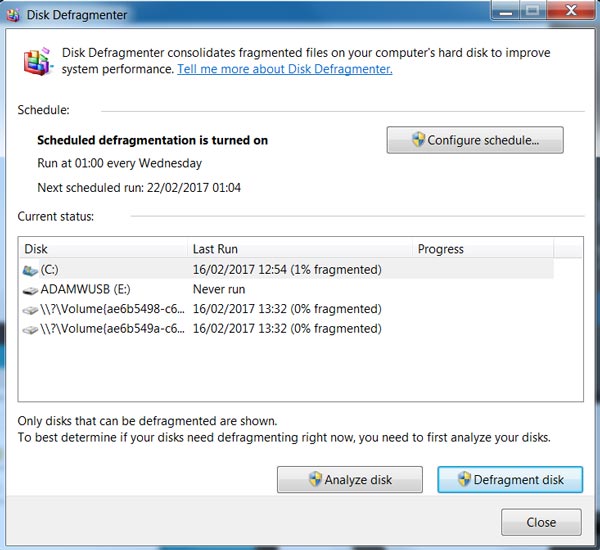
Luckily, Windows has us covered, providing a ‘Disk Defragmentation’ tool. Using this tool, we can analyze which of our drives would benefit from defragmentation, before we commit to defragging. This is very useful, as if you have a large drive full of data, it may take a substantial amount of time to defrag.
To make use of this tool, hit your Windows icon, or Start menu, then start typing “Defragment”. From the search list, click Disk Defragmenter. Once you see the tool’s window, you can elect each drive and analyze them to determine what percentage of them is fragmented. Higher percentages mean higher fragmentation.
To defragment your disk, just hit “Defragment Disk”.
Note:
- It is not advised to defragment your hard drive too often, as the constant writing and erasing of data can reduce the lifespan of your hard drive.
- It may also be worth pointing out that there has been some debate as to whether defragmentation of SSDs (solid-state drives) is beneficial or detrimental to the drive. If you are unsure, you can read up on the discussion at PC World.
11. Sufficient RAM
RAM (Random Access Memory) is the hardware in your computer which determines how you store data. RAM stores data or instructions which you use frequently, providing fast read or write processes to improve the general speed of your computer experience.
Sounds great, right? Right. However, if you don’t have sufficient RAM, your computer will start to store the overflow of information which should be stored in RAM, in your hard drive instead. Then, when your computer wants to read or write this data, it is a much slower process between hard drive-computer than RAM-computer.
For these reasons, make sure that you have enough RAM for the processes that you generally do on your computer. It may be worth pointing out that the average user, who’s agenda may be text editing and web browsing, will not require as much RAM as a user who frequently runs multiple programs at once including photo or video editing and rendering software.
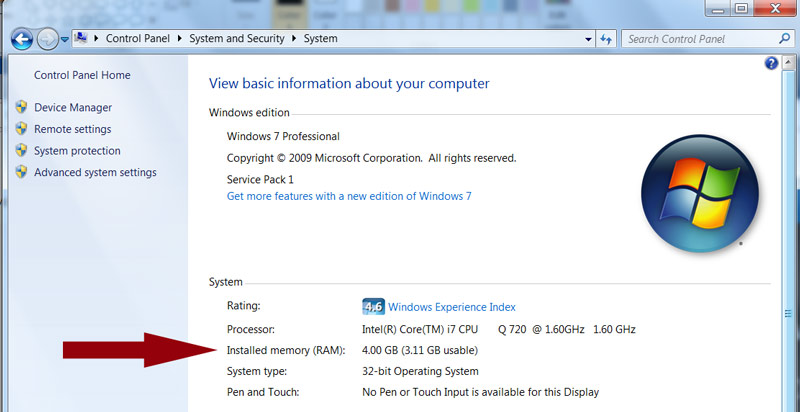
You can find out how much RAM you currently have installed in your computer by going to Computer > Properties.
Want more tech tips like this?
Add us as a Preferred Source on Google.