Duplicate Sweeper is not removing my duplicate files
Why do my duplicate files persist?
So, you've scanned your computer for duplicate files and photos using Duplicate Sweeper. You have chosen which files you would like to keep, from the groups of duplicates found.

However, upon running the duplicate removal, you have noticed that your duplicates have not actually been deleted.
Read on to find out what could cause this issue, and how to resolve it:
1. Outdated Software
Software updates often include fixes for common issues. Ensure that you are running the latest version of Duplicate Sweeper for the most stable version of the program.
To do this, open Duplicate Sweeper and go to Help > Check for Updates. Updates can be downloaded for free from the download links below.

2. Lack of Permission
Duplicate Sweeper may not currently be allowed to remove files on your computer. Follow the steps below to grant additional permissions:
Windows 11
Click the Windows icon at the bottom of your screen and type "Duplicate Sweeper". When it appears in the search, click "Run as administrator".
Then, try deleting your duplicates again.
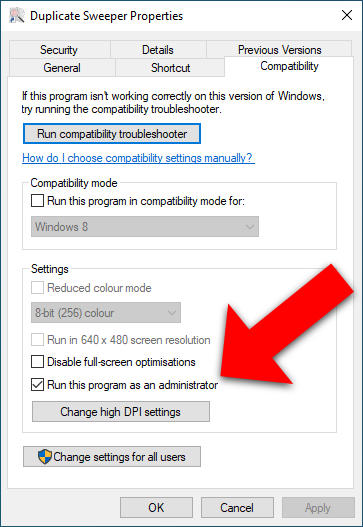
Windows 10 and lower
- Right-click the Duplicate Sweeper icon either on your desktop or in your programs folder.
- Select "Properties" and then go to the "Compatibility" tab.
- Tick "Run this program as an administrator", then click "Apply" and "OK".
- Please then re-launch Duplicate Sweeper to try deleting your duplicates again.
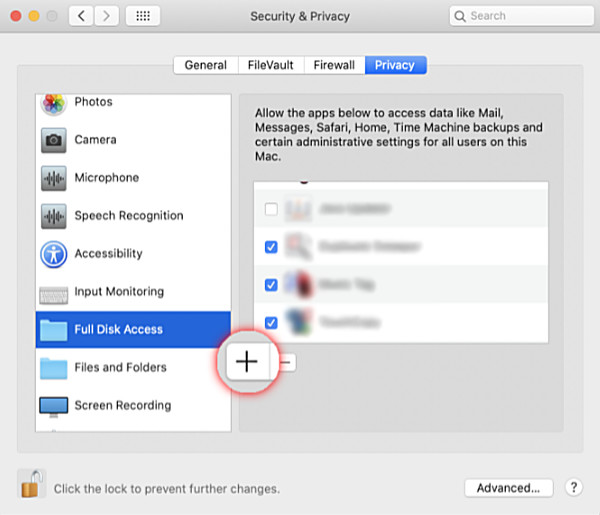
Mac (macOS Mojave and higher)
- Open System Preferences > Privacy & Security > Full Disk Access.
- Find Duplicate Sweeper in the list of apps, and toggle it on.
- If it isn't listed, click the "+" to add Duplicate Sweeper and enable Full Disk Access.
- Please then re-launch Duplicate Sweeper to try deleting your duplicates again.
3. The Location of your Duplicate Files
Duplicate Sweeper can remove duplicate files from your computer hard drive, attached external drives, network drives, Google Drive, OneDrive and iCloud Drive.
Removing duplicates from an External or Network drive
Please note that Duplicate Sweeper will not remove duplicates from external/network drives if the removal location is set to the Recycle Bin within Duplicate Sweeper's Preferences.
Go to Edit > Preferences > Removing Duplicates in Duplicate Sweeper and choose a location on the drive the files are being searched on.
When removing duplicates, the removed files will then be moved to the chosen folder on the drive. You can then either manually delete the folder containing the removed files, or recover any files should you wish.
Popular FAQs
- How to Activate Duplicate Sweeper
- Delete Duplicate Photos on Windows 10 and Windows 11
- How do I Remove Duplicate Files using Duplicate Sweeper?
- How do I Search for Duplicate Files on my External Hard Drive?
- How to Remove Duplicate Files from Google Drive?
- How to Remove Duplicate Photos from OneDrive
- How to Delete Duplicate Photos in Google Photos
- How to Remove Duplicate Files from iCloud Drive
- What are the Free Trial Limitations of Duplicate Sweeper?
- I have Forgotten my License Password