How to Delete Duplicate Photos Windows 10 and 11

Deleting duplicate photos from a Windows 10 or a Windows 11 computer...
- Open Duplicate Sweeper.
- Add folders to search for duplicate photos.
- Click "Start Duplicate Search".
- Select which files to remove, or let Duplicate Sweeper decide automatically (based on your preferences).
- Click "Recycle Selected Duplicates".

Watch our video to see how to quickly find and remove duplicate photos with Duplicate Sweeper, or read on for a detailed step-by-step walkthrough...
Walkthrough Steps - find duplicate photos and remove them
Duplicate Sweeper is a great piece of duplicate photo finder software that can find and remove duplicate pictures and files stored on your Windows 10 or 11 computer. Duplicate Sweeper can also find and remove duplicates on Google Drive, Google Photos, iCloud Drive and OneDrive.
First of all, ensure that you have downloaded and installed the latest version of Duplicate Sweeper on your computer.
Launch Duplicate Sweeper from the icon on your Desktop.
-
Next, you'll need to tell the program where to check for your duplicate photos.
In the example below, I have selected all of the suggested locations simply by checking the boxes on the right.
You can also add specific folders from your computer by clicking the "Add Folder" button, or by dragging and dropping a folder into this Duplicate Sweeper window.

How to Find Duplicate Photos: Click the "Start Duplicate Search" button in the top-right corner of Duplicate Sweeper.
Duplicate Sweeper will now scan your chosen folders and return a list of any duplicate files it has found. Click on an entry from the list under the heading "Duplicate Groups" to review the duplicate files.
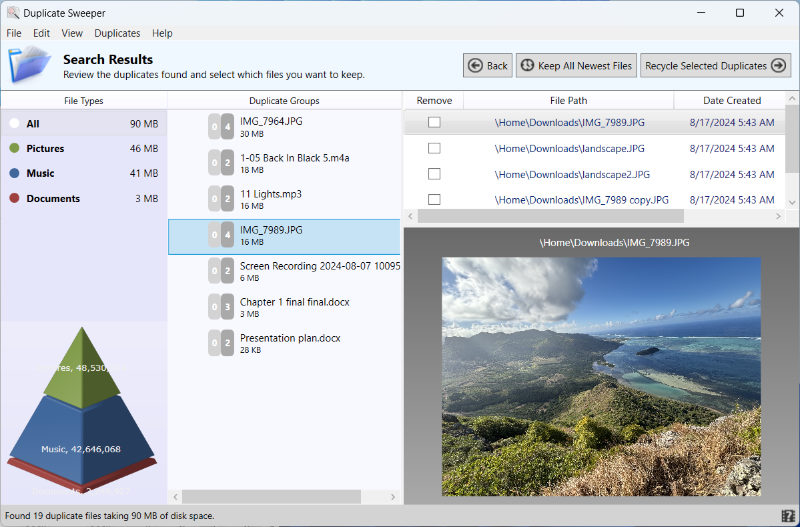
Tick the files in each group that you want to remove, or press the "Keep All Newest Files" to automatically select the oldest files to remove.
More selection preferences can be found under the Duplicates tab of the Duplicate Sweeper toolbar (keep the newest or oldest files, or the earliest or latest modified files).

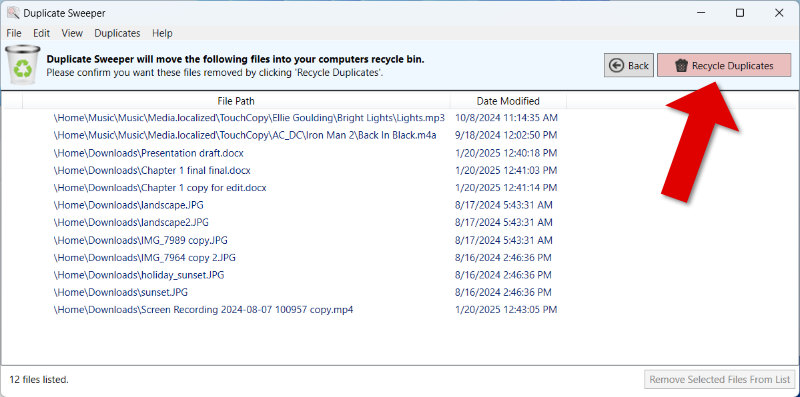
How to delete duplicate photos on Windows 10 or 11: Click the "Recycle Selected Duplicates" button.
Review your selections. Once you are happy with them, confirm the delete by clicking "Recycle Duplicates".
Popular FAQs
- How to Activate Duplicate Sweeper
- How do I Remove Duplicate Files using Duplicate Sweeper?
- Duplicate Sweeper is not Removing my Duplicate Files
- How do I Search for Duplicate Files on my External Hard Drive?
- How to Remove Duplicate Files from Google Drive?
- How to Remove Duplicate Photos from OneDrive
- How to Delete Duplicate Photos in Google Photos
- How to Remove Duplicate Files from iCloud Drive
- What are the Free Trial Limitations of Duplicate Sweeper?
- I have Forgotten my License Password