Whether you're switching from Android to iPhone, or you have one of each device, you'll probably want to transfer your photos from one to the other.
There are many ways to do this, each with its own merits and drawbacks. In this guide, we'll cover all the best methods we've found - whether it be using your computer, or an online service.
Quick jump to any of the sections in the guide:
Method 1:
Transfer Photos from Android to iPhone via your PC
First, we'll cover how to transfer photos from device to device locally, using your computer (PC or Mac). This does not require the use of the internet or cloud services, so there's no worry about having to upload or store your content online.
We can break this method down into 2 steps: copying photos from Android to PC, and then syncing photos from PC to your iPhone.
Step 1: Copy photos from Android to computer
If you're using Windows on your computer, we recommend using Droid Transfer for copying data from Android to PC.
With Droid Transfer, you can access all your Android data through your computer and easily copy the content you need to the computer.
The great thing about this method is that you can create a differential backup of your photos. This means that you can intelligently copy only photos which you have not copied already to your chosen folder on PC. This saves you lots of time looking through your photo library and deciding whether you have already backed up certain photos.
Here's how to transfer your Android photos using Droid Transfer:
- Download and install Droid Transfer on your Windows PC.
- Get the free Transfer Companion app on your Android, and connect it to your computer using a USB cable or Wi-Fi (Set Up Guide).
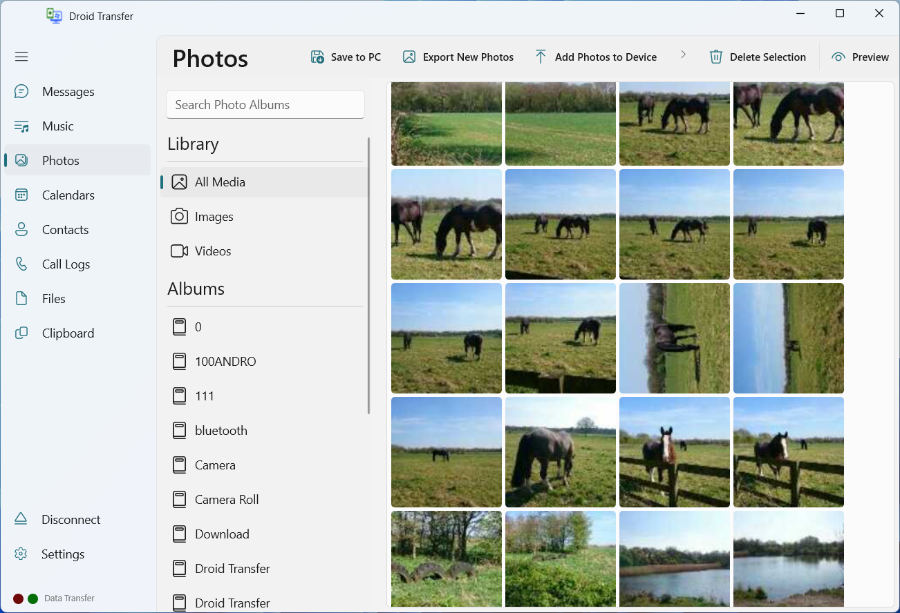
- Click "Export New Photos".
- Choose a location on your PC where you'd like to save your photos.
- Droid Transfer will scan the chosen folder for existing photos, and will show you which of your Android phone photos are not yet backed up.
- Click "Save Selected" to export all these photos to your chosen folder.
This method is great because it prevents you from accidentally copying photos that you have already copied before, thereby eliminating the risk of creating duplicates. It also makes it really easy if you need to back up the photos regularly (which is recommended).
Video Guide: Transferring photos from Android to PC with Droid Transfer
As you can see, you can view all your photos and videos in Droid Transfer, as well as other data types (Messages, Contacts, Call Logs and more)! This makes the software a staple for Android users who need to manage data between Android and PC.
Step 2: Sync Photos from computer to iPhone
Now that you've copied your photos from Android to your computer, you're ready to transfer them onto your iPhone.
To do this, we'll use Apple's iPhone management tools: the Apple Devices app or iTunes. If you don't yet have one of these tools on your PC, you can get them free from the Microsoft Store. As iTunes is being phased out, we recommend using Apple Devices on PCs running Windows 10 or higher.
Attention
Syncing photos onto an iPhone which already contains photos?
Apple Devices and iTunes will remove existing photos from your iPhone if they were synced from other photo libraries or folders previously. Photos which were taken on your iPhone will not be affected.
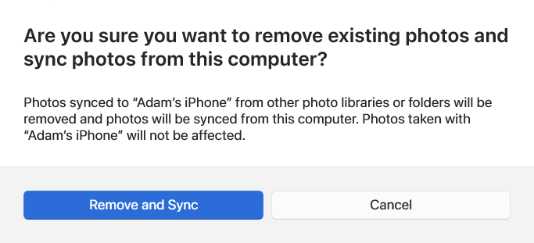
As such, carefully consider whether you may lose photos on your iPhone before syncing.
- Open the Apple Devices app or iTunes on your computer.
- Connect your iPhone using your USB cable.
- Select your device.
- In Apple Devices, click your device from the menu on the left of the app.
- In iTunes, click the device icon.
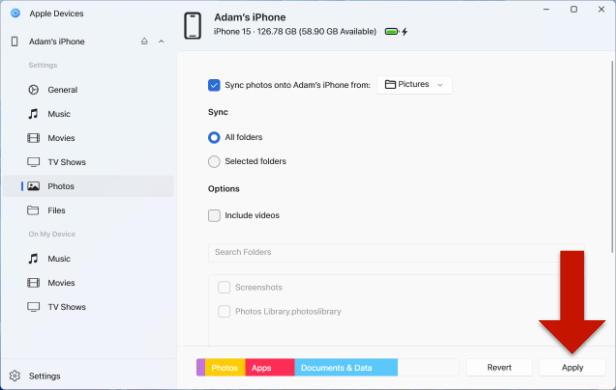
- Click "Photos".
- Tick the "Sync Photos" box and choose which photos to copy from your computer to iPhone, and also whether to include videos.
- Once you have made your selection, click "Apply" to start the transfer to your iPhone.
Method 2:
Sync Android pictures with iPhone using Google Photos
Cloud services are a great way to store your data - and the Google Photos app is a prime example of this. The advantages of storing data in the cloud are that it can save storage space on your device, and you can access that data from any device which has the internet.
The process required for this method is really easy (but we'll break it down below). The only downside is that users get only 15GB of free storage in Google Photos (which can fill up really fast with quality photos and videos). If you require more space, you'll need to pay a subscription cost with Google.
Without further ado, let's take a look at how to use Google Photos to sync your pictures between Android and iPhone...
- Back up your Android device.
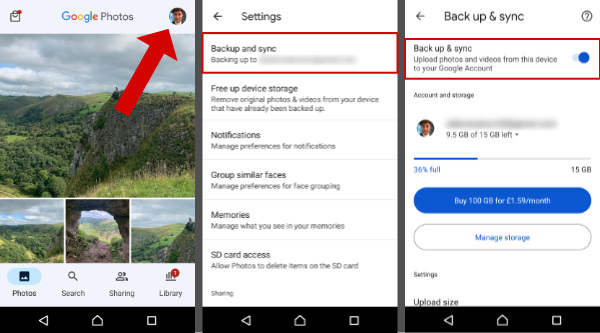
- If you haven't already, check that you have backed up your Android photos. To do this, open the Google Photos app on your Android and sign in to your Google account. Tap your profile icon in the top-right corner of the app > tap "Photos settings" > "Back up & Sync" > toggle "Back up & sync" on. Your device will begin backing up your photos to Google Photos cloud storage - this may take some time depending on the amount of media you need to back up.
- Once the backup is complete, grab your iPhone and open the App Store app.
- Search "Google Photos" and install it on your device.
- Open Google Photos on your iPhone and sign into your Google account (this must be the same Google account used on your Android).
- Next, tap your profile icon in the top-right corner of the app. Just like you did on your Android device, go to "Photos settings" > "Back up & Sync" > toggle "Back up & sync" on. You may be prompted to allow Google Photos to access your photos.
Once the setup is complete, all photos from your Android and iPhone devices will be stored in Google Photos cloud storage in a collective library. You can view any of those photos and videos on either Android or iPhone.
Also, whenever you take a new photo on either device, the photo will be uploaded to Google Photos, allowing you to access even new photos on your other devices.
Method 3:
Transfer content from Android to iPhone with the Move to iOS app
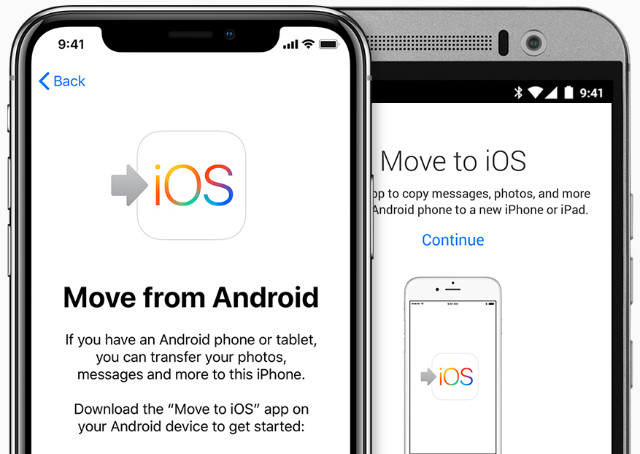
Apple has their own app - "Move to iOS" for people wanting to switch to the Apple ecosystem from their Android rivals.
The free app is a great way to transfer all content from your Android device over to a new iPhone. Crucially though, this method must be used during the setup of a new iPhone - not one which already contains content. So, if you have already set up and started using your new iPhone, you may want to consider a different solution from this guide.
How to transfer content from Android to iPhone with Move to iOS...
- Download the Move to iOS app on your Android phone.
- Connect the Android and the iPhone to a power source, and to the same Wi-Fi network.
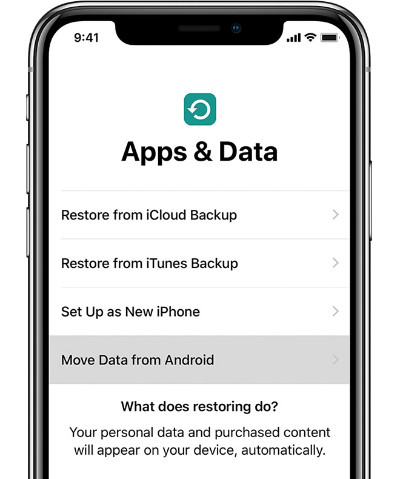
- Turn on your new iPhone to start the setup wizard.
- Follow the iPhone setup until you reach the "Apps & Data" step. Tap "Move Data from Android".
- Open the Move to iOS app on your Android and tap Continue. When you see "Find your Code", tap Next.
- Back to your iPhone: tap Continue on the "Move from Android" screen. You'll receive a code.
- Enter the code on your Android device to make the connection between iPhone and Android.
- On the Android, choose what data you want to transfer, then hit Next.
- Once the transfer is complete, you can continue and finish the setup on your iPhone!
When you've completed setting up your new iPhone, go to the Photos app, where you'll find all the photos which were copied from your Android device!
Method 4:
Send photos from Android to iPhone using email
The final method worth briefly mentioning in this guide is probably the simplest - using the humble email.
All you'll need to send your photos and videos from Android to iPhone is an email address.
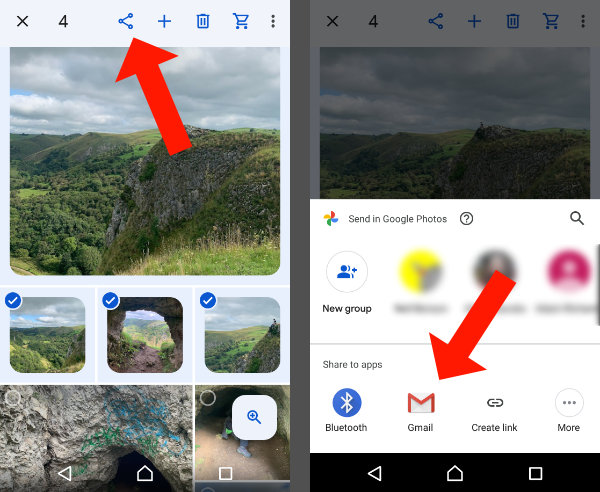
- On your Android device, open your Photos app.
- Long press a photo you want to send to select it and activate multiple selections. Tap all the other photos and videos you'd like to send to select them.
- Tap the Share icon at the top of your screen.
- Choose Email or Gmail.
- Enter your own email address in the "To" field, then tap the Send button.
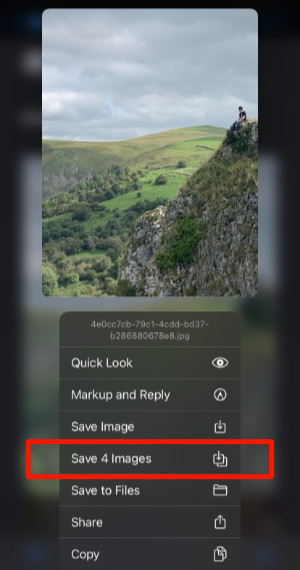
- Access the email on your iPhone.
- Long tap one of the image attachments, then tap "Save Images". The images will be saved to your iPhone where you can access them in your iPhone Photos app.
The downside of this method is that you'll be limited to the number of photos you can send in a single email. For example, Gmail limits the size of attachments in an email to 25MB. As such, we would only recommend this method if you only need to transfer a handful of pictures.
Take Aways
So, we've covered the best ways to transfer pictures from your Android device to your iPhone. You should now have all the information you need to make the switch.
For the most robust method for transferring Android content using a PC, we recommend using Droid Transfer.
For a quick way to transfer a handful of images, you may want to simply send a quick email to yourself.
Or if you are switching from Android to a brand new iPhone, Move to iOS could be the method most suited for you.
Thanks for reading!
Want more tech tips like this?
Add us as a Preferred Source on Google.